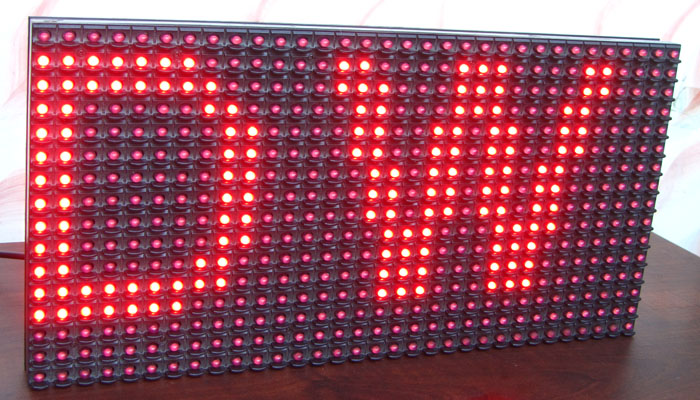
All posts by Avinash

About Avinash

Avinash Gupta is solely focused on free and high quality tutorial to make learning embedded system fun !

Bluetooth Control of Home Appliances

This article on DigitalWizard describes how you can easily make a system that can control your home appliances like lights, fans etc from your smart phone. The project is based on ATmega8 MCU which is a 28 pin high performance microcontroller from Atmel Corp. Communication between this system and the smartphone is over the Bluetooth network. Please click here to read more.

Creating Your First Embedded Project in Atmel Studio

In the last chapter we learned about the development process of embedded systems. We saw what hardware and software tools are required to work with Atmel AVR microcontrollers. We learned about programming languages, compilers and IDEs. In this chapter we will go in the step by step details of using the Atmel Studio IDE to enter and compile a program written in C language. We won ‘t be going in the details of the program. That means what each line means and does. We will simply copy/paste a program as our intention in this chapter is to get familiar with the IDE only. Program will be discussed in latter chapters. You can start Atmel Studio 6 by using its icon from the Windows® Desktop or the Start Menu. Atmel Studio 6 Startup Screen The First screen shown up after the AS5 has started is the Start Page. The start page helps you quickly create a new project or load your previous project without wasting much time. Atmel Studio 6 Home Screen To create a new project we select New Project … option from the Start Page. AS6 will show you the New Project Wizard as shown in the above image. From the project template area (Installed Templates) select C/C++ as the project template. From the project type area select “C […]

Development Process of Embedded Systems

Come on, let’s see how an idea in your brain can be transformed to a working embedded systems. What are the key steps you would be following each type you design a system. The key characteristic of embedded system is that it inherits much of its functionality from a well designed program. Everything the embedded system is able to do is through a program which is running inside the microcontroller. This program is a special type of "software" called a firmware. Because it is "firm" in nature because the embedded system once programed and deployed to the end user will be running the same program through out its life time. For example a TV remote control runs the same program which encodes key press data into serial bit stream and sends through an IR transmitter. Same is the case with a MCU inside a pen drive, digital watch and calculators. In contrast a "software" like MS Word or Firefox is not that much "firmly" tied to your PC or Phone. Your PC can run several other software in addition to these and also they can be replaced by their alternatives. So development of embedded software (i.e. firmware) and its installation on microcontroller should be clear to the user. Step I – Development of Program A program is a step by […]

SMS Based Wireless Home Appliance Control System using PIC MCU

This article on DigitalWizard describes how you can easily make a system that can control your home appliances like lights, fans etc from SMS commands. The project is based on PIC18F4520 MCU which is a 40 pin high performance microcontroller from Microchip Inc. It has a 16×2 LCD module as the main output unit to show various status messages to the user, thus making it extremely user friendly. GSM connectivity is achieved using a SIM300 or SIM900 modems. Please click here to read more.

Obstacle Sensing Walking Stick for Visually Impaired Persons

This project is designed to guide a visually impaired person to walk and avoid bumping into obstacles. Low cost ultrasonic rangefinders along with a microcontroller is used to measure the distance to obstacles and if they are close enough provide a feedback to the user in form of beeps or vibrations. The project is made on a small single layer PCB. The sensors are not mounted on the PCB but they are mounted on front of the stick and connected to the main board using wires. All the parts of project PCB is shown in the image below. Read more … Pages Introduction and Usage Block Diagram Schematic and BOM PCB Layout Details of the Sensor Program and it’s Explanation

GSM Based Projects Buyer’s Guide

Today the market is flooded with so called project guidance institutes who provide ready made projects to the students of engineering. Over hyped and flashy names are the characteristics of such projects. I am writing this for the guidance of both students who are planning to buy such things or the faculty members of the collages evaluating such projects. Below I am giving some simple tests that could help you judge how well the software is developed. Start up the system with GSM Module disconnected from the MCUs Rx and Tx line and check if the system is able to detect this fault. Start up the system without inserting a SIM card, and check if the system is able to tell you the exact problem. Use a SIM card which has NO balance and SMS pack and check if the system is able to tell you weather message sending failed or not. Check if the system is able to detect presence of network before sending message. Faculty members of collage should arrange a mobile blocker, turn it on and then boot the system. If the system is designed to receive the message, try sending more that 32 SMS to the system to make the SIM memory full and then check what happens. A properly designed system should delete the messages […]

Interfacing MMA7455 I2C Accelerometer with AVR ATmega8

This article on Digital Wizard describes everything about interfacing MMA7455 I2C accelerometer with an AVR ATmega8 MCU. A C library compatible with Atmel Studio 6 is also provide with step by step instructions to get it properly installed in your new AS6 project. Each function in the library is also explained in details. Finally we make a demo program to show raw acceleration readings for each axis on a LCD. Read more …

Relays, Introduction, Working and Interfacing

Relays are very interesting and useful electronic component. They are a kind of switch, like those we use everyday in our home and offices to turn on and off electrical devices like bulbs, TVs, fans etc. The function of relay is to control the switching of a relatively heavier load which demands high voltages (like 240 V AC mains) or high current, from a relatively low voltage control signal (like 5v or 12v) Relays, an Introduction Working of Relays Interfacing of Relays with Microcontrollers Pinouts of common relays Relay Interface with AVR ATmega8 Relay Interface with AVR ATmega16