Displaying Custom Characters on Alphanumeric LCDs

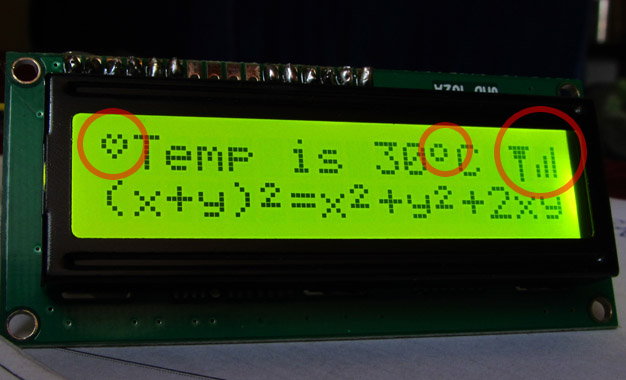
You can use this LCD Custom Char Builder Software to quickly and easily build custom characters for alphanumeric LCD modules. LCD Custom Char Maker A standard alphanumeric LCD module supports eight custom characters. So our software has view for all eight custom chars named from Char 0 to Char7. You can select any char to edit at a time. Select a char to edit … You can use your mouse to draw the character in the large green area as shown above. Holding right mouse button erases the pixel. In the example below we have drawn a "Heart" symbol for custom Char 1. Draw the char using mouse. Now we have completed drawing all the eight custom characters. Draw all 8 characters. Finally HIT Save code to get a custom_char.h file. This header file is compatible with our popular LCD interface library. You just need to copy/paste this header file in your lcd project folder. Then edit the lcd.c (part of our library) to include this file. Outputting a custom char on LCD is fairly easy! Say for example if you need to write. "I ♥ AVR" write the code like this :- LCDWriteString("I %2 AVR"); The %2 will be replaced by the custom Custom Char 2 which is defined as a heart symbol in our header file generated above. […]

LED Moving Message Display using AVR ATmega8

An interesting project that can be done using Microcontroller is a LED message scroll er. It teaches you a quite lot of things. So I decided to make one. I made the hardware design modular and cascadeble That means the whole display is made up of several 15×7 modules. Each module has everything to drive 15×7 led matrix which includes a ULN2003 row driver IC and two shift register IC to drive the 15 columns. Data is loaded serially into the 15 columns. and multiplexing is done along the row. Video Demo The 15×7 Smart LED Board. The 15×7 Smart LED Board.   Schematic. The Controller Board. Any cheap AVR MCU like a ATmega8 can be used to control this board (also up to 4 such boards which give a total of 60px by 7px display). We are using our low cost development board as the controller to the LED matrix board. This board can be purchased at a price as low as Rs. 249 including the MCU ! So wiring this project is a matter of ten minutes ! Low Cost AVR Board   Whole Setup. Connecting The Display Module with Devboard. PIN Diagram.   PIN No PIN Name Devboard PIN 1 GND GND 2 N/C   3 +5V IN +5V out 4 N/C   5 Serial Data In […]

Translators Wanted

Hi All, We are planning to make our Software eXtreme Burner – AVR available in your local languages! So we need translators. Those who are interested in translating the app may leave a comment here, so that we can contact you latter. How to translate? Download the message catalog file (English). It has a pair of string values named msgid and msgstr. The msgid has the original English text. You have to translate it in your local language and enter in the field msgstr. For example see the images below. Finally you can send the completed message catalog to my email id given in the catalog file itself. Download message catalog. Completed Translations Ukrainian Translation by Mr. Pavlo Kasperskyi German Translation by Håkon Spanish Translation by Breogan Slovak Translation by Alex OM3TY Czech Translation by Martin Ondrák Bengali Translation by Muhammad Hasan-uz-zaman (Hasan) Portuguese Translation by Mauro Souza Waiting for others to finish rest languages !

eXtreme Burner – AVR 1.3 Beta Test

Hi All, I was adding support for some chips with big flash memory (like ATmega2560 etc.) in my Programmer Software eXtreme Burner – AVR. But right now I do not have any ready setup with ATmega2560 so I ask anyone of you who have got a ATmega2560 (or ATmega128) setup to please carry out a simple test. Just download the eXtreme Burner AVR 1.3 Beta. And try to flash the following hex files. Test Hex File for ATmega128 and ATmega2560. And update me the details via a comment on this page. Serial Interface. Now your USBasp can double as a USB to serial converter at NO extra cost! We now have a basic serial terminal integrated in the eXtreme Burner AVR ! The terminal can be launched from the Tool Menu. But you need a modified USBasp Firmware to use the terminal. It is available from here. USBasp Firmware with UART Support. eXtreme Burner AVR v1.3 Beta !

High Power Multiplexed Seven Segment LED Display Driver

One of the most common place where small MCUs are used is to drive big seven segment displays in public area. For example the bank token number, flight or train schedule, train coach number, production volume (in factories), current forex(in banks) or gold rates etc. Since these are public display they should be big (and bright) enough to be seen from a distance of few meters. And due to their bigger size(and high brightness) they require 12V supply for each segments. Current requirement is also high. All these call for a sophisticated circuit, since these type of circuit is very common we have developed a compact board with integrated high voltage driver circuit coupled with an AVR 8 bit CPU. High Voltage Seven Segment Display Driver Board Further information, datasheet and user manual will be available as soon as the product is offered for sale. More Images

DS1307 Based RTC Module

An RTC Module or a Real Time Clock Module helps a system keep track of current time (hour, minutes and seconds). It automatically increments the time without any help from the host (microcontroller). Other benefit is that it has a backup power supply from a small coin cell that help it maintain the time in absence of power. It needs very small power in backup mode so that the coin cell last for years! One such RTC IC is DS1307. It communicates with the host using I2C serial interface. We have put all the required components in one PCB to make a neat module that we can hook up to our MCUs like PIC or AVR. After the experiment you can put the module safely in your drawer, bring it out after an year and still it will give you the correct time! DS1307 Module Schematic DS1307 Based RTC Module Schematic DS1307 Module Fabricated ! DS1307 Based RTC Module   Professional DS1307 RTC module     Connection with MCU The SCL line of RTC Module will be connected to SCL line of MCU similarly the SDA line will be connected to the MCU’s SDA line. The RTC Module should be powered from the microcontroller development board. Most of our boards have extra 5v output points. Please see their documentation for […]

PC Controlled Robot

In this tutorial we will discuss a simple PC controlled robot. The Robot PC link will be a RS232 serial line. The robot will have only five commands. Move forward (RS232 char ‘F’ or ‘f’) Move backward (RS232 char ‘B’ or ‘b’) Turn Left (RS232 char ‘L’ or ‘l’) Turn Right (RS232 char ‘R’ or ‘r’) Stop (RS232 char ‘S’ or ‘s’) To keep things as simple as possible, in this example we will use terminal software RealTerm for sending commands to the robot. Later on a dedicated software can be written on PC end to control the robot. The Robot’s Hardware The robot’s hardware will be a simple differential drive using two 200RPM DC Gear motor mounted on a HQ Metal Chassis with a front castor wheel. On the back motors we have mounted plastic wheels. More about differential drive is explained in this tutorial. Gear Motors   Wheels   Metal Chassis   Remove motor’s nut   Insert the motor   Fasten the nuts again   Both motors installed   Front Castor wheel   Installing the front castor   Mounting hole for wheels screw   Mounting the wheels   Chassis is ready! The Electronics The robot is controlled using xBoard v2.0 which has ATmega32 as main CPU and integrated motor drivers. We have connected xBoard v2.0 with PC using […]

GSM-GPRS Module SIM300

GSM-GPRS Module SIM300 with sim card holder, RS232 interface, power supply, buzzer and audio interface. Nice for learning the SIM300 module. You can connect this to PC using a USB to Serial Adaptor and use terminal programs such as Realterm to send receive data. Buy SIM300 Module from our store.