Hello friends, welcome to this exciting tutorial were we will begin our journey with latest PIC18F micros from Microchip Technologies. This tutorial will give you information on what software/hardware you will require and basic steps on how to get, install, configure and use them. After going through this tutorial you will have a complete setup and knowledge to experiment with these powerful chips !
What you will learn ?
- MPLab as a powerful IDE.
- HI-TECH C for PIC18 MCUs as a powerful C Compiler.
- Creating a new HI-TECH C project in MPLab.
- Write a C Code to blink LED and compile it to get a HEX code.
- Configure the MCU for proper oscillator selection.
- Basic Use for PIC development board from eXtreme Electronics
- Burn the HEX code to MCU using eXtreme Burner PIC from eXtreme Electronics.
- Use the programmed MCU to actually blink the LED !
So lets get started !!!
First get these stuffs
- Microchip’s MPLab IDE or Integrated development Environment. This is the central tool from where you can access most of other tools, like the C Compiler. This also lets you create and edit program files and projects. Download this from Microchips Web site and Install it in your computer.
- HI-TECH C Pro for PIC18 MCUs – This is will compile the high level human readable programs (in C Language) to Machine Language Instructions (contained in a HEX file). You will not interact directly with this software instead the MPLAB will use it internally. Actually this is a commercial software but a fully functional demo is available. The demo has only restriction that codes are not highly optimized. Not a problem for startup hobbyist!
Download HI-TECH C Pro for PIC18 Free
- eXtreme Burner PIC – This hardware + software tool is used for burning(uploading) the HEX file to the microcontroller chip. This is a USB Based programmer with GUI interface so it is very easy to install and use.
- If you have made a Simple Serial Port Based PIC Programmer as discussed here then you need this nice program from Mr Christian Stadler. This is similar to eXtreme Burner PIC but serial port based and the hardware can be made easily.
Creating your first project with MPLAB + HI-TECH C.
After installing the above tools open MPLAB IDE from desktop Icon or Start Menu. You will get a main screen similar to this.
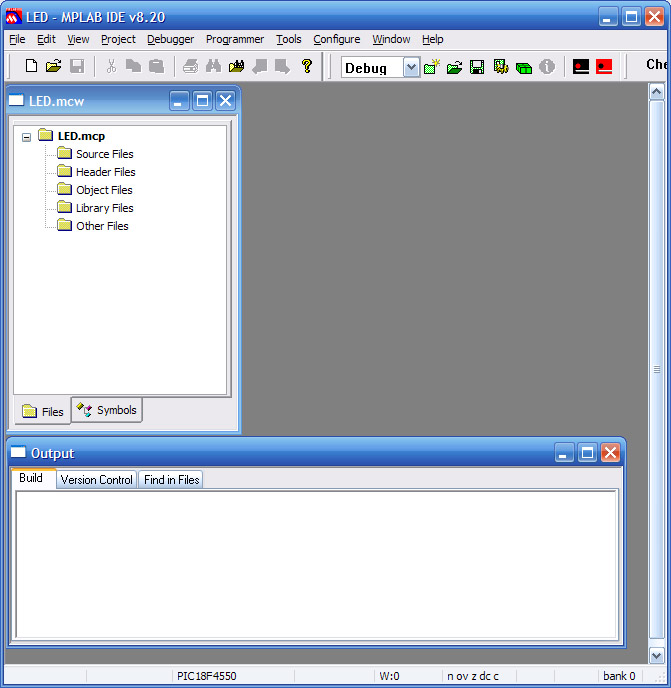 |
Fig.: Microchip MPLAB IDE Main Screen. |
From the Project Menu Select Project Wizard.
The Project Wizard will come up that will help you easily create a C Project. Click Next.
On the next screen select the Microcontroller you want to use. in our case select "PIC18F4550" and Click Next.
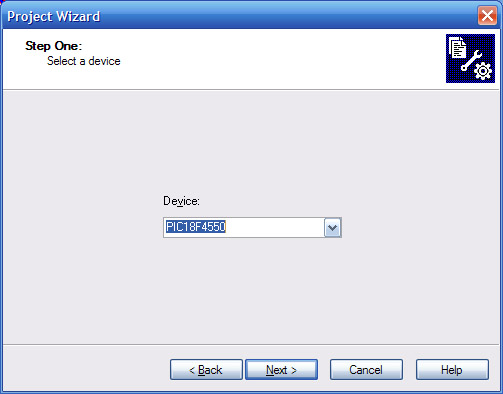 |
Fig.: Microchip MPLAB IDE – Processor Selection. |
After that select what tool suit you want to use this project. There are many C Compilers for PIC18 (from different vendors) and also many people use assembly language, so this step is required.
As we will be working will HI-TECH C, select that from the list. Do not touch any other fields in this dialog. Just select Active Tool Suit = HI-TECH Universal ToolSuit. as shown in image below.
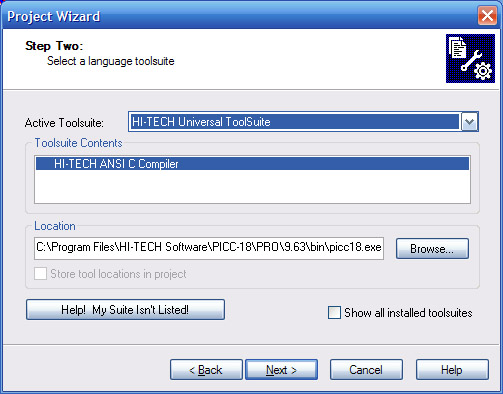 |
Fig.: Microchip MPLAB IDE – ToolSuit Selection. |
Now Select select a suitable folder for your new project. I recommend create a Folder Named MPLAB (To save all MPLAB project in one place) and then create subdirectories in this folder for each new project. Like use C:\Your Name\MPLAB\LED\ for this led blinky demo. Now show the project wizard the path to this folder so it can create a project file here. See the next image.
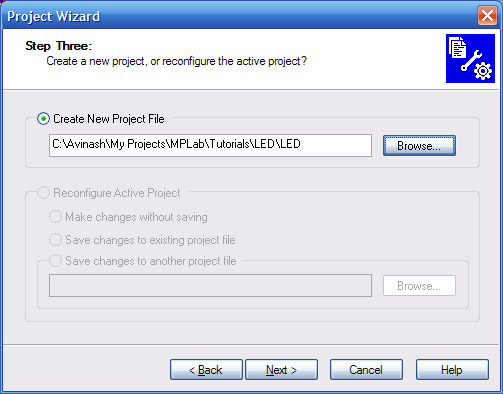 |
Fig.: Microchip MPLAB IDE – Project Location. |
The next screen asks to add existing files to project. This is useful when you have some ready made and tested code that you can add to this project. Like if you have got a tested LCD interfacing library (which you have got from Net or made yourself) then you can add that now. But since this a simple "hello world" project you can skip this step. So click Next
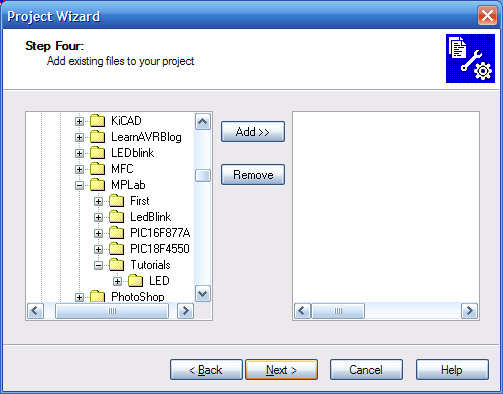 |
Fig.: Microchip MPLAB IDE – Adding existing files. |
The final screen shows the project summary, review that and click Finish.
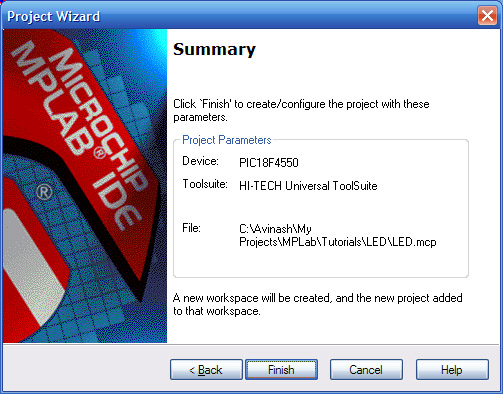 |
Fig.: Microchip MPLAB IDE – Project Summary. |
Now you will be presented with the WORKSPACE. Now our Workspace is ready we need to add some source files. As this is a very simple project we will have as single source file. To add a new source file click File>New from menu or Select New File from toolbar. We need to save this file and also "add" this to our project. Select File>Save from Menu or Save File from Toolbar or Ctrl+S from keyboard. Give a proper name to file like LED.c and save in your project folder.
Make Sure that Add File To Project is checked. As shown below.
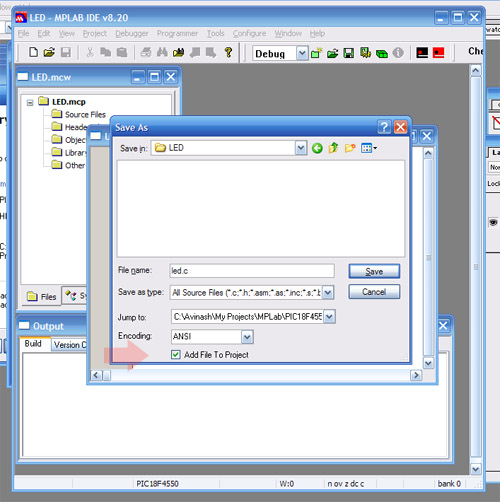 |
Fig.: Microchip MPLAB IDE – Saving a C File. |
Now your new file is ready, lets do some coding!!! Hey I mean just copy paste the following code.
/*****************************************************

       PIC DEVELOPMENT BOARD

      ***********************

SAMPLE #1
   A simple program to blink on-board led of
   PIC Development Board. When the BUTTON is pressed
   the speed of LED blinking fast.

   Please short JUMPER J5

Copyrights 2009 © eXtreme Electronics, India
www.eXtremeElectronics.co.in

*****************************************************/
#include <htc.h>

//Chip Settings
__CONFIG(1,0x0F24);
__CONFIG(2,0X0000);
__CONFIG(3,0X8100);
__CONFIG(4,0X0081);


//Simple Delay function
void Wait(unsigned char delay)
{
   unsigned char i;
   for(i=0;i<delay;i++)
      _delay(60000);
}


void main()
{
   unsigned char delay=100;

   //Initialize PORTB
   //RB1 as Output (LED) rest PINs are Input.
   TRISB=0b11111101;

   //Now loop forever

   while(1)
   {
      //Check Button State
      //PORTB BIT 4 (RB4)
      if(PORTB & (0b00010000))
      {
         //Button Not Pressed

         delay = 100;

      }
      else
      {
         //Button Pressed
         delay = 15;
      }

      LATB=0B00000010;  //PORTB1 = HIGH

      Wait(delay);

      LATB=0B00000000;  //PORTB1 = LOW
      Wait(delay);

   }
}
And don’t scratch your head now if you don’t get the code, just copy paste, everything will be explained in latter tutorials. So don’t forget to register for updates (see Feedburner Sidebar).
Now time to convert that source code to machine code. So Select Rebuild form Project Menu.
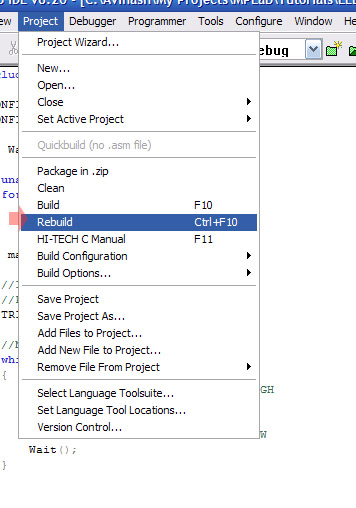 |
Fig.: Microchip MPLAB IDE – Rebuild from Project Menu. |
If everything is ok you will get a message "Build Successful". The the compiler has compiled and linked your project and a HEX file is generated. You have to transfer this HEX file to your MCU using a Programmer. The HEX file ready to burn is located in the project folder.
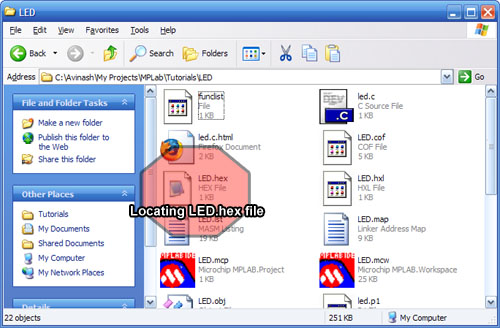 |
Fig.: HEX file Ready to burn to PIC MCU ! |
To know how to transer this hex file to your MCU on PIC Development Board see
PIC Development Board – Programming
After you successfully burned the HEX code to your Board. Short JUMPER J5, this will connect the LED with the MCU (on RB1). Now apply power to the board and switch it on. The LED should start to blink. Press BUTTON and LED should now blink faster.
For an overview of board like where is the power switch or the LED, please see this)
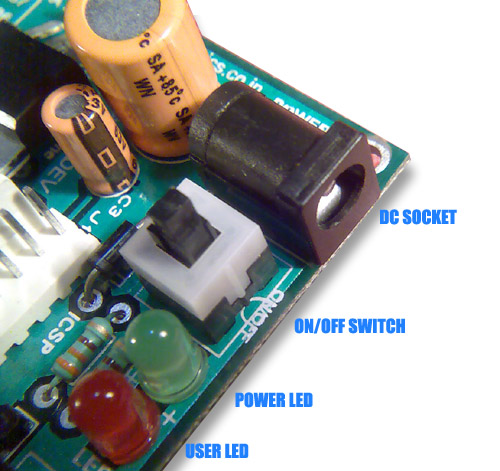 |
Fig. DC Socket, On/Off Switch
and LEDs |
Dowloads
Return to Help Index.
Facing problem with your embedded, electronics or robotics project? We are here to help!
Post a help request.
Avinash
Avinash Gupta is solely focused on free and high quality tutorial to make learning embedded system fun !
Follow Me:


I am trying to understand your code. Can you please explain the following lines and what they are used for..
__CONFIG(1,0x0F24);
__CONFIG(2,0X0000);
__CONFIG(3,0X8100);
__CONFIG(4,0X0081);
Thanks, Don
@Don
For that you have to refer to the datasheet. PIC18F MCUs have some configuration bytes which stores the settings of microcontroller. To configure the MCU we have to setup the configurations bytes. the above line put a value in config area of MCU lile __CONFIG(1,0x0F24) instructs the compiler to put 0x0F24 in config word 1. Their are 7 config words. To know how to set up config are pls refer datasheet.
Dear avinash,
i have USB PIC programmer V1.0.. when i am trying to install it. i am getting an error that USB0.dll file missing.
i have tried in many ways but i am not able to install
@MUX
:(Why don’t you guys follow the instructions given in manual ???
The error is because you FORGET to install the drivers !!!!!!!
Go see help files in CD
Dear Avinash
in driver folder system file and dll files are there.
i have tried to install in different system in a similar manner there it is not giving error why?
sir after trying a lot i m not able to resolve this error
No valid installed HI-TECH compiler drivers
I am getting the following error
Clean: Deleting intermediary and output files.
Clean Warning: File “C:\prog\test\buttin2.p1” doesn’t exist.
Clean: Done.
Build C:\prog\test\test1 for device 18F4550
Using driver C:\Program Files\Microchip\bin\picc18.exe
Executing: “C:\Program Files\Microchip\bin\picc18.exe” –pass1 C:\prog\Button2\buttin2.c -q –chip=18F4550 -P –runtime=default –opt=default -D__DEBUG=1 -g –asmlist “–errformat=Error [%n] %f; %l.%c %s” “–msgformat=Advisory[%n] %s” “–warnformat=Warning [%n] %f; %l.%c %s”
Error [194] C:\prog\Button2\buttin2.c; 4.17 “)” expected
Error [194] C:\prog\Button2\buttin2.c; 5.17 “)” expected
Error [194] C:\prog\Button2\buttin2.c; 6.17 “)” expected
Error [194] C:\prog\Button2\buttin2.c; 7.17 “)” expected
********** Build failed! **********
wat can i do?