Tag Archives: USART

USART Library for PIC – Setup on MPLAB X IDE

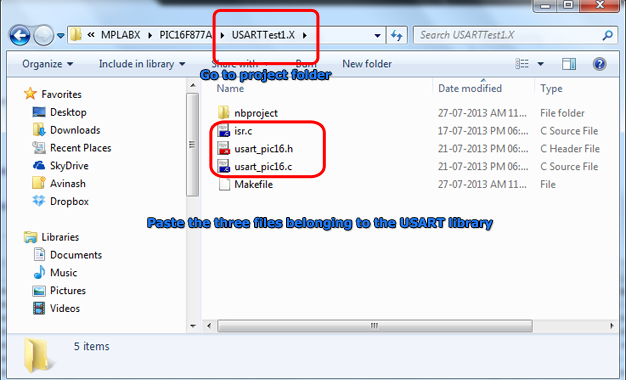
This article describes the setup and use of the C library for serial communication. We focus on its usage with PIC16F series of MCUs from Microchip. Here we describe how to setup a MPLAB X project with support for serial communication related functions. The library is designed for compilation and use with Microchip’s XC8 C Compiler. Fig. Serial Communication Demo   Creating a New Project in MPLAB X You can create a new project using the MPLAB’s Start page as shown below. Fig. MPLAB X Start Page Alternatively you can use menu File->New Project Fig. Select New Project from File Menu And for those who love the Keyboard over mouse can hit <Ctrl>+<Shift>+<N> Any of the three method will launch the New Project Wizard as shown below. The first step is the selection of project type. From the Categories list select Microchip Embedded and from Projects select Standalone Project. Fig. Project Type Selection Second step is the selection of device for which the project is targeted. Select Mid Range 8-bit MCUs (PIC12/16/MCP) in Family and PIC16F877A in Device. Fig. Device Selection Third step is the selection of debug tool. For that select Simulator. Fig. Tool Selection Microchip MPLAB lets you install more that one compiler. It also lets you install more that one version of the same compiler. So their […]

Serial Communication with PIC16F877A

This article series aims at teaching serial communication between a PIC microcontroller and a PC. We first introduce you with what is serial communication is and how it can used. Then we tell you how to perform serial communication using PIC microcontroller and how we use the USART peripheral for the purpose. We will tell you how our usart library for PIC16F series can be used for easy serial communication, in this part we also discuss how to set up a MPLAB X project for using the USART library. After that we will build a demo project to explore the library. Finally we will burn this demo in a PIC16F877A and establish a serial communication with PC. Serial Communication Their are several serial communication standards like RS232, SPI, I2C etc. Of which RS232 is a asynchronous method. That means it does NOT have a synchronizing clock line. One way data requires only one conductor line. Since it is a two way communication their are two lines between the two device. One for sending data called the Tx and one for receiving data called the Rx. The communication is full duplex, that means data can be sent at the same time data is being received. generally other serial communication like SPI and I2C are used for short range communication like between […]

Digital Humidity Sensor

Digital Humidity sensors are of great help in maintaining suitable environmental condition in places such as ware houses, green houses, factories, smart homes etc. They are also very easy to interface with MCU and PC. When coupled with a PC or Microcontroller they can be used in wide variety of smart automation. One such sensor I will present today is a serial humidity sensor. The interface is very simple. The communication is done over a standard asynchronous serial line. The interface parameters are as follows. UART 9600 bps. Start bit: 1 Stop bit: 1 Parity Bit : 0 (No parity bit) No Flow Control. Fig.: Serial Humidity Sensor.   Command Set All commands are begin by "$sure" followed by space (ascii 32) All UART Command are in ASCII Commands are NOT case sensitive. All commands ends with a CR LF pair (ascii \r\n in C language). Get Current Temperature in Degree Centigrade Command : $sure temp -c Returns: XXXCentigrade Where XXX is current temperature. Example in C UWriteString("$sure temp -c\r\n"); Get Current Temperature in Degree Fahrenheit Command : $sure temp -f Returns: XXXFahrenheit Where XXX is current temperature. Example in C UWriteString("$sure temp -f\r\n"); Get Current Humidity Command : $sure humidity Returns: XXX%RH Where XXX is current relative humidity. Example in C UWriteString("$sure humidity\r\n"); Get Current Status Command : $sure […]

Interfacing RFID Reader with AVR MCUs – AVR Tutorial

Hello Friends!, RFID is a great technology, has may uses and become very cheap and easy to implement these days. Very interesting and useful project can be made by using RFID technology. In our tutorial series on RFID we will get introduced to this magical technology and practically create RFID based solutions. In RFID or Radio Frequency Identification their is a tag (or label) which has a unique ID stored on it. We can read this ID by using a RFID reader. Not much fun yet? Well the features which makes magical are :- The RFID tag does not need to make any electrical contact with reader (Wow!) The RFID Tag is an active device which has a chip and antenna but does NOT need any power and are low cost!(Some tags need battery) RFID tags are very small, don’t need battery so can be put in cards (looks like a credit/ATM cards) or key chains. By reading the features offered by RDIF technologies you may be wondering that the application would be much sophisticated or costly. But the good news is that we have done enough research to find the best RFID solution and they are available from our online shop. And with the help of our beginner friendly tutorials you can easily get it to work in no […]

RS232 Communication using PIC18F4520’s USART – PIC Microcontroller Tutorial

Hello Friends! In this tutorial I will discuss how to practically do a simple communication over RS232 interface. For those who are completely new to this I clarify that the motive is to send and receive data between two device using a standard called RS232. RS232 is serial interface that means that data is transferred BIT by BIT at a time. Since data is transferred BIT by BIT so we need only a single wire two send data and an another one to receive data. One more common wire (called GND) is required between two separate circuit to enable current flow. So a total of three wire are required for communication. RS232 can be used to communicate between a variety of devices. Like your MCU and a GSM module or a PC. In this tutorial we will demonstrate a link between a PIC18F4520 MCU and a standard PC. On PC we will run a terminal program like RealTerm or Hyperterminal. A terminal program is used to send and receive text data. So any text send by the MCU will be visible on Terminal Screen and Any keypress you make on the PC keyboard will be send over RS232 to your MCU. This configuration is the simplest setup to test and understand RS232 communication. When you have enough knowledge you can […]

RF Communication Between Microcontrollers – Part III

Welcome to the 3rd part of RF Communication tutorial. In the last two parts I have introduced the basics of RF Communication. RF Communication Between Microcontrollers – Part I : Introduction to RF Communication and Modules. RF Communication Between Microcontrollers – Part II : Algorithm and general description of data transfer. Part III will be covering mostly the practical part, i.e. we will build a complete & working data transfer system. Here you will get circuit and program to implement the solution. The application is very simple in this case, just to transfer a byte of data from Tx station to the Rx station. Once you implement it and get it working you will have enough information and experience to make other RF based projects. I request all users to follows the instruction exactly as given (unless they are smart enough to know what they are doing). The most important thing in this article is timing of the MCU, so Use the exact frequency crystals as used in the designs. Write High Fuse = C9 (HEX Value) and Low Fuse FF (HEX Value) to enable external crystal. Hardware We will have two units. One is Tx (Transmitter) and Other is Rx (Receiver). Both units are based around ATmega16 MCU(you can use ATmega32 also) on external 16MHz crystal. On the Tx […]

Using the USART of AVR Microcontrollers : Reading and Writing Data

Till now we have seen the basics of RS232 communication, the function of level converter and the internal USART of AVR micro. After understanding the USART of AVR we have also written a easy to use function to initialize the USART. That was the first step to use RS232. Now we will see how we can actually send/receive data via rs232. As this tutorial is intended for those who are never used USART we will keep the things simple so as to just concentrate on the "USART" part. Of course after you are comfortable with usart you can make it more usable my using interrupt driven mechanism rather than "polling" the usart. So lets get started! In this section we will make two functions :- USARTReadChar() : To read the data (char) from the USART buffer. USARTWriteChar(): To write a given data (char) to the USART. This two functions will demonstrate the use of USART in the most basic and simplest way. After that you can easily write functions that can write strings to USART. Reading From The USART : USARTReadChar() Function. This function will help you read data from the USART. For example if you use your PC to send data to your micro the data is automatically received by the USART of AVR and put in a buffer […]

Using the USART of AVR Microcontrollers.

Welcome to the third part of my RS232 serial communication tutorial. Till now we saw the basics of RS232 communication and made our level converter. Now its time to understand the USART of AVR microcontroller and write the code to initialize the USART and use it to send and receive data. Like many microcontrollers AVR also has a dedicated hardware for serial communication this part is called the USART – Universal Synchronous Asynchronous Receiver Transmitter. This special hardware make your life as programmer easier. You just have to supply the data you need to transmit and it will do the rest. As you saw serial communication occurs at standard speeds of 9600,19200 bps etc and this speeds are slow compared to the AVR CPUs speed. The advantage of hardware USART is that you just need to write the data to one of the registers of USART and your done, you are free to do other things while USART is transmitting the byte. Also the USART automatically senses the start of transmission of RX line and then inputs the whole byte and when it has the byte it informs you(CPU) to read that data from one of its registers. The USART of AVR is very versatile and can be setup for various different mode as required by your application. In this […]

RS232 Communication – The Level Conversion

Hello and welcome back. Continuing our discussion on RS232 serial communication in this part we will make a RS232 level converter. In the last tutorial we saw that how RS232 level signals differs from normal logic signals. So to interface RS232 level signals to our MCUs we need a "Level converter". And in this tutorial we will make one. What a level converter will do is to convert RS232 level signals (HIGH=-12V LOW=+12V) from PC to TTL level signal (HIGH=+5V LOW=0V) to be fed to MCU and also the opposite. Fig – Working of RS232 level converter       As RS232 is such a common protocol there is a dedicated IC designed for this purpose of "Level Conversion". This IC is MAX232 from Maxim. By using charge pumps it generates high voltages(12V) and negative voltages(-12V). Now lets make it! Things you need S.No Item Value Qty 1 MAX232 IC 1 2 Capacitors 1uF 4 3 10uF 1 4 DB9 Female Connector 1 5 General Purpose PCB 1 6 Some Wires – –   Fig – Stuffs required for RS232 level converter.     Now having all the stuffs in our working table lets begin. The Schematic Fig – Schematic for RS232 level converter.     Assembly Assemble the circuit according to the schematic on a small piece of general […]

RS232 Communication – The Basics

RS232 is a asynchronous serial communication protocol widely used in computers and digital systems. It is called asynchronous because there is no separate synchronizing clock signal as there are in other serial protocols like SPI and I2C. The protocol is such that it automatically synchronize itself. We can use RS232 to easily create a data link between our MCU based projects and standard PC. Excellent example is a commercial Serial PC mouse (not popular these days, I had got one with my old PC which I bought in year 2000 in those days these were famous). You can make a data loggers that reads analog value(such as temperatures or light using proper sensors) using the ADC and send them to PC where a special program written by you shows the data using nice graphs and charts etc.. actually your imagination is the limit! Basics of Serial Communication. In serial communication the whole data unit, say a byte is transmitted one bit at a time. While in parallel transmission the whole data unit, say a byte (8bits) are transmitted at once. Obviously serial transmission requires a single wire while parallel transfer requires as many wires as there are in our data unit. So parallel transfer is used to transfer data within short range (e.g. inside the computer between graphic card and […]