Programming in C - Tips for Embedded Development.
AVR ATmega8 Bases Line Follower
Easy to make PID LFR Robot.
Here I will highlight some features of C language commonly used in 8 bit
embedded platforms like 8051, AVR and PICs. While programming microcontrollers
in C most of the time we have to deal with registers. Most common tasks
are setting and clearing bits in a register and check whether a bit is 0
or 1 in a given register. So here I will give detail on those topics, it
will help you if you are new to embedded programming in C and if you get
confused when you see some codes.
A Register
A register is simply a collection of some bits (mostly 8 bits in case of 8bit MCUs). Either each different bit in a register has some purpose or the register as a whole holds a value. Registers serves as connection between a CPU and a Peripheral device (like ADC or TIMER). By modifying the register the CPU is actually instructing the PERIPHERAL to do something or it is configuring it in some way. And by reading a register, the CPU can know the state of peripheral or read associated data.
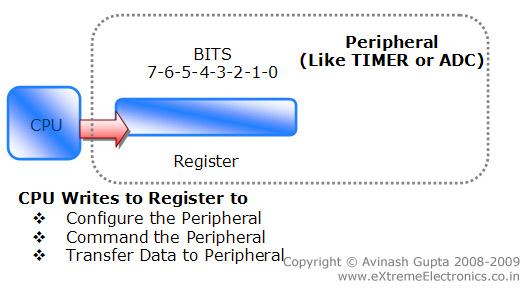 |
Fig.: CPU writing to Peripheral Register |
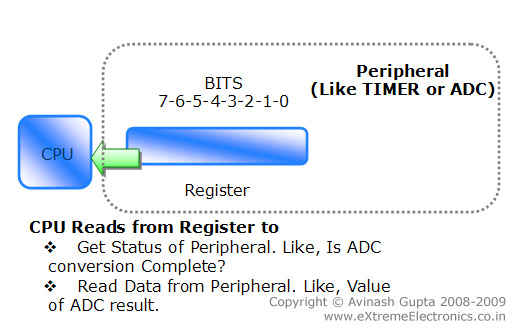 |
Fig.: CPU Reading from Peripheral Register |
Binary Numbers in C
When you write a=110; in C it means you are setting the value of variable"a" to "one hundred and ten" (in decimal). Many time in embedded programming we are not interested in the value of a variable but the state of each bits in the variable. Like when you want to set the bits of a register (MYREG) to a bit pattern like 10010111 (binary). Then you cannot write MYREG=10010111. Because compiler will interpret 10010111 as decimal. To specify a binary number in C program you have to prefix it with 0b (zero followed by b). So if you write
MYREG=0b10010111;
it assigns the bit pattern 10010111 to the bits of Register MYREG.
HEX Numbers in C
In same way if you prefix a number by 0x (a zero followed by x) then compiler interpret it like a HEX number. So
MYREG=0x10; (10 in HEX is 16 in decimal)
MYREG=0xFF;(Set all bits to 11111111 or decimal 255)
Setting a BIT in Register
Here our aim is to set (set to logical 1) any given bit (say bit 5) of a given register (say MYREG). The syntax is
MYREG=MYREG | 0b00100000;
The above code will SET bit 5 to 1 leaving all other bits unchanged. What the above code does is that it ORs each Bit of MYREG with each bit of 0b00100000 and store the value back in MYREG. If you know how logical OR works then you will get it.
In short you can write the same code as
MYREG|=0b00100000;
Now lets come to practical usage. In practice each bit has got a name according to its work/function. Say our BIT (the 5th bit) has got name ENABLE, and what it does is clear by its name,when we set it to 1 it enables the peripheral and when cleared (0) it disables it. So the right way to set it is.
MYREG|=(1<<ENABLE);
The << is called left shift operator. It shifts the bits of LHS variable left by the amount on its RHS variable. If you write
b=1<<3;
then, 1 whose binary value is 00000001 is shifted 3 places to left which results in 00001000
So if ENABLE is defined as 5 (as enable is 5th bit) then
MYREG|=(1<<ENABLE);
will result in
MYREG|=(1<<5);
which again result in
MYREG|=(0b00100000);
Now a beginner would ask "What's the Advantage ?". And once you know it you would realize that advantage is immense!
- Readability of code: MYREG|=(1<<ENABLE); gives a clue that we are enabling the peripheral while MYREG|=0b00100000; does not give any clue what it is doing, we have to go to data sheet and find out which bit actually ENABLEs the peripheral. While ENABLE=5 is already defined in header files by the developer of compiler by carefully studying the datasheets of device.
- Easier Portability: Suppose you use this code many times in your program (and your program is reasonably large and uses other register also) and you now want the same code to run on some other MCU model. The new MCU is of similar family but has slightly different bit scheme, say ENABLE is bit 2 instead of bit 5. Then you have to find all occurrence of MYREG|=(0b00100000); and change that to MYREG|=(0b00000100); But if you have used the other method then you simply need to inform the compiler (by its setting options) that you are going to use the other MCU and compiler will automatically get the definitions for the new device. And in this definition ENABLE=2 will already be defined by the compiler developer. So it will be lot easier.
Clearing a BIT in Register
For clearing a bit logical AND(symbol &) operator is used in place of logical OR (symbol |). The syntax is as follows
MYREG&=~(1<<ENABLE);
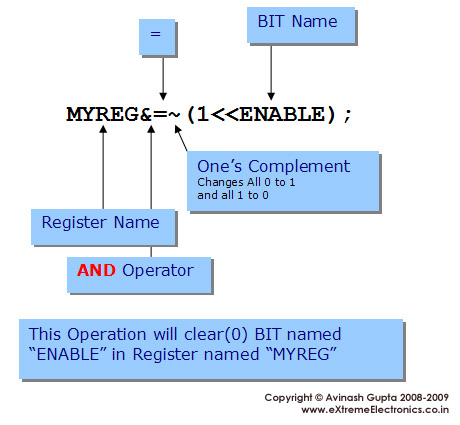 |
Fig.: How to clear (0) a bit in C language. |
This will clear (i.e. set to value 0) a given bit (identified by name ENABLE) in a register called MYREG. This operation will not affect any other bits of register except ENABLE.
Let us see how it works with the help of following diagram.
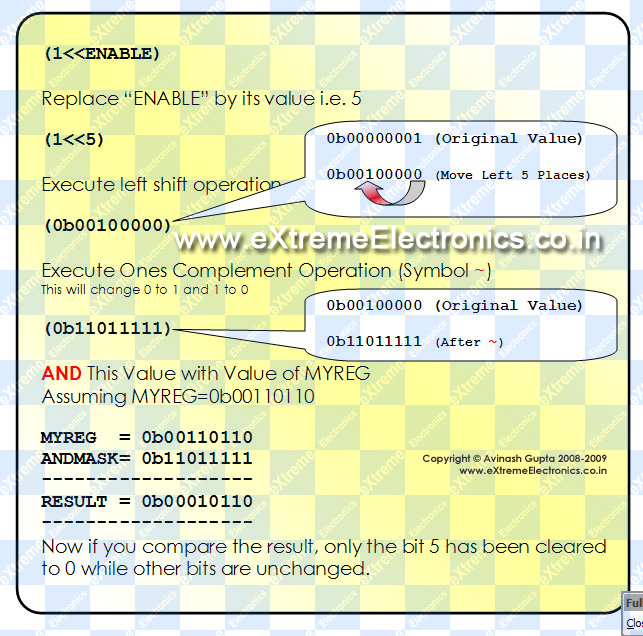 |
Fig.: "Clearing a BIT" how it works? |
So now you know how you can selectively clear any bit in any given register. If you want to clear more than one bit at a time you can write like this
//This will clear bits ENABLE,FAST_MODE and BUSY, leaving all other bits untouched
MYREG&=(~((1<<ENABLE)|(1<<FAST_MODE)|(1<<BUSY)));
Similarly the syntax for setting(set to 1) multiple bits at a time is as follows
//This will set bits ENABLE,FAST_MODE and BUSY, leaving all other bits untouched
MYREG|=((1<<ENABLE)|(1<<FAST_MODE)|(1<<BUSY));
Testing The Status of a Bit.
Till now we were modifying the registers either setting or clearing bits. Now we will learn how can be know that a specific bit is 0 or 1. To Know if a bit is 0 or 1 we AND it with a AND MASK. Suppose if we want to check bit 5 of a register MYREG then the AND MASK would be 0b00100000. If we AND this value with the current value of MYREG then result will be non-zero only if the 5th bit in MYREG is '1' else the result will be '0'.
The syntax would be like this.
if(MYREG & (1<<ENABLE))
{

	//ENABLE is '1' in MYREG
	...
}
else
{
	//ENABLE is '0' in MYREG
}
So now you know the basic operation on bits, they are widely used in firmware programming and will help you understand other codes in this manual and my website.