Come on, let’s see how an idea in your brain can be transformed to a working embedded systems. What are the key steps you would be following each type you design a system. The key characteristic of embedded system is that it inherits much of its functionality from a well designed program. Everything the embedded system is able to do is through a program which is running inside the microcontroller. This program is a special type of "software" called a firmware. Because it is "firm" in nature because the embedded system once programed and deployed to the end user will be running the same program through out its life time. For example a TV remote control runs the same program which encodes key press data into serial bit stream and sends through an IR transmitter. Same is the case with a MCU inside a pen drive, digital watch and calculators. In contrast a "software" like MS Word or Firefox is not that much "firmly" tied to your PC or Phone. Your PC can run several other software in addition to these and also they can be replaced by their alternatives.
So development of embedded software (i.e. firmware) and its installation on microcontroller should be clear to the user.
Step I – Development of Program
A program is a step by step instruction given to any processor to perform certain task. Actually machines(processor) understands very low level commands (known as opcodes) this language is sometimes referred to as machine language. Each instruction is very low level and basic, and they are represented by numbers in memory. For example 1 could be the opcode to load a byte from RAM to CPU register while 2 could be the instruction to move data from CPU register to memory or 3 could be instruction to add value stored in two CPU registers. An AVR microcontroller has about 130 such instructions to various types of operation. Since working with machine language is very difficult for humans. We have deviced many ways to generate the machine language instructions. They are described below.
Assembler
This is a piece of software running on the host not in the microcontroller. By host I mean the development machine which is a full PC running Windows or other OS. The assembled adds a layer over machine language that it takes a input program in assembly language. This assembly language is exactly the machine language but those numeric instructions are given nice names in English. For example LDS for load direct from data space. STS for store direct to data space. ADD for as the name say add contents of two registers. The assembler takes input the program file in assembly language and converts each of those instructions in their English names to a numeric values that the microcontroller can understand.
Compilers of High level language
Writing programs in assembly language is also difficult and very time taking process. It also require the user to have complete idea of processor architecture. After assembly language comes the high level language like C, C++. Writing programs in such language is very easy.
A program written in high level language cannot be directly executed on CPU! It must first be converted into machine language.
Learning a programming language is NOT an one night affair! It takes years to get expert on them. Also some programming languages like C looks very tough to new programmers. Thus they must first learn concepts of programming with some easier languages like BASIC or LOGO.
Luckily I was born in the times when they taught programming to school kids like they teach MS Office nowadays!
Compiler is a computer software that converts a program written high level language to machine code that can be directly executed on a CPU. So we need a compiler that converts the program written in C language to machine code for AVR series MCUs. Since compiler is a "product" thus it is developed by many companies and sold at different prices. I have selected a compiler that is also good for your pocket. I use avr-gcc for all my projects. Latest version comes bundled with Atmel Studio 6(described next) so you don’t need to install it separately.
IDE or Integrated Development Environment
Installing a compiler only is NOT enough to get started with development. Because a compiler takes as input the programs written in high level language in form of text files. You can theoretically create those program files in any text editor like Notepad under Windows. But to make the entire task manageable, one GUI software called the IDE is required to create those program files. An IDE offers much more than just editing programs.
- Add and edit files to project.
- The editor is much more powerful than Notepad and is specially designed for writing programs in C and thus has following advantage.
- Your typing gets faster with the assistance of auto-complete where the editor offers you to chose long variable and function names from a list.
- Any syntax error is underlined RED in real time thus allowing to to make corrections.
- Better view of the program. Thanks to syntax highlight feature different parts of the program gets different colours and looks.
- IDE also manages the compiler settings which are very crucial for proper and error free compilation of the programs.
- It calls the compiler for your from just a click of menu.
- Shows the result of the compilation process.
- It also helps in debugging of the programs.
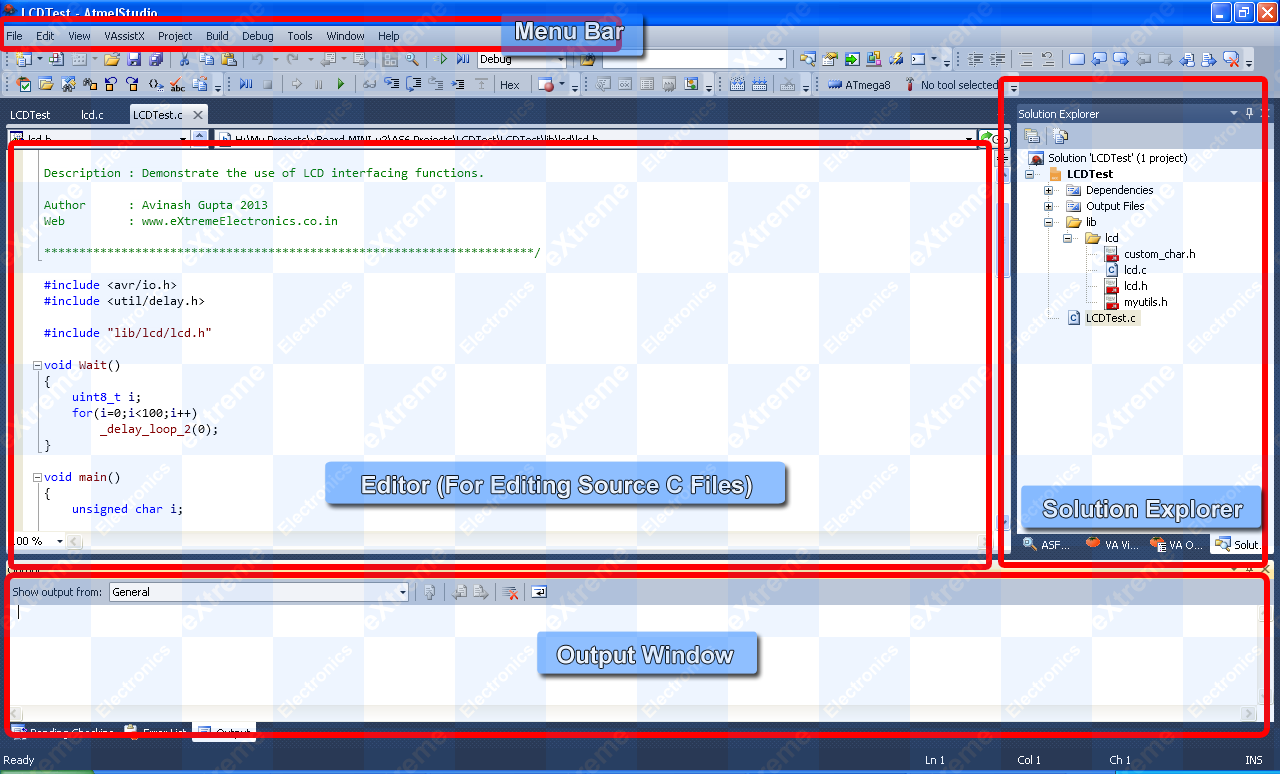
Atmel Studio 6 Integrated Development Environment
Once a program is developed in C language using the Atmel Studio 6 and compiled to get the executable file. The next step is to transfer this file from your development PC to the microcontroller chip.
After a successful compilation, the final hex file is generated which you can burn directly to the AVR MCU using a USB Programmer. This HEX file can be found at the Debug folder inside your project folder.The extension of this file is .hex
Step II – Installation of Program in the Chip
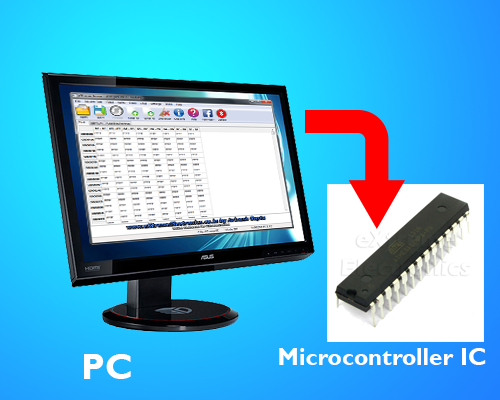
To install the developed program into a microcontroller chip requires the following two items
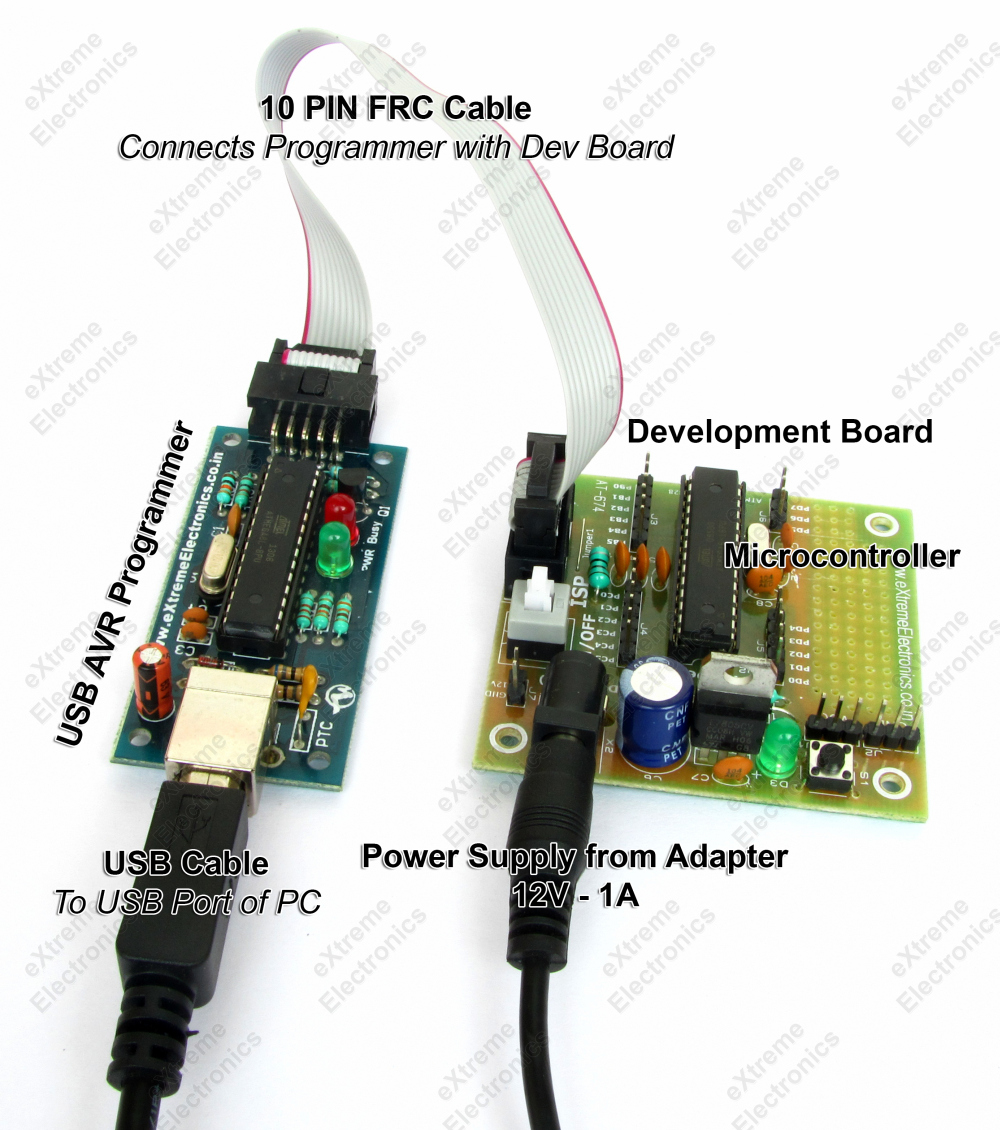
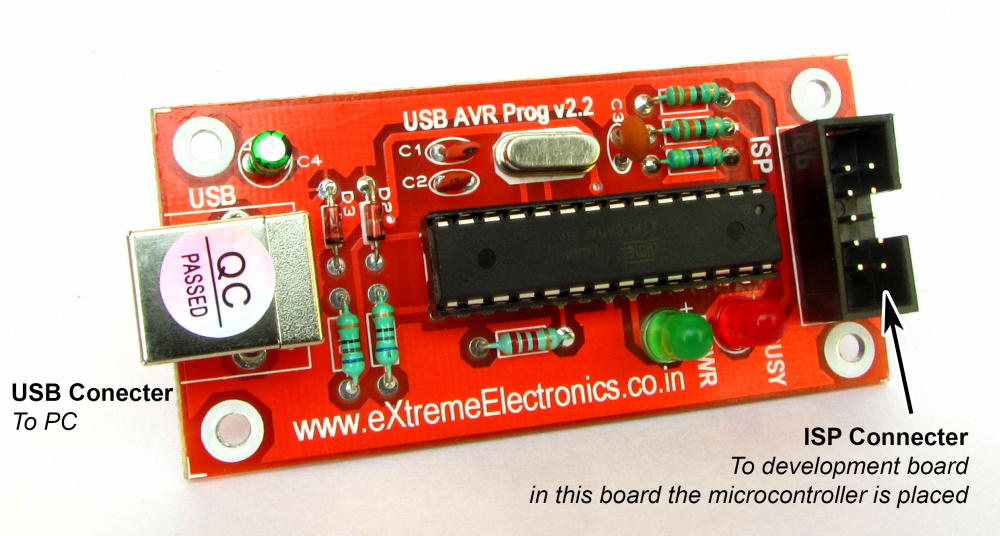
- A Programmer Hardware: This is a piece of hardware that can talk to both your PC and also the microcontroller. This enables it to get what PC is saying and write those to the microcontroller chip. To talk to the PC it uses the USB interface. And to talk to the MCU it uses the ISP interface. You can buy a programmer from our store.
- A Programmer Software: This runs on your same development PC where you ran the IDE (discussed above). Its task is to read data from the hex file generated by a C compiler and transfer them to the programmer hardware connected on the USB port. Here at eXtreme Electronics we have developed a programmer software that is very easy to use by a beginner. You can download it from here.
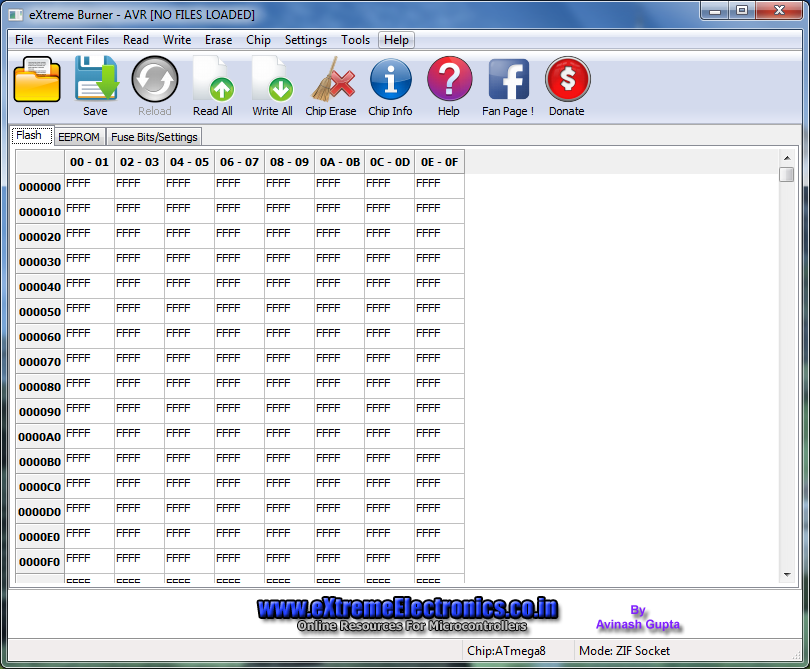
Screenshot of programmer software
A Development Board
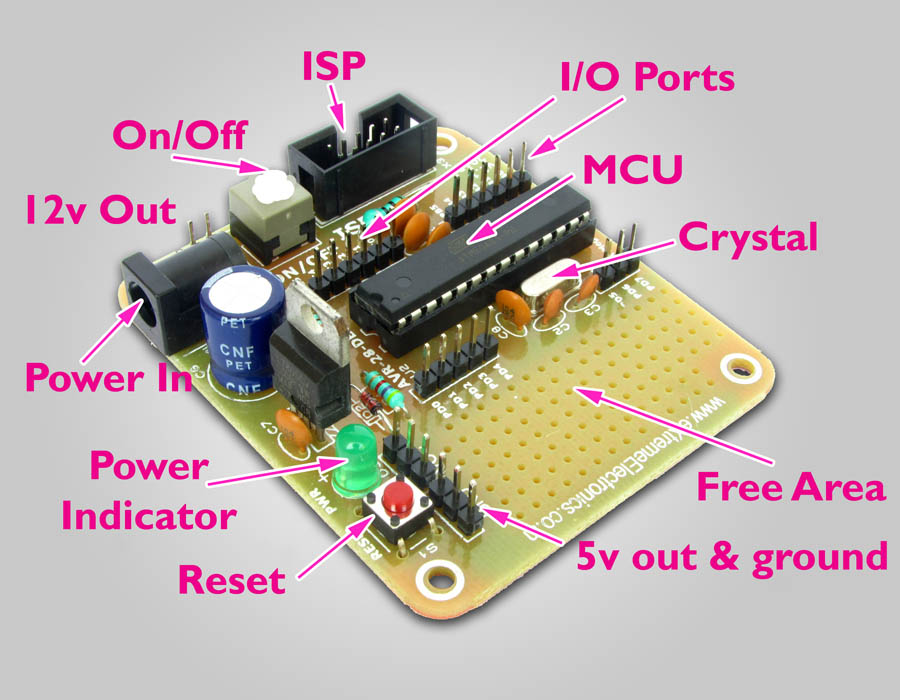
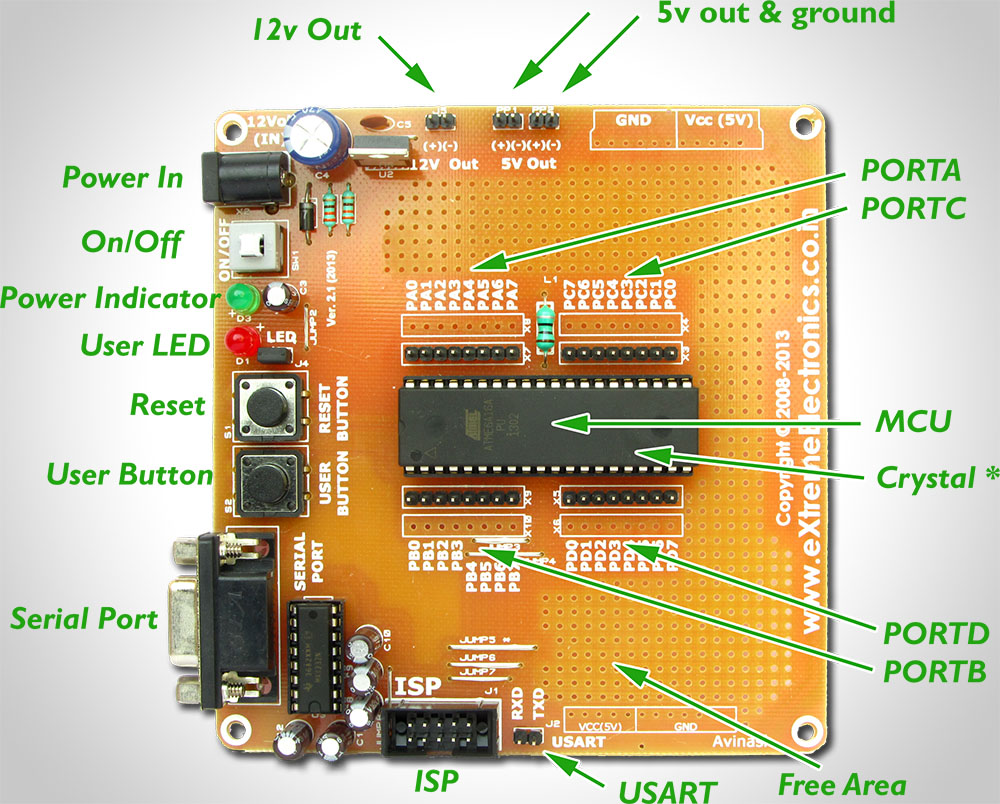
The final important piece required is a development board. The development board is a hardware board that makes it easy to work with microcontrollers during the learning phase. A simple development board has the following vital parts.
- A socket for placing microcontroller.
- Power supply circuit that helps easy connection with a DC adapter. It converts 12V from adapter to a clean 5v and feed this to microcontroller. It also makes these 5volts available in male headers so that user can get 5v for their own use. For example to power other ICs or module they want to interface with microcontroller. To make the experience richer, this unit also has a power switch to turn on/off the entire board and a LED to indicate power status of the board.
- Crystal oscillator: This is like the heart for MCU. It provides beats that makes the MCU take steps. For accurate timing in you application you need a crystal oscillator. It provides a voltage and temperature independent clock source.
- ISP Header – This is used to update the program of the MCU without removing it from the board. Here the programmer is connected using a cable.
- I/O Ports – They connect the MCU to the external world, all the peripherals are connected using these i/o ports. They are available in male headers so that user can make connection to them very easily.
Some people try to make this circuit on a breadboard or general purpose PCBs. But they often fail. Because these type of construction is error pron. So we recommend user not to try to learning programming and soldering at same time!
Next Part
In the next tutorial we will learn the how to make your first project in Atmel Studio 6 IDE. We will create a new project, type code using the editor and finally compile the source program to get the executable hex file.
Click here to Goto Next Tutorial
Facing problem with your embedded, electronics or robotics project? We are here to help!
Post a help request.



avinash i like your posts very much. i want to learn embedded system . will u plz suggest me how and where to start? and how to proceed further.