Category Archives: AVR Tutorials

RF Communication Between Microcontrollers – Part II

Hello Friends, Welcome back to the Part II of RF Communication tutorial. Here I will show you the basic working of RF modules and how to send and receive data. Please see the Part I of this tutorial for basic introduction. You should also be familiar with RS232 communication. If you are new to it please see RS232 Serial Communication Tutorial. I also recommend using wireless link only after you have successfully tried wired RS232 communication. Here I will not go deep in how RS232 works because it is already discussed in RS232 Serial Communication Tutorial. I will use my interrupt driven fully buffered USART library for communication. How RF Module Works Working of RF Modules is simple but with a little trick. The working is shown in figure below. Fig- Working of RF Modules.   Here what ever digital data you input on "Data In" of TX is available on "Data Out" of RX. Say, if you set "data in" high, the "data out" will become high as well. But here lies the trick! The fact is that you cannot Keep Logic HIGH or LOW for a Long period of time, say for a few millisecond second. If you apply a logic low on "data in" the "data out" will become low but only for few millisecond and it […]

Programming in C – Tips for Embedded Development.

Here I will highlight some features of C language commonly used in 8 bit embedded platforms like 8051, AVR and PICs. While programming microcontrollers in C most of the time we have to deal with registers. Most common tasks are setting and clearing bits in a register and check whether a bit is 0 or 1 in a given register. So here I will give detail on those topics, it will help you if you are new to embedded programming in C and if you get confused when you see some codes. A Register A register is simply a collection of some bits (mostly 8 bits in case of 8bit MCUs). Either each different bit in a register has some purpose or the register as a whole holds a value. Registers serves as connection between a CPU and a Peripheral device (like ADC or TIMER). By modifying the register the CPU is actually instructing the PERIPHERAL to do something or it is configuring it in some way. And by reading a register, the CPU can know the state of peripheral or read associated data. Fig.: CPU writing to Peripheral Register   Fig.: CPU Reading from Peripheral Register Binary Numbers in C When you write a=110; in C it means you are setting the value of variable"a" to "one hundred and […]

GUI Software for USBasp based USB AVR Programmers.

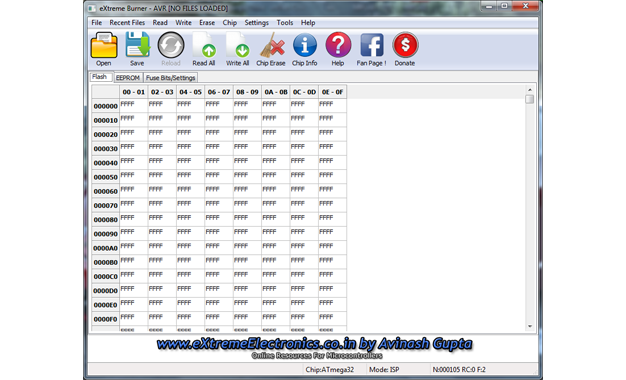
When I started using USBasp (a great programmer for AVRs), I soon realized that the avrdude (the software for driving USBasp) is not much usable. Sometimes it irritates me a lots because of its command line interface. Also the avrdude-gui is not much helpful as it was just calling the avrdude in background. It cannot write/read the fuse bytes easily and reading the chip content was impossible. I made many changes to the software to make it more useful but Finally I decided to write a fresh new software from scratch and eXtreme Burner – AVR was born! The eXtreme Burner- AVR has full graphical user interface (GUI) and can be used much more easily. Screen shots Fig.: GUI Software for USBasp   Fig.: GUI Software for USBasp – Burn Progress.   Fig.: GUI Software for USBasp – Task Complete ! Easy AVR Clock Source Configuration AVR series of MCU supports several types of clock sources for various applications. For example a cheap RC Oscillator or a perfect high speed crystal oscillator. You can select from the following clock sources easily using a drop down menu. External Clock. Calibrated Internal RC Oscillator. (DEFAULT) External RC Oscillator. External Low Frequency Crystal. External Crystal/Ceramic Resonator. Fig.: Selecting AVR Clock Source Fig.: Selecting Clock Option Linux Version ! Finally the much awaited Linux […]

Easy 24C I2C Serial EEPROM Interfacing with AVR Microcontrollers

In this turorial we will see how we can easily interface a 24C series serial EEPROM with AVR microcontrollers. What is an EEPROM? An EEPROM is kinds of novalatile memory, that means it is used for storing digital data permanently without any power suply. EEPROM stands for Electrically Erasable Programmable Read Only Memory. The advantage of these kind of ROMs is that they can be erased Electrically to make them ready for storing new data. Compare this with a CD R disks they can be recorded only once. A small amount of EEPROM is also available internally on the AVR chips. So if the volume of data you want to store is small (say few user names and password) then you can use it. The internal eeprom makes design small and simple. But if the amount of data you want to store is large, say in order of few tens of kilobytes then you have to interface a External EEPROM chip with your AVR MCU. You can store pictures, sound and long texts in these eeproms. Their are many kinds of EEPROM chip available from many manufactures. One very common family is 24C series serial EEPROMs. They are available upto 128KB in size. They uses I2C interface with host controller (MCU) which is a very popular serial communication standard. I […]

Synchronous Serial Communication Tutorial – The Basics of I2C and SPI.

This tutorial give you the details of synchronous serial communication, which is the basis of data transfer in communication standards like SPI and I2C. The tutorial is aimed for a beginner who has no experience or any idea of serial communication. So intermediate user who already has some idea about serial data transfer can skip this tutorial and jump directly to SPI or I2C tutorials. Data Transfer. Knowledge of data transfer is very important for any embedded system developer. In any embed ed system data is moved between several units like between RAM and CPU. There are many methods and technique for data transfer each having its own pros and cons. So different data transfer technique is used in different situations. Some example of data transfer are Simple parallel transfer. (Used to transfer 8,16,32 … bits of data in the same time) Asynchronous Serial Transfer (USART) – Old but still in use mode of serial communication using only 2 lines (+1 additional line for GND). SPI – Serial Peripheral Interface – Standard Mode of communication between different ICs. Many ICs designed for a Variety of Jobs like Flash Memory, LCD controller, Ethernet Controllers etc uses this standard for communication. So if you want to use any of these functionality you need to have a knowledge of SPI. IIC(or I2C) – […]

PWM Signal Generation by Using AVR Timers. Part II

In this tutorial we will set up the TIMER0 in fast pwm mode and use it to generate PWM signals of varying duty cycles. In this way we would be generating analog signals of voltages between 0 and 5v. In the example we will connect this output to a LED and see how it varies its brightness. Please see the previous tutorials on PWM and TIMERs before reading this tutorial. PWM Introduction to PWM – Pulse Width Modulation PWM Signal Generation with AVR Timers. Timers Introduction To AVR Timers. Timers In Compare Mode Part I Timers In Compare Mode Part II Setting Up TIMER0 in Fast PWM mode Setting up the TIMER0 in fast pwm mode is very easy and just require one line of code. You only need to deal with one register named TCCR0 (Timer Counter Control Register For Timer 0). You just need to set up various bits in it to get the required setting. The various bits of TCCR0 is given below. TCCR0 This register is used for configuring the TIMER0. See Timer Tutorial for more info. The explanation of various bits of this register is as follows. Bit No 7 6 5 4 3 2 1 0 Name FOC0 WGM00 COM01 COM00 WGM01 CS02 CS01 CS00 Initial Val 0 0 1 0 0 0 0 […]

PWM Signal Generation by Using AVR Timers.

In the last tutorial you saw how the PWM technique helps us generate analog signals from a microcontroller. In this tutorial we will see how PWM generation is implemented with microcontrollers. Before you begin please see Introduction to PWM Introduction to AVR Timers Generation of PWM signals is such a common need that all modern microcontrollers like AVR has dedicated hardware for that. The dedicated hardware eliminates the load of generation of PWM signal from software (thus frees the CPU ). Its like asking the hardware to generate a PWM signal of a specific duty cycle and the task of CPU is over. The PWM hardware with start delivering the required signal from one of its PINs while the CPU can continue with other tasks. In AVR microcontrolers PWM signals are generated by the TIMER units. (See AVR Timer Tutorials) . In this tutorial I will give you the basic idea of how PWM signals are generated by AVR timers. Their are two methods by which you can generate PWM from AVR TIMER0 (for ATmega16 and ATmega32 MCUs). Fast PWM Phase Correct PWM Don’t worry from their names they will become clear to you as we go on. First we will be considering the Fast PWM mode. PWM Generation Fundas We will use the simplest timer, TIMER0 for PWM generation.(Note […]

Introduction to PWM – Pulse Width Modulation.

A digital device like a microcontroller can easily work with inputs and outputs that has only two state, on and off. So you can easily use it to control a LED’s state i.e. on or off. In the same way you can use it to control any electrical device on/off by using proper drivers (transistor,triac, relays etc). But sometimes you need more than just "on" & "off " control over the device. Like if you wanna control the brightness of a LED (or any lamp) or the speed of DC motor then digital (on/off) signals simply can’t do it. This situation is very smartly handled by a technique called PWM or Pulse Width Modulation. PWM is the technique used to generate analogue signals from a digital device like a MCU. Almost all modern MCUs have dedicated hardware for PWM signal generation. In this tutorial we will learn the basics of PWM technique and later on we will see how to implement PWM generation with AVR microcontrollers. PWM : Pulse Width Modulation A digital device, like a microcontroller can only generate two levels on its output lines, HIGH=5v and LOW=0V. But what if we want to generate 2.5v or 3.1v or any voltage between 0-5 volt output ? For these kinds of requirement, instead of generating a constant DC voltage output […]

Using the USART of AVR Microcontrollers : Reading and Writing Data

Till now we have seen the basics of RS232 communication, the function of level converter and the internal USART of AVR micro. After understanding the USART of AVR we have also written a easy to use function to initialize the USART. That was the first step to use RS232. Now we will see how we can actually send/receive data via rs232. As this tutorial is intended for those who are never used USART we will keep the things simple so as to just concentrate on the "USART" part. Of course after you are comfortable with usart you can make it more usable my using interrupt driven mechanism rather than "polling" the usart. So lets get started! In this section we will make two functions :- USARTReadChar() : To read the data (char) from the USART buffer. USARTWriteChar(): To write a given data (char) to the USART. This two functions will demonstrate the use of USART in the most basic and simplest way. After that you can easily write functions that can write strings to USART. Reading From The USART : USARTReadChar() Function. This function will help you read data from the USART. For example if you use your PC to send data to your micro the data is automatically received by the USART of AVR and put in a buffer […]

Using the USART of AVR Microcontrollers.

Welcome to the third part of my RS232 serial communication tutorial. Till now we saw the basics of RS232 communication and made our level converter. Now its time to understand the USART of AVR microcontroller and write the code to initialize the USART and use it to send and receive data. Like many microcontrollers AVR also has a dedicated hardware for serial communication this part is called the USART – Universal Synchronous Asynchronous Receiver Transmitter. This special hardware make your life as programmer easier. You just have to supply the data you need to transmit and it will do the rest. As you saw serial communication occurs at standard speeds of 9600,19200 bps etc and this speeds are slow compared to the AVR CPUs speed. The advantage of hardware USART is that you just need to write the data to one of the registers of USART and your done, you are free to do other things while USART is transmitting the byte. Also the USART automatically senses the start of transmission of RX line and then inputs the whole byte and when it has the byte it informs you(CPU) to read that data from one of its registers. The USART of AVR is very versatile and can be setup for various different mode as required by your application. In this […]

RS232 Communication – The Level Conversion

Hello and welcome back. Continuing our discussion on RS232 serial communication in this part we will make a RS232 level converter. In the last tutorial we saw that how RS232 level signals differs from normal logic signals. So to interface RS232 level signals to our MCUs we need a "Level converter". And in this tutorial we will make one. What a level converter will do is to convert RS232 level signals (HIGH=-12V LOW=+12V) from PC to TTL level signal (HIGH=+5V LOW=0V) to be fed to MCU and also the opposite. Fig – Working of RS232 level converter       As RS232 is such a common protocol there is a dedicated IC designed for this purpose of "Level Conversion". This IC is MAX232 from Maxim. By using charge pumps it generates high voltages(12V) and negative voltages(-12V). Now lets make it! Things you need S.No Item Value Qty 1 MAX232 IC 1 2 Capacitors 1uF 4 3 10uF 1 4 DB9 Female Connector 1 5 General Purpose PCB 1 6 Some Wires – –   Fig – Stuffs required for RS232 level converter.     Now having all the stuffs in our working table lets begin. The Schematic Fig – Schematic for RS232 level converter.     Assembly Assemble the circuit according to the schematic on a small piece of general […]