Atmel Studio 6
AVR ATmega8 Bases Line Follower.
Easy to make PID LFR Robot.
Atmel Studio 6 or AS6 in short, is the latest IDE (Integrated Development Environment) by Atmel for their 8 bit and 32bit MCUs lines. AVR Studio 6 comes integrated with latest version of avr-gcc compiler. So the completed development environment can be installed with a single easy to use installer.
The IDE Consist of a high end editor with flawless auto-complete. The editor is powered by proven Microsoft Visual Studio. The editor makes it easy to type and edit C source file with its auto complete feature, the user don’t have to “refer” to the reference manual often as the editor itself shows the parameter requirements of a function, return type and the help.
Introduction to the AVR Studio 5 Environment.
You can start AVR Studio 6 by using its icon from the Windows® Desktop or the Start Menu.
|
Fig. 1 - AS6 Desktop Icon |
|
Fig. 2 - AS6 Startup Screen |
The First screen shown up after the AS5 has started is the Start Page. The start page helps you quickly create a new project or load your previous project without wasting much time.
|
Fig. 3 - AS6 Home Screen. |
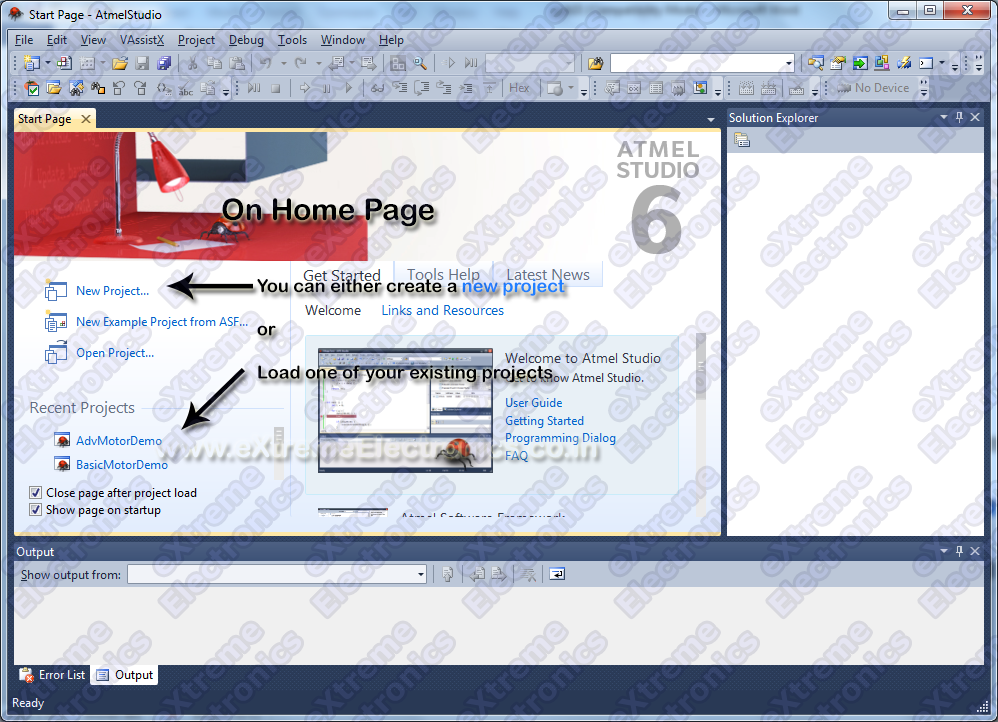
To create a new project we select “New Project …” option from the Start Page. Please refer to Fig 3.
|
Fig. 4 - New Project Page1 |
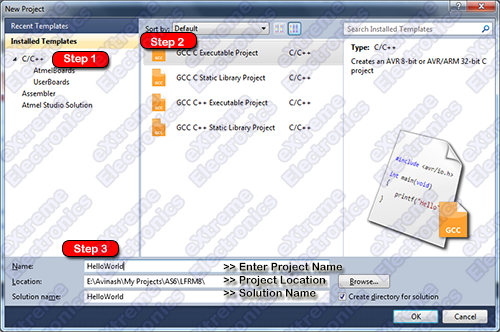
AS6 will show you the New Project Wizard as shown in the above image (Fig 4). From the project template area (Installed Templetes) select C as the project template. From the project type area select “C Executable Project” . After that fill out the project details at the bottom like project name, its location on your PC etc. Finally Hit Ok.
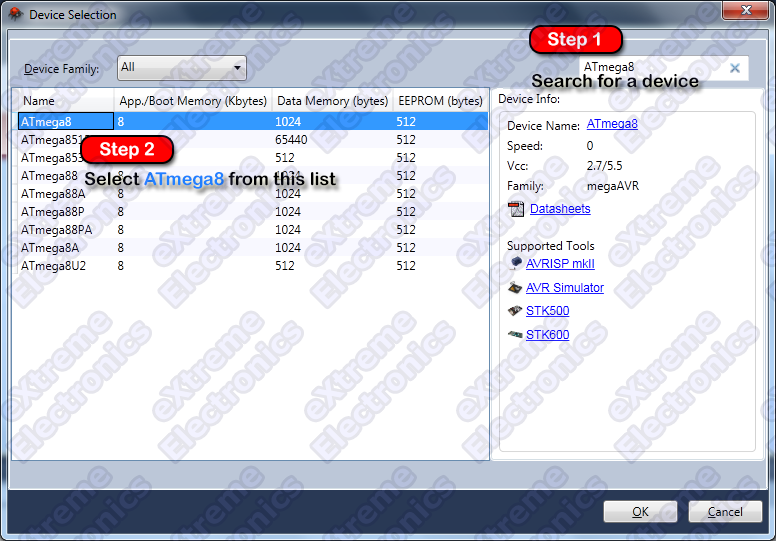
Next to the project detail window comes the Device Selection Window. That let you choose the target MCU for your project. Here in our project we are using ATmega8 MCU so select that from the device list.
|
Fig. 5 - Device Selection. |
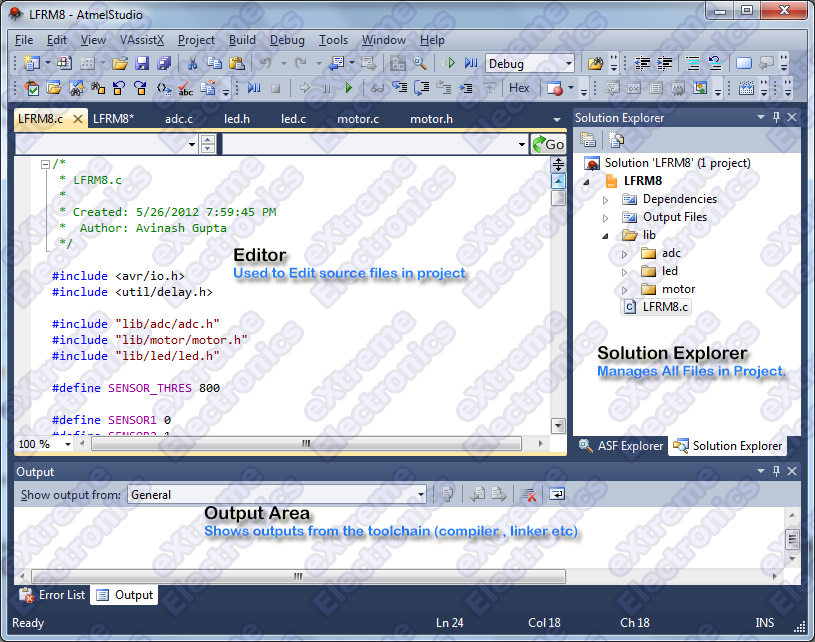
After we completed the “New Project” wizard, we are presented with the AVR Studio 6 main window. So let us get introduced with the various parts of AVR Studio 6 window.
- The Menu Bar – Common in all application. This has commands for all tasks organized in submenus like File , Edit, View etc.
- The Tool Bar – It is also common in all application. The tool bar has selected commands from the Menu Bar which the user uses often. They have small icons for each command.
- The Main Source Editor – This window is the main editor for the source files in the current project. you can load any file (in your current project) by double clicking it in the solution explorer (discussed shortly). The editor has spell check and auto complete features.
- Solution Explorer – In AVR Studio 5 a solution can house one or more projects. In our case we simply keep one project per solution. Solution Explorer is discussed in more detail in next section.
- Output Window – Most build tools like the compiler, linker etc are command line tools. When we issue command such as the Build command, their output is captured and shown in this area. Also errors or warning if any are also shown in this area.
|
Fig. 6 - Main Parts of AS6. |
The Solution Explorer.
The image below shows the Solution Explorer. By default it is on the right hand side.
|
Fig. 7 - Main Parts of AS6. |
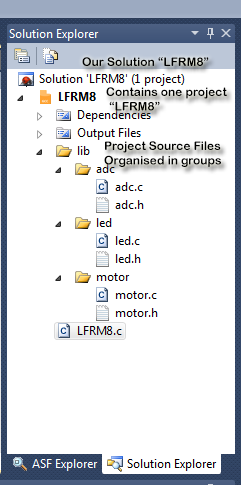
The solution explorer helps us keep the project sources file in an organized hierarchal way. In our project there is an main application code file that is the high level application program (say a line follower robot or LFR). In this case the file is named LFRM8.c, it is placed in the root of project.
The high level application requires services from lower level codes like the Motor Library, ADC Library etc. All these library are kept in their own folders inside the lib folder.
All our library are deployed in two files namely libname.c and libname.h
The c file contains the actual implementation while the h file contains the prototypes.
The Solution Explorer Tasks.
Creating a Folder.
As you have seen above how we organize our project in an Hierarchical way now we see how to actually do this.
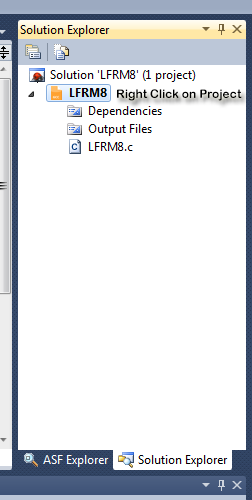
- Right Click on the Project in the solution explorer. This will bring up the project context menu.
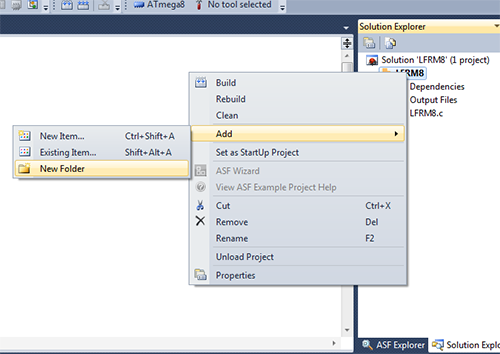
- From the context menu select Add->New Folder.
- Name the folder lib.
|
Fig. 8 - Right Click on Project Name. |
|
Fig. 9 - Add new folder to Project. |
In a similar way you can add sub folders like adc, motor, led inside the lib folder.
Since the low level driver modules are reusable pieces they are often copied to the new project from their repositories. What I mean is there is no need to write the low level drivers for each project, they are just copied from their storage location.
You can copy files like motor.c, motor.h etc using Windows Explorer to their respective folders.
Adding Existing Files to Project.
Once the support files are copied to the project folder (using My Computer) they must be added to the project. To add existing source files to project do the following.
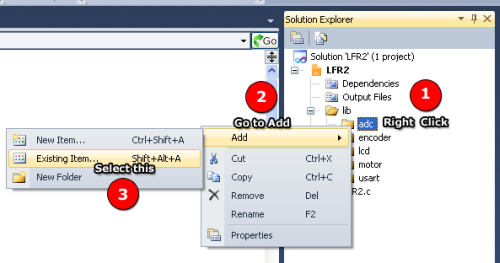
- Right click on the folder in which you want to add the file. For example if you want to add files to adc sub folder, right click on adc to bring the context menu.
- Select Add->Existing Item …
- Select the files adc.c and adc.h from the select file dialog.
|
Fig. 10 - Add Existing Item to AS6. |
Editing a File In Project
You can double click a file in the solution explorer pane to load it into the main editor.
Defining a Preprocessor Symbol
A preprocessor symbol which often used as a global constant can be defined for a project using the project properties dialog.
To bring up the project properties dialog you can do any one of the following.
- Hit Atl+F7 from the keyboard.
- From Project menu select <project name> Properties (last item on Project menu).
|
Fig. 11 - Project Properties Dialog. |

|
Fig. 12 - Defining a new Symbol. |
To define a new symbol do the following :-
- From the left hand list on the Project Properties dialog, select Symbols which is under AVR/GNU C Compiler. (Refer Fig. 11)
- Select New Symbol button.
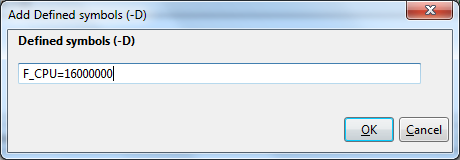
- In the new dialog that comes enter <symbol name>=<value> for example F_CPU=16000000 where F_CPU is symbol name and 16000000 is the value.
NOTE: One symbol that must be defined in all project is the CPU clock frequency in Hz. This symbol is named F_CPU. Its value must be set according to the speed on which AVR MCU will be running. The LFR board runs at 16MHz so we define F_CPU=16000000 in all our projects.
Building the Project.
Building is the process of compiling(or assembling if file is in assembly language) various source files in the project and linking the output files (.o) to give a final executable hex file.
To build the project, select Build Solution from the Build menu. You can also use keyboard shortcut F7 to build the project.
If everything is setup correctly and your source files do not have any syntax error then you will get the following message.
It states the number of projects succeeded and the number of projects failed. Since we have only one project in our solution we should get something like this :-
Build succeeded.
   ========== Build: 1  succeeded or up-to-date, 0 failed, 0 skipped ==========
Locating the HEX File
Once the project is build successfully a hex file is generated. You can use any programmer to upload this hex file to your MCU. This hex file is generated inside the folder Debug which is inside the Project folder (LFRM8 in our case) which is again inside the solution folder (LFRM8 in our case).
How to transfer this hex file to the board is given in this tutorial.
Return to Help Index.