Advance Motor Control
AVR ATmega8 Bases Line Follower.
Easy to make PID LFR Robot.
In the last part we saw the basics of DC motor interfacing with AVR microcontroller. In this part we step further to look at the xAPI routines for motor control which gives easy access to the motors on our robot.
Connecting Motors.
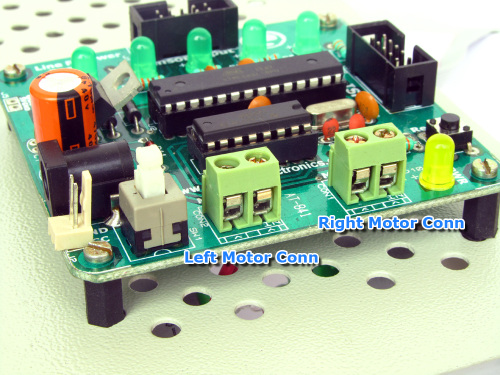 |
Fig. 1 - Motor Connectors |
- First make the screws loose by using a screw driver.
- Insert the motor wire in proper connectors.
- Tighten the screws.
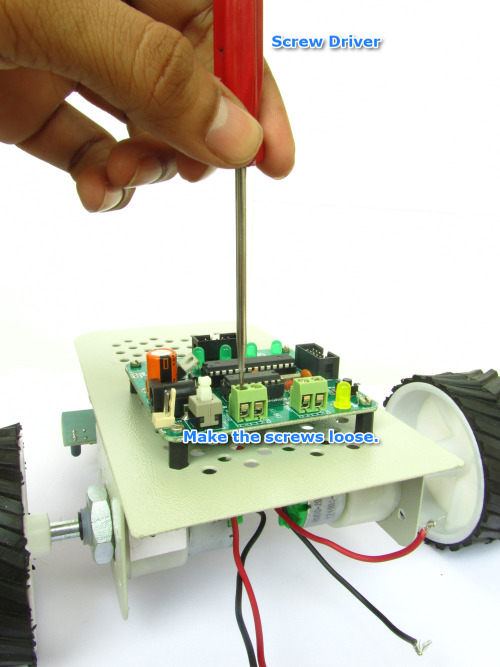 |
Fig. 2 - Make screws loose |
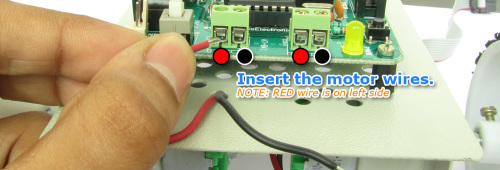 |
Fig. 3 - Insert motor wires |
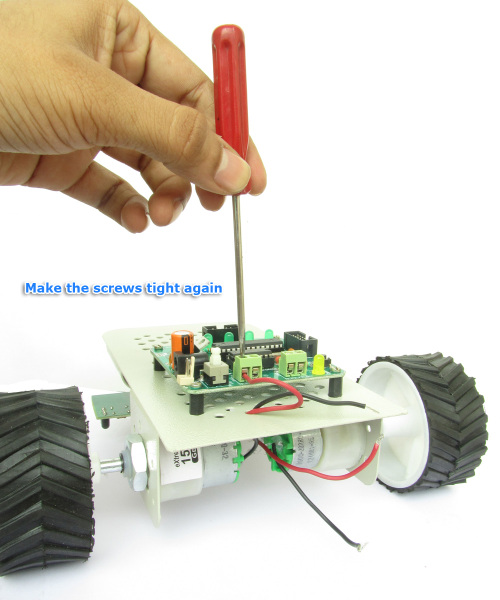 |
Fig. 4 - Make screws tight again |
 |
Fig. 5 - A Geared DC Motor. |
xAPI for Motor Control
Motors can be controlled using the motor library that comes in as following files.
- motor.c
- motor.h
- myutils.h
You can get these files from the lib folder in the DVD.
To use the motor Library do the following :-
- Create a new folder lib in the project using Solution Explorer.
- Create a new sub folder motor inside the lib folder.
- Using Windows File Manager copy/paste the motor.c, motor.h & myutils.h files to your <project folder>/lib/motor/ from the DVD.
- Add all three files to your projects under lib/motor.
- Now you are ready to use the library!
It is made up of only three functions.
void MotorInit(void)
This function must be called before any other Motor Control Function is used. It sets up the I/O Ports and Initializes the PWM Module of AVR.
********
void MotorA(uint8_t dir,uint8_t speed)
This function controls the Motor-A. The first argument is the direction of rotation required. It can be one of the following constants.
MOTOR_STOP - Stops the motor.
MOTOR_CW - Rotates the Motor Clockwise (CW).
MOTOR_CCW - Rotates the Motor Counter Clockwise(CCW).
The Second Argument is the speed required. It can be any value between 0 and 255.
Examples
MotorA(MOTOR_CW,128); //Set Rotation as Clockwise with approx half the max speed.
The above example set the direction of rotation of motor-a as Clockwise with approximately half the maximum rated speed. If the motor was a 200 RPM motor then it will rotate approx 100 revolutions per minute (RPM).
********
void MotorB(uint8_t dir,uint8_t speed)
This function controls the Motor-B. The first argument is the direction of rotation required. It can be one of the following constants.
MOTOR_STOP - Stops the motor.
MOTOR_CW - Rotates the Motor Clockwise (CW).
MOTOR_CCW - Rotates the Motor Counter Clockwise(CCW).
The Second Argument is the speed required. It can be any value between 0 and 255.
Examples
MotorB(MOTOR_CCW,25); //Set Rotation as Anti Clockwise with approx 10% of the max speed.
The above example set the direction of rotation of motor-b as Counter Clockwise with approximately 10% of the maximum rated speed. If the motor was a 200 RPM motor then it will rotate approximately 20 revolutions per minute (RPM).
********
Sample Code
Following sample code makes use of the above functions to demonstrate advance motor control feature of xAPI. The example will do the following
- Start MOTOR-A in Clockwise direction with full speed.
- Reduce the speed to half.
- Change direction of Motor to Counter Clockwise and Again set the speed to MAX.
- Reduce Speed to Half
/*********************************************************************

                 LFR Board Sample Programs

               ------------------------------------


Description :  Demonstrate the use of DC motor. Teaches you how to control
            the speed and direction of DC motors.

            The program starts the MOTOR - A in CW direction with
            with Full Speed. Then it changes speed to half.

            After that the direction is reversed and speed is again
            set to MAX. After some time speed is reduced to 50%

            This whole process is repeated again and again.


Author      : Avinash Gupta 2012
Web         : www.eXtremeElectronics.co.in


**********************************************************************/

#include <avr/io.h>
#include <util/delay.h>

#include "lib/motor/motor.h"

//Simple Delay Function
void Wait();

void main()
{
   //Initialize motor subsystem
   MotorInit();

   while(1)
   {
      //Start Motor A in Clock Wise (CW) direction with full speed (255)
      MotorA(MOTOR_CW,255);

      //Wait
      Wait();

      //Set speed to half
      MotorA(MOTOR_CW,127);

      //Wait
      Wait();

      //Now change direction to Counter Clock Wise (CCW)
      MotorA(MOTOR_CCW,255);

      //Wait
      Wait();

      //Now change direction to Counter Clock Wise (CCW)
      MotorA(MOTOR_CCW,127);

      //Wait
      Wait();
   }

}

void Wait()
{
   uint8_t i;

   for(i=0;i<250;i++)
   _delay_loop_2(0);

   for(i=0;i<250;i++)
   _delay_loop_2(0);
}
NOTE: If the motors rotates opposite of the expected direction then you must have wired the motor in wrong polarity. The left wire in the connector should be RED and the right one should be BLACK as shown in above image.
NOTE: You need a powerful Battery or Adaptor (current supply of 1A or More). The project would not run properly with small 9V battery or small adaptor(500ma).
HEX File Ready to Burn
The hex file ready to burn can be found in the Precompiled HEX Files folder in the Support DVD.
- AdvMotorDemo.hex
Return to Help Index.