Tag Archives: relay

Relays, Introduction, Working and Interfacing

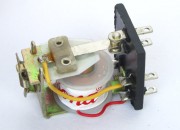
Relays are very interesting and useful electronic component. They are a kind of switch, like those we use everyday in our home and offices to turn on and off electrical devices like bulbs, TVs, fans etc. The function of relay is to control the switching of a relatively heavier load which demands high voltages (like 240 V AC mains) or high current, from a relatively low voltage control signal (like 5v or 12v) Relays, an Introduction Working of Relays Interfacing of Relays with Microcontrollers Pinouts of common relays Relay Interface with AVR ATmega8 Relay Interface with AVR ATmega16

Microwave Controller using ATmega8 – AVR Project

Microwave Controller’s User Interface Fig. Microwave Timer using AVR ATmega8   The user interface has the following parts. Output Device: A 16×2 alphanumeric LCD Module is used as the main output device. It can display numbers, alphabets and few symbols. It can show two line and each line can have 16 characters. The backlight enables the text to be visible even in dark. A buzzer beeps when the system receive input from the user and the input is successfully processed. For example if the user presses 10 MIN button to increment timer by 10 min and this is successfully carried out the buzzer beeps. But if the timer is already at the maximum setting (90 minutes) the operation could be carried out, so the buzzer does not beeps. This buzzer also beeps a few time when the food is ready (countdown is finished) Input Device: Input from user is received by a keypad which has seven push buttons. The details of button is given below. Button Function Microwave Selects Microwave mode. Grill Selects Grill mode. 10 MIN Increment timer by 10 minutes. MIN Increment timer by 1 minute. 10 SEC Increment timer by 1 sec. STOP/Clear If the microwave is in on condition, this button turns it off and pauses the timer count down. If you are setting the timer, […]

AVR Project – ATmega8 Based Multi channel IR Remote

Hi Friends, Today I will present an easy to build Multi channel IR Remote control system. It can control heavy loads (Up to AC 220V 6 Amps or smaller) with a touch of remote control. A total of 5 devices can be controlled from a distance of up to 20 feet. We will be using a standard remote control protocol that is called the NEC format. The NEC format is common in remote controls used with Chinese made CD/DVD players. They are easily available in Indian Markets. They also come in variety of sizes from full to small 21 keys (used in car audio systems). Our system is smart enough, so the user can set which key controls which load. Their are five load indicator LEDs which provide the state of five loads. When the device is powered on for the first time, the load LEDs start to blink one by one. That is the first load LED starts to blink, this means the system is waiting for the user to assign a key for that load. So you should press the key you want to use for that load. Once the system receives the key of your choice it stores it in internal EEPROM. From now on you can use that key to control that specific load. In this […]

AVR Project – Relay Timer with ATmega8 AVR MCU

Timers are widely used in industrial and domestic application for automating tasks. Microcontrollers can be used to design versatile and accurate timers with ease. Here I present a simple timer that can be used to turn on/off a load after user specified time. The Timer uses a standard 16×2 lcd module for user interface (UI). User can set the time using a 3 button keypad. After that Timer is started. While count down is in progress, the time left is displayed on screen. The program use our LCD driver library more details of which can be found in here. Use avr-gcc + AVR Studio to compile. The prototype was developed using xBoard MINI, a low cost easy to use ATmega8 development board. The program was burned to the MCU’s flash memory using eXtreme Burner – AVR Software and Hardware. A basic knowledge of working with different tools of AVR development is required, so please refer to following articles. Note: Fuse Must be set as follows, HIGH FUSE=C9 LOW FUSE=FF (Very Important) If display is blank please adjust RV1 Part List 01 ATmega8-16 PU U1 02 16×2 LCD Module LCD1 03 16 MHz Crystal X1 04 BC548 Transistor Q1 05 1N4007 Diode D1 06 4.7K Resistor R1,R2 07 10K Variable Resistor VR1 08 22pF Disk Capacitor c1,c2 09 0.1uF Disk Capacitor […]