Tag Archives: Timer

Microwave Controller using ATmega8 – AVR Project

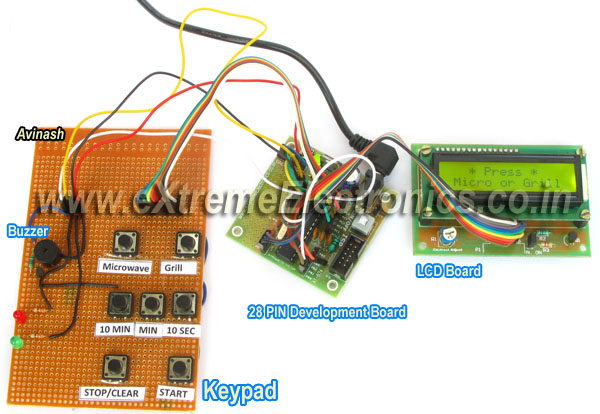
Microwave Controller’s User Interface Fig. Microwave Timer using AVR ATmega8   The user interface has the following parts. Output Device: A 16×2 alphanumeric LCD Module is used as the main output device. It can display numbers, alphabets and few symbols. It can show two line and each line can have 16 characters. The backlight enables the text to be visible even in dark. A buzzer beeps when the system receive input from the user and the input is successfully processed. For example if the user presses 10 MIN button to increment timer by 10 min and this is successfully carried out the buzzer beeps. But if the timer is already at the maximum setting (90 minutes) the operation could be carried out, so the buzzer does not beeps. This buzzer also beeps a few time when the food is ready (countdown is finished) Input Device: Input from user is received by a keypad which has seven push buttons. The details of button is given below. Button Function Microwave Selects Microwave mode. Grill Selects Grill mode. 10 MIN Increment timer by 10 minutes. MIN Increment timer by 1 minute. 10 SEC Increment timer by 1 sec. STOP/Clear If the microwave is in on condition, this button turns it off and pauses the timer count down. If you are setting the timer, […]

Introduction to PIC18’s Timers – PIC Microcontroller Tutorial

Timers are common features of most microcontroller. In simplified terms a timer is just a register whose value keeps increasing (or decreasing) by a constant rate without the help of the CPU. The CPU can read or write this register any time. It reads it find out how much time has elapsed. The Timer register can have the following bit length 8 bit timers – These can count between between 0-255 16 bit timers – These can count between 0-65536 32 bit timers – These can count between 0-4294967296 A timer has a clock source, for example of the clock source of 10KHz is input to a timer then one increment will take 100uS (micro second). This clock source can be obtained from the CPU clock. The CPU clock of popular MCU ranges from 1 MHz to 20Mhz, this can be sometimes too fast. To help us out their is a thing called prescaler in the MCU. The job of prescaler is to divide the CPU clock to obtain a smaller frequency. The PIC Micro that we will use in this example has the following prescaler division factors available. 256 128 64 32 16 8 4 2 1 (Prescaler by-passed) Timers are also called Counters this is because they can be used to count external events. The following example illustrate […]

AVR Project – Relay Timer with ATmega8 AVR MCU

Timers are widely used in industrial and domestic application for automating tasks. Microcontrollers can be used to design versatile and accurate timers with ease. Here I present a simple timer that can be used to turn on/off a load after user specified time. The Timer uses a standard 16×2 lcd module for user interface (UI). User can set the time using a 3 button keypad. After that Timer is started. While count down is in progress, the time left is displayed on screen. The program use our LCD driver library more details of which can be found in here. Use avr-gcc + AVR Studio to compile. The prototype was developed using xBoard MINI, a low cost easy to use ATmega8 development board. The program was burned to the MCU’s flash memory using eXtreme Burner – AVR Software and Hardware. A basic knowledge of working with different tools of AVR development is required, so please refer to following articles. Note: Fuse Must be set as follows, HIGH FUSE=C9 LOW FUSE=FF (Very Important) If display is blank please adjust RV1 Part List 01 ATmega8-16 PU U1 02 16×2 LCD Module LCD1 03 16 MHz Crystal X1 04 BC548 Transistor Q1 05 1N4007 Diode D1 06 4.7K Resistor R1,R2 07 10K Variable Resistor VR1 08 22pF Disk Capacitor c1,c2 09 0.1uF Disk Capacitor […]

PWM Signal Generation by Using AVR Timers.

In the last tutorial you saw how the PWM technique helps us generate analog signals from a microcontroller. In this tutorial we will see how PWM generation is implemented with microcontrollers. Before you begin please see Introduction to PWM Introduction to AVR Timers Generation of PWM signals is such a common need that all modern microcontrollers like AVR has dedicated hardware for that. The dedicated hardware eliminates the load of generation of PWM signal from software (thus frees the CPU ). Its like asking the hardware to generate a PWM signal of a specific duty cycle and the task of CPU is over. The PWM hardware with start delivering the required signal from one of its PINs while the CPU can continue with other tasks. In AVR microcontrolers PWM signals are generated by the TIMER units. (See AVR Timer Tutorials) . In this tutorial I will give you the basic idea of how PWM signals are generated by AVR timers. Their are two methods by which you can generate PWM from AVR TIMER0 (for ATmega16 and ATmega32 MCUs). Fast PWM Phase Correct PWM Don’t worry from their names they will become clear to you as we go on. First we will be considering the Fast PWM mode. PWM Generation Fundas We will use the simplest timer, TIMER0 for PWM generation.(Note […]

Introduction to PWM – Pulse Width Modulation.

A digital device like a microcontroller can easily work with inputs and outputs that has only two state, on and off. So you can easily use it to control a LED’s state i.e. on or off. In the same way you can use it to control any electrical device on/off by using proper drivers (transistor,triac, relays etc). But sometimes you need more than just "on" & "off " control over the device. Like if you wanna control the brightness of a LED (or any lamp) or the speed of DC motor then digital (on/off) signals simply can’t do it. This situation is very smartly handled by a technique called PWM or Pulse Width Modulation. PWM is the technique used to generate analogue signals from a digital device like a MCU. Almost all modern MCUs have dedicated hardware for PWM signal generation. In this tutorial we will learn the basics of PWM technique and later on we will see how to implement PWM generation with AVR microcontrollers. PWM : Pulse Width Modulation A digital device, like a microcontroller can only generate two levels on its output lines, HIGH=5v and LOW=0V. But what if we want to generate 2.5v or 3.1v or any voltage between 0-5 volt output ? For these kinds of requirement, instead of generating a constant DC voltage output […]

Multiplexed Seven Segment Displays – Part II

Hi Friends, In last tutorial we discussed about Multiplexing Seven Segment Displays. So you must be very much familiar with the theory. Now let us write the code and design a small project that will make you expert in using these displays in your own projects. We will make a system that can display any number between 0-9999 using four of these displays. We will design a function Print() that we can use on latter projects to easily write integers onto displays. Once we have successfully tested this function we can add to to any project without any problem. This concept of code reuse will make bigger project both easy to make and far less painful. In this sample project we will test our function by using it in a loop to print all numbers from 0-9999. for(i=0;i<10000;i++) { Print(i); Wait(); } Things Required S. No. Item Image 1 28 PIN AVR Dev Board Contains the core AVR circuit including 5v regulator, reset, ISP. 2 Seven Segment Display Module Four common anode displays multiplexed with driver transistors and current limiting resistors. 3 Single Pin Female to Female Burg Wires Used to interconnect the two boards   4 USB AVR Programmer To upload the program to the development board. These are all the things required to get started with seven segment […]

Multiplexed Seven Segment Displays.

We have discussed the basics of seven segment displays on our tutorial “Using Seven Segment Displays with AVR MCUs”. So you should be familiar with them. In this tutorial we will discuss about multiplexing of seven segment displays.Multiplexing is required when we want to interface 3 or 4 or even more such displays with MCUs since it we go for normal way it will require lots of IO port. So the smart way is multiplexing. Multiplexing achieved by tricking our eyes. Only one display is active at a time but we see all of them active. For multiplexing all the displays are connected in parallel such that if you activate any segment, say ‘a’ the ‘a’ segment of all displays glows up. But the trick is that we can switch on and off the “common” line of the displays under MCU control. So if we wish to light up the ‘a’ segment of display 2 we simply switch on display 2 first by applying proper level at the base of its driving transistor as shown in figure. Fig – Multiplexed Seven Segment Displays. If we like to display the digit say “123” on three displays first we select disp-3 by applying a “low” level at the base of transistor Q1 and output the code of required digit at the data […]