In the last tutorial we learn about the multiplexing technique used with seven segment displays. We learnt how it saves i/o line by using persistence of vision. Only one digit is lit at a time, but to a human eye it is too fast to catch, so we see all four digit lit the same time. In this tutorial we will make a practical use of multiplexed seven segment displays. We will use them to show current room temperature using a LM35 temperature sensor.
Before reading further make sure you know the following concepts
- Multiplexing Seven Segment Display with PIC Micro.
- Using ADC of PIC Micro.
- Interfacing LM35 temperature sensor with PIC Micro.
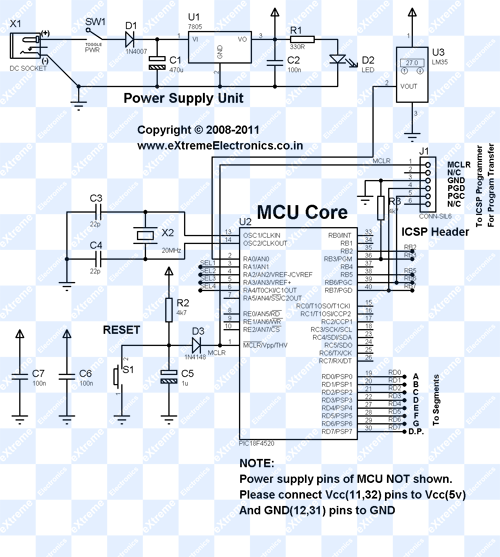
Schematic for PIC Thermometer
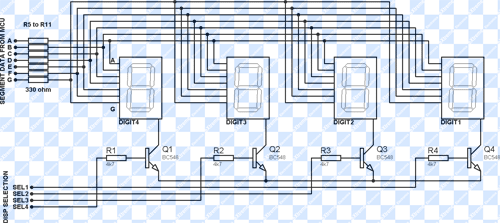
Please note that this schematic is slightly different from our previous schematic on multiplexed seven segment display. The display select i/o pins were RA0,RA1,RA2,RA3 on that schematic. But in this schematic the display lines are RA1,RA2,RA3,RA4 this is because RA0 is used as analog input channel for LM35’s output.
PIC Thermometer using LM35 |
Multiplexed Seven Segment wiring |
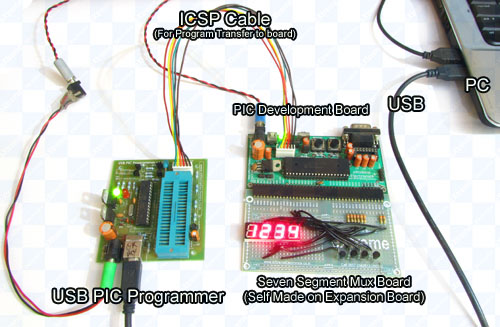
We use our PIC Development Board for making the above demo project. The PIC Development Board has all the core circuitry to sustain the MCU while the project specific part is developed on the expansion board.
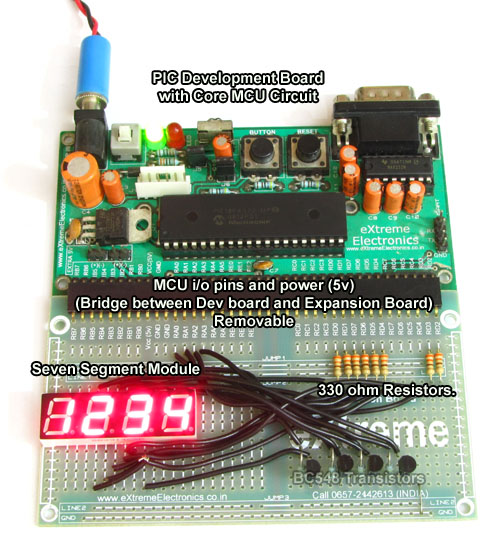 |
Multiplexed Seven Segment Display Setup |
Multiplexed Seven Segment Display Setup |
HI-TECH C Code for Thermometer Project
/********************************************************************

LM35 Temperature Sensor INTERFACING TEST PROGRAM

---------------------------------------------------------
Simple Program to connect with LM temperature sensor using the
internal ADC of PIC MCU.

The program displays the current environment temperature on
LED Module.

MCU: PIC18FXXXX Series from Microchip.
Compiler: HI-TECH C Compiler for PIC18 MCUs (http://www.htsoft.com/)

Copyrights 2008-2011 Avinash Gupta
eXtreme Electronics, India

For More Info visit
http://www.eXtremeElectronics.co.in

Mail: me@avinashgupta.com

********************************************************************/
#include <htc.h>

#include <math.h>

#include "types.h"

#define _XTAL_FREQ 20000000ul

//Chip Settings
__CONFIG(1,0x0200);
__CONFIG(2,0X1E1F);
__CONFIG(3,0X8100);
__CONFIG(4,0X0081);
__CONFIG(5,0XC00F);


//Configure i/o ports where display is connected
//below is segment data port
#define SEVENSEG_TRIS   TRISD
#define SEVENSEG_PORT   PORTD

//below is disp select data port
#define SEVENSEG_CMN_TRIS  TRISA
#define SEVENSEG_CMN_PORT  PORTA
#define SEVENSEG_CMN_POS 1

//Simple Delay Routine
void Wait(unsigned int delay)
{
   for(;delay;delay--)
      __delay_us(100);
}

//Function to Initialise the ADC Module
void ADCInit()
{
   //We use default value for +/- Vref

   //VCFG0=0,VCFG1=0
   //That means +Vref = Vdd (5v) and -Vref=GEN

   //Port Configuration
   //Only AN0 pin is analog
   //Other ANx pins are digital i/o
   PCFG3=1;
   PCFG2=1;
   PCFG1=1;
   PCFG0=0;

   /*

      ADCON2

      *ADC Result Right Justified.
      *Acquisition Time = 2TAD
      *Conversion Clock = 32 Tosc
   */

   ADCON2=0b10001010;
}

//Function to Read given ADC channel (0-12)
unsigned int ADCRead(unsigned char ch)
{
   if(ch>12) return 0;  //Invalid Channel

   ADCON0=0x00;

   ADCON0=(ch<<2);   //Select ADC Channel

   ADON=1;  //switch on the adc module

   GODONE=1;//Start conversion

   while(GODONE); //wait for the conversion to finish

   ADON=0;  //switch off adc

   return ADRES;
}

uint8_t digits[4]={0,0,0,0};

void SevenSegment(uint8_t num)
{
   switch(num)
   {
      case 0:
                  //  .GFEDCBA

         SEVENSEG_PORT= 0B00111111;
         break;

      case 1:
               //      .GFEDCBA
         SEVENSEG_PORT= 0B00000110;
         break;

      case 2:
               //      .GFEDCBA

         SEVENSEG_PORT= 0B01011011;
         break;

      case 3:
               //      .GFEDCBA
         SEVENSEG_PORT= 0B01001111;
         break;

      case 4:
               //      .GFEDCBA

         SEVENSEG_PORT= 0B01100110;
         break;

      case 5:
               //      .GFEDCBA
         SEVENSEG_PORT= 0B01101101;
         break;

      case 6:
               //      .GFEDCBA

         SEVENSEG_PORT= 0B01111101;
         break;
      case 7:
               //      .GFEDCBA
         SEVENSEG_PORT= 0B00000111;
         break;

      case 8:
               //      .GFEDCBA

         SEVENSEG_PORT= 0B01111111;
         break;

      case 9:
               //      .GFEDCBA
         SEVENSEG_PORT= 0B01101111;
         break;
   }
}


void SevenSegInit()
{
   //Setup i/o ports
   SEVENSEG_TRIS=0X00;
   SEVENSEG_CMN_TRIS=~((0B00001111)<<SEVENSEG_CMN_POS);

   SEVENSEG_CMN_PORT=(0B00000001<<SEVENSEG_CMN_POS);

   //Setup Timer0
   T0PS0=1; //Prescaler is divide by 256

   T0PS1=1;
   T0PS2=1;

   PSA=0;      //Timer Clock Source is from Prescaler

   T0CS=0;     //Prescaler gets clock from FCPU (5MHz)

   T08BIT=1;   //8 BIT MODE

   TMR0IE=1;   //Enable TIMER0 Interrupt
   PEIE=1;     //Enable Peripheral Interrupt

   GIE=1;      //Enable INTs globally

   TMR0ON=1;   //Now start the timer!
}

void SevenSegPrint(uint16_t num)
{
   /*


   This function breaks apart a given integer into separete digits
   and writes them to the display array i.e. digits[]

   */
   uint8_t i=0;
   uint8_t j;
   if(num>9999) return;
   while(num)
   {
      digits[i]=num%10;
      i++;

      num=num/10;
   }
   for(j=i;j<4;j++) digits[j]=0;
}


void SevenSegISR()
{
   /*

   This interrup service routine (ISR)
   Updates the displays

   */

   TMR0=150;

   static uint8_t i;

   if(i==3)
   {
      //If on last display then come
      //back to first.
      i=0;

   }
   else

   {
      //Goto Next display
      i++;
   }


   //Acivate a display according to i
   SEVENSEG_CMN_PORT=((SEVENSEG_CMN_PORT & (~(0x0F<<SEVENSEG_CMN_POS)))|(1<<(i+SEVENSEG_CMN_POS)));

   //Write the digit[i] in the ith display.

   SevenSegment(digits[i]);
}

//Main Interrupt Service Routine (ISR)
void interrupt ISR()
{
   //Check if it is TMR0 Overflow ISR
   if(TMR0IE && TMR0IF)
   {
      //Call the SevenSegISR
      SevenSegISR();

      //Clear Flag

      TMR0IF=0;
   }
}

void main()
{

   //Initialize the Seven Segment Subsystem
   SevenSegInit();

   //Initialize the ADC Module
   ADCInit();

   while(1)
   {
      unsigned int val; //ADC Value

      unsigned int t;      //Temperature

      val=ADCRead(0);   //Read Channel 0(pin2 on PIC18f4520, RA0)

      t=round(val*0.48876);//Convert to Degree Celcius

      //Print temperature to display
      SevenSegPrint(t);

      Wait(1000);
   }

}
To compile the above code you will need the MPLab IDE and HI-TECH C for PIC18. Both are available free at Microchips Website.
- Download Microchip’s MPLAB v8.70
- HI-TECH C Compiler for PIC18 MCUs – Lite mode v9.66 (Requires free registration)
If you are new to these tools then please see the following tutorials :-
- PIC Hello Word Project (Please read carefully and setup the software exactly as described)
Burning the HEX File to PIC MCU
Hex file contains data for three different segments,
- The FLASH (Stores the program)
- The EEPROM (This is a non volatile memory that can be accessed(read/write) by the program. It retains the data even when MCU is switch off, you can specify EEPROMs initial content in hex file. In this project this feature is not required so our hex file DO NOT contain the initial EEPROM contents.
- CONFIG bytes are a special location inside the chip that is used to configure many aspects of the chip like clock source, brown out detector, watch timer, startup times. See page 249 on PIC18F4520’s datasheet. This section is most important for proper working of program so make sure this section is programmed when you write the chip. If you use our USB PIC Programmer. Then as soon as you load the hex file it shows the sections that are present on the hex file.
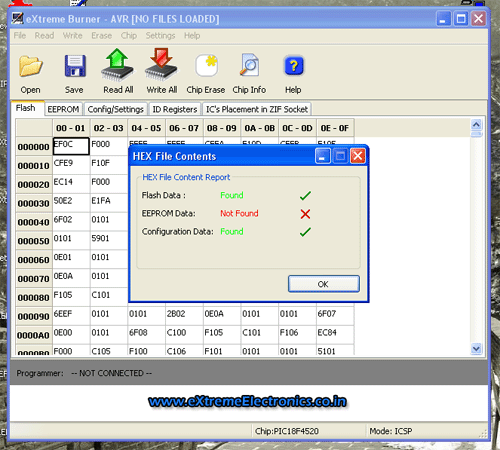 |
HEX File Report |
As you can see it states that Flash Data (Your Program), and Configuration Data are present on the hex file, while EEPROM data is not present. When you are ready to transfer the data to the chip select "Write All" from the toolbar or Select menu Write->All. This ensures that Configuration memory is also written. If you write only the Flash section(By selecting Write->Flash) the program WON’T WORK.
You need to take similar steps when using other programmers like PICKIT3 etc.
Videos for PIC Thermometer
Help Us!
We try to publish beginner friendly tutorials for latest subjects in embedded system as fast as we can. If you like these tutorials and they have helped you solve problems, please help us in return. You can donate any amount as you like securely using a Credit or Debit Card or Paypal.
We would be very thankful for your kind help.
Downloads
- Complete MPLab Project for PIC18F4520 running at 20MHz
- Hex File Ready to burn for PIC18F4520 running at 20MHz
- Proteus Simulation File (for quick testing)
- Complete MPLab Project for PIC18F4550 running at 48MHz
- Hex File Ready to burn for PIC18F4550 running at 48MHz
Subscribe!
Don’t miss any article get them right in your inbox! Subscribe to our feeds powered by Feedburner.
By
Avinash Gupta
www.AvinashGupta.com
me@avinashgupta.com
![]()
![]()
Facing problem with your embedded, electronics or robotics project? We are here to help!
Post a help request.



May be my understanding is not correct, in both cases (for PIC and AVR) extreme burner is same ! Here in screen shot showing “eXtreme Burner-AVR[NO FILES LOADED] –
Regards,
Uttam
@Uttam Dutta,
Its a small bug.
Spectacular … I knew I was right to add you to my feed reader.
Greetings from Argentina
fantastic
good tutorials
in the main function i dont understand this statement.
t=round(val*0.48876);
why are you multiplying by 0.48876?
How did you get that number?
Hi,
I am working on a room temperature measurement project, and after building the code. it gave me the error “demo limit”.
Could you help to build and compile this codes if i sent it to you in other to produce the hex file.
Thanks
Tolu
Hi
I am trying to use PIC 18f452 for sense different tempratures and show on LCD , but I have problem on showing and count down on LCD. May you please help me in this case ?
best regards
Rodelf
nice work. thanks a lot for sharing, specially the MPLAB project files. This helped me a lot. keep up good work.