Hi Friends,
Today I will present an easy to build Multi channel IR Remote control system. It can control heavy loads (Up to AC 220V 6 Amps or smaller) with a touch of remote control. A total of 5 devices can be controlled from a distance of up to 20 feet. We will be using a standard remote control protocol that is called the NEC format. The NEC format is common in remote controls used with Chinese made CD/DVD players. They are easily available in Indian Markets. They also come in variety of sizes from full to small 21 keys (used in car audio systems).
Our system is smart enough, so the user can set which key controls which load. Their are five load indicator LEDs which provide the state of five loads. When the device is powered on for the first time, the load LEDs start to blink one by one. That is the first load LED starts to blink, this means the system is waiting for the user to assign a key for that load. So you should press the key you want to use for that load. Once the system receives the key of your choice it stores it in internal EEPROM. From now on you can use that key to control that specific load. In this way all five loads are mapped to five keys on the remote control.
The above key mapping procedure is required only once. From the next time the system is started it does not goes through the key mapping procedure. Although if required the same key mapping can be initiated if user wants. This is done by pressing any key on remote control within 3 second of booting. If the system receives any key press during boot up (i.e. within 3 sec. of startup) it starts the key mapper.
Once the key mapping is done, user can switch on/off the loads by just pressing the keys on remote control.
Their are five power connectors (the green thing on the edge of the board), they are used to connect external load. They function like simple switch. That means the two contact are closed (connected) when relay is active. Other wise they are open (NOT connected).
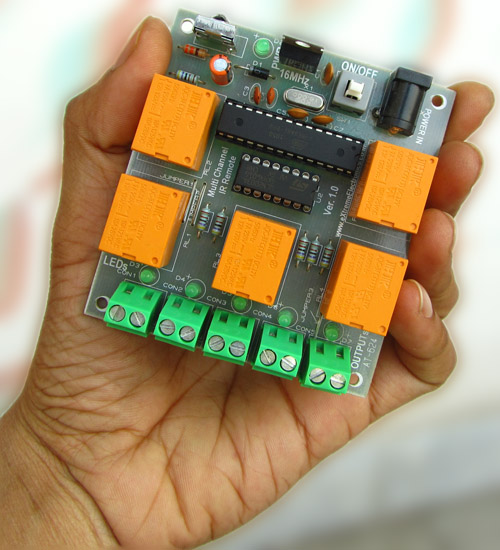 |
Fig.: Multi channel IR Remote |
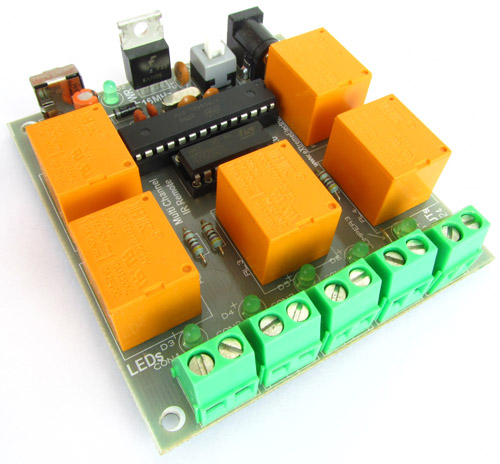 |
Fig.: Multi channel IR Remote |
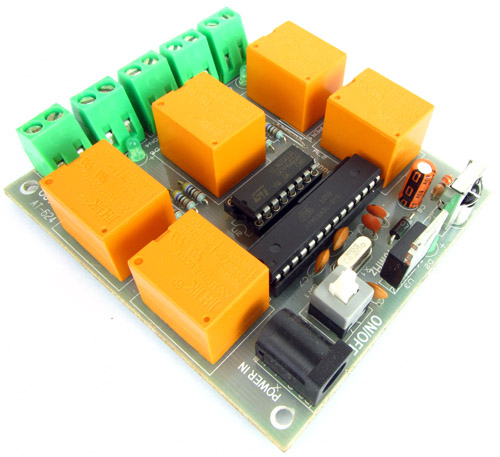 |
Fig.: Multi channel IR Remote |
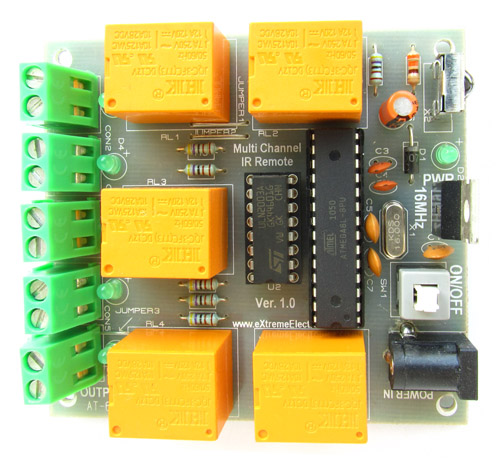 |
Fig.: Multi channel IR Remote |
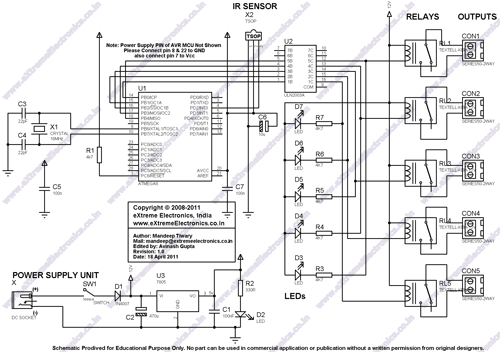
Schematic for Multi channel IR Remote
Fig.: Multi channel IR Remote. Click to Enlarge/Print. |
avr-gcc Source Code for Multi channel IR Remote
/******************************************************************************

Title:

   ATmega8 Based Multi channel IR Remote.

Description:
   It can control heady loads (Up to AC 220V 6 Amps or smaller) with a touch
   of remote control. A total of 5 devices can be controlled from a distance
   of up to 20 feet. We will be using a standard remote control protocol
   that is called the NEC format. The NEC format is common is remote

   controls used with Chinese made CD/DVD players remote controls. They are
   easily available in Indian Markets. They also come in variety of sizes
   from full to small 21 keys (used in car audio systems)

   For More information visit
   http://www.eXtremeElectronics.co.in

Author:
   Avinash Gupta.
   avinash@eXtremeElectronics.co.in

Copyright:
   eXtreme Electronics, India 2008- 2011

Notice:

   No part of this work can be copied or published in electronic or
   printed form without proper permission from the Original Creators.

   ONLY INTENDED FOR EDUCATIONAL, HOBBY AND PERSONAL USE.
   COMMERCIAL USE IS STRICTLY PROHIBITED.


Disclaimer of Warranty.

   THERE IS NO WARRANTY FOR THE PROGRAM, TO THE EXTENT PERMITTED BY APPLICABLE LAW.
   EXCEPT WHEN OTHERWISE STATED IN WRITING THE COPYRIGHT HOLDERS AND/OR OTHER
   PARTIES PROVIDE THE PROGRAM “AS IS” WITHOUT WARRANTY OF ANY KIND, EITHER
   EXPRESSED OR IMPLIED, INCLUDING, BUT NOT LIMITED TO, THE IMPLIED WARRANTIES
   OF MERCHANTABILITY AND FITNESS FOR A PARTICULAR PURPOSE.

   THE ENTIRE RISK AS TO THE QUALITY AND PERFORMANCE OF THE PROGRAM IS WITH YOU.
   SHOULD THE PROGRAM PROVE DEFECTIVE, YOU ASSUME THE COST OF ALL NECESSARY
   SERVICING, REPAIR OR CORRECTION.

******************************************************************************/


#include <avr/io.h>

#include <util/delay.h>

#include "remote.h"
#include "eeprom.h"

void Wait()
{
   uint8_t i;
   for(i=0;i<4;i++)
      _delay_loop_2(0);
}


void main()
{
      //Main command received from remote.
   uint8_t cmd;

   //Set PORTB0 to 4 as output. Relays are connected here.
   DDRB|=0b00011111;

   //Initialize the IR Remote library.
      RemoteInit();

   //Key codes assigned to five loads.

   uint8_t KeyCodes[5];

   uint8_t i;

   //Wait for any key during boot up.
   //if any key is pressed we enter the keymapper.
   for(i=0;i<16;i++)
   {
      cmd=GetRemoteCmd(0);

      if(cmd!=RC_NONE)
      {
         //Reset the Key mapping

         //If eeprom address 0x0000 contains 0xFF
         //that means remote keys are NOT mapped.
         EEPROMWrite(0,0xFF);
         break;
      }

      Wait();
   }

   //Flush Remote Command Buffer
   while(GetRemoteCmd(0)!=RC_NONE);

   //Check if eeprom area 0x0000 contains 0xFF

   //if yes we start key mapper. Which assigns
   //keycodes to loads. Other wise we load
   //key mapping from eeprom (see else block)
   if(EEPROMRead(0)==0xFF)
   {
      //This is first Run, so Map keycodes

      uint8_t i;
      for(i=0;i<5;i++)
      {

         while(1)
         {
            PORTB&=~(1<<i);

            Wait();
            cmd=GetRemoteCmd(0);
            if(cmd!=RC_NONE)
            {
               KeyCodes[i]=cmd;
               EEPROMWrite(i+1,cmd);
               break;
            }

            PORTB|=(1<<i);

            Wait();
         }
      }
      EEPROMWrite(0,0);
   }
   else

   {
      //Load Key configuration from EEPROM
      uint8_t i;
      for(i=0;i<5;i++)
      {

         KeyCodes[i]=EEPROMRead(i+1);
      }
   }

   //Main program loop
      while(1)
      {

      cmd=GetRemoteCmd(1);

      uint8_t i;

      for(i=0;i<5;i++)
      {
         if(cmd==KeyCodes[i])
         {
            PORTB^=(1<<i);//Toggle load

            break;
         }
      }

      _delay_loop_2(0);
      _delay_loop_2(0);


   }
}
Building from sources.
The above code requires the IR Remote Library and EEPROM Library in order to compile. The two library comes in four files.
- IR Remote Library
- remote.c
- remote.h
- EEPROM Library
- eeprom.c
- eeprom.h
You need AVR Studio and WinAVR compiler installed on system. Details on how to get and install these tools is described here.
The above four files must be copied to your project folder. Then added to the current project using the AVR Studios left hand side panel. The .c files must be added to the source files section and the .h files should be added to the header file section. Refer to the following image for details.
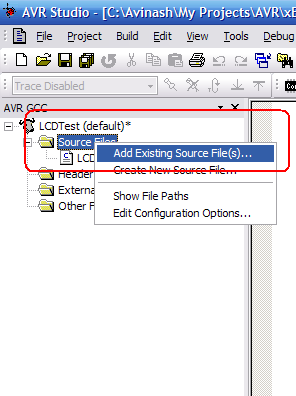 |
Fig: Adding files to projects. |
Finally when the project is ready, You can build the project using the "Build Active Configuration" button as shown below. You can also hit F7 button or Select Build from Build Menu.
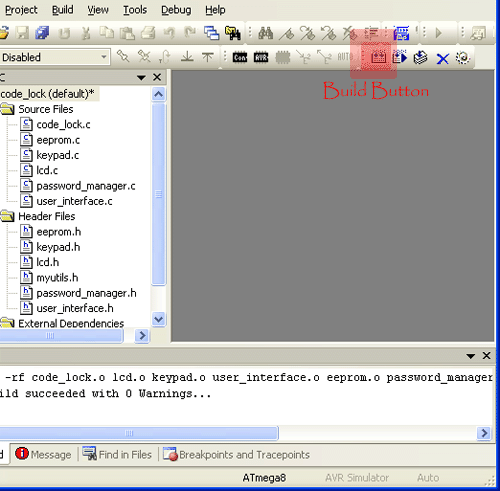 |
Fig.: AVR Studio Build Button |
If everything works fine, the hex file (with same name as you gave to your project) will be created in default folder inside your main project folder. You can then burn this hex file to your target ATmega8 MCU using any AVR Programmer. You also need to set the two fuse bytes in the MCU to the following value.
- High Fuse Byte = 0xC9
- Low Fuse Byte = 0xFF
Important Notice: The project will NOT work at all if the Fuse bytes are NOT programmed.
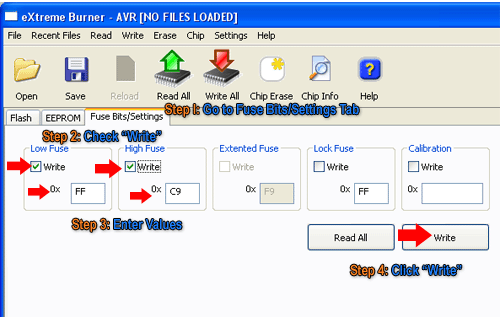 |
Fig.: Setting the Fuse bytes. |
PCB for Multi Channel IR Remote
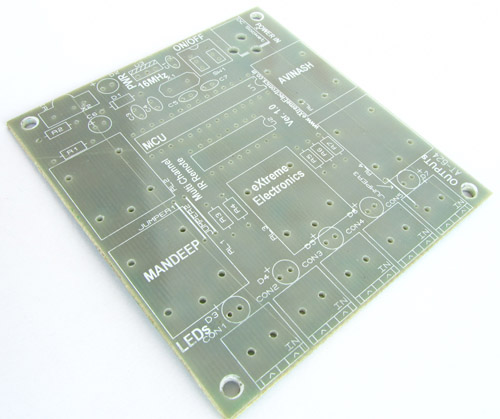 |
Fig.: PCB for Multi Channel IR Remote. |
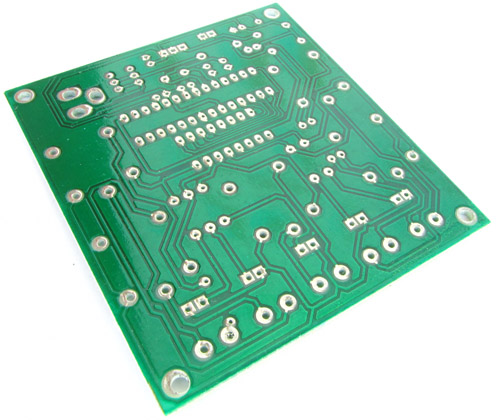 |
Fig.: PCB for Multi Channel IR Remote. |
You can download the PCB layouts from the download section at the end of article. That can be used to make PCBs at home. Other wise you can buy ready made PCBs from our online store. Our PCBs are made with high quality FR4 material complete with solder mask, silkscreen and tinning.
Videos
Coming soon!
Downloads
- Complete AVR Studio Project. (load the MIRRemote.aps in AVR Studio)
- HEX File Ready to burn.
- PCB Layouts in PNG, DOC and PDF formats.
If you like our projects and tutorial please share it with your friends on social networks using the sharing buttons below.
Subscribe!
Don’t miss any article get them right in your inbox! Subscribe to our feeds powered by Feedburner.
By
Avinash Gupta
www.AvinashGupta.com
me@avinashgupta.com
Facing problem with your embedded, electronics or robotics project? We are here to help!
Post a help request.



long wait on this and thank you.
tanks..
ou its a NEC format when will be ported this for RC5 protocol?
grt work sir……thanks a lot..controlling my room gadgets by using this is awsome 🙂
i like to make this ir remote what is the number of the ir receiver can i use tsop 1738 ir receiver pls help
can i do this using tv remote ?
@ragav
Any problem using as described ???
i want to do this project temporarily,i have all components,but 4 remote ,i thought it can be done usin tv remote. So do i need to change the prg if i’ve to use it ?Also if i change i<5 to i<3 in prg ,can i cntrl 3 loads usin 3 relays ?
i m getting 5 errors when i build this project, undefined referrence to Remoteinit, undefined referrence to GetRemoteCmd ??? i have added all
.c and .h files
hello Raghav,
am having the same problem.errors are shown as if yours and i added the header and source files but error is shown that such a file is not intialised.can you send me the actual header and source files along with the solution you carried out when you were doing the project
Hi Avinash….I’m great fan of your job and my dream is one day become myself a person like you, that knows a lot about micro controllers and programming. i’ve been studying a lot and your tutorials are my guide when I don’t know where to go anymore!! Would be nice if you, as a great teacher, creat a tutorial talking about DMX-512, for controlling leds and others light devices. Here in Brazil this kind of equipments are become very usual. tks a lot by your time and long life for you!!
@Fernando,
Thanks a lot. Its from the people like you, we get energy to go forward ! Keep reading and I will keep writing.
As for your request I will surely find time and come up with some info.
Hello Sir,
I like your “ATmega8 Based Multi channel IR Remote”, i want to buy it so give me its price & how i pay for it?
Have a nice day.
Hello Mr!!!!, I liked a lot your proyect, but i would like to ask you if its possible use more than one remote control with the same device, I mean two controls with the same input relay(the same channel)(CON).
Thanks. Bye!!
I’m facing a problem with the Multi channel ir remote project. I brought the pcb from the your shop and assembled it at home. When I power on the device the power LED goes on but load LEDs do not start to blink. I programmed the mcu(also Fuse Bytes Settings) as you told in the tutorial. Even I download the HEX file from your site, the problem still remains.
Please Help Me Out 🙁
Dear Sir,
I’m facing a problem with the Multi channel ir remote project.I tried this project but is not working.when I Load this project , it does not work.When I power on the device the power LED goes on but load LEDs do not start to blink. I programmed the mcu(also Fuse Bytes Settings) as you told in the tutorial. Even I download the HEX file from your site, the problem still remains.
Please Please Please Please Please Help Me Out Sir.
thanks
problem is same as above.tried even internal 8 MHz rc oscillator,but no result.It just seems to be hanged after start up,not a single LED is blinking.Got disappointed,having such a nice project,but all in vain!!say something av,you are the man!.
@cyborg dude internal oscillator arent reliable there freq changes with temperature, and in this project timers are used so you need to have good accuracy with timers, better try out with external crystal. One thing that could probably be wrong is that you burned the program as it is provided here and used 8 MHz freq that will surely screw up whole thing.
very – very nice project .can also provided it with PIC 16f72\676 ver. ? hope u do it sure shortly .I am saying about PIC 16f72\676 ver., because it is easily available in INDIA at low price @ INR 45\28.5.
i am wait hear
not yet reply , any body
hi all ._.
May Goddess Lakshmi And Lord Ganesha bless you With happiness Progress and prosperity On Diwali and In the year ahead…
thank you so much for this great job
Hello I appreciate your master work. I have a question: what remote control is suitable to this receiver, can you make a suitable transmitter to it with also atmega8 or atmega16, so that one with buttons to control corresponding relay.
regards
hi Avinash, thanks for your beautiful project.
i have some problem.
when I Load this project , it does not work.
I tested it & I understood even when INT0 pin is disconnected , ” GetRemoteCmd(0)” does not return RC_NONE & ” GetRemoteCmd(1)” does not wait for key pressed. In other words QFront is not equal to -1, even in the start of program.
please help me , what can I do?
thanks . HD
Dear Avinash,
I tried this project but is not working. Set up the fuses as per the requirements and burnt the .HEX code bu t it was worth less. In the texts u have mentioned INTERRUPT1, However in the software you have accessed INT0 through out. May be this is causing the problem. Please help me in building the project. Hmm, I have taken ATmega16 and External Crystal Osc of 16MHz.
sir,
you have done a grat job but i have some doubts.sir i m not getting remote.h i tried to understand it but i didn’t get me please tell me some ways to understand that code
please give me program for rc tv remote.
I’m facing a problem with the Multi channel ir remote project. I brought the pcb from the your shop and assembled it at home. When I power on the device the power LED goes on but load LEDs do not start to blink. I programmed the mcu(also Fuse Bytes Settings) as you told in the tutorial. Even I download the HEX file from your site, the problem still remains.
Please Help Me Out
Dear Avinash Sir,
I’m facing a problem with the Multi channel ir remote project.I tried this project but is not working.when I Load this project , it does not work.When I power on the device the power LED goes on but load LEDs do not start to blink. I programmed the mcu(also Fuse Bytes Settings) as you told in the tutorial. Even I download the HEX file from your site, the problem still remains.
Please Please Please Please Please Help Me Out Sir.
Would the source code also work with improved atmega88?
No
where exactly is that capacitor (C5) is connected ??
and did u a separate rechargeable battery for Vcc n 12v ?
C5 is called decoupling capacitor and it is placed close to the MCU, connected between the Vcc and GNDs pins of MCU.
are the resistance values 47k or 4k ?? its not clear in the schematic !!
and can u please provide the proteus file if possible ??
thank you !
Resistance values are 4K7 as clearly written on the schematic. How you say it is NOT clear?
Why you need Proteus file?
dear sir,
i want to see how simulation goes !! please provide it sir,,if it is available !!
thank you for ur quick replies!
@Sudarshan
How will you simulate the remote control? Please tell me that and I will give you the files.
i thought we can use push buttons in that place to switch the signal and simulate.
@Sudarshan, Please elaborate what you are telling? How you will connect buttons? How many? What signal they would produce and how?
Hi.
I have problem with start it, but when i touch crystal or capasitors between it, led are blinking with different speed, depend of type stuff I touch it. All parts are working, I check it with simply program with turn on/off led.
What can i do?
hi Dear Avinash,
i have problem no blink led
i make project and I programmed the mcu(also Fuse Bytes Settings) as you told in the tutorial. When I power on the device the power LED goes on but load LEDs do not start to blink
this is photo of pcb http://upload7.ir/images/04173760155288351077.jpg
I got a picture of the remote control. thats Right?
please help me
I thank you very much
Its out of stock
Kindly mail me when it is available
I want to buy in bulk
Kindly provide me details about bulk orders.
Thank you
Hello Sir I worked on your many projects and all are good , but in this when I burn hex file and set fuse bits the controller burn only once and then it can’t detect by burner , also not run on PCB. So please give me solution my 6 controllers already burn and unusable.
I’m facing a problem with the Multi channel ir remote project. I brought the pcb from the your shop and assembled it at home. When I power on the device the power LED goes on but load LEDs do not start to blink. I programmed the mcu(also Fuse Bytes Settings) as you told in the tutorial. Even I download the HEX file from your site, the problem still remains.
Please Help Me Out 🙁
Hi Mr. Avinash. how are you? I thank you for this nice and useful project. I build it on a breadbord. I’m Using “ATmega8A”. As you said, “When the device is powered on for the first time, the load LEDs start to blink one by one”. But it’s not blinking! I’ve double checked my circuit. the connection was right. Am i missing something? I have connected only one relay for testing. is that causing the problem? I saw those comments. others also facing this kind of problem. you have not reply! please reply and help us correcting the problem. Thanks!
@Pavel,
Use kit from our store.
Finally! It worked!!! I modified the code a little bit and it worked! thank you Mr. Avinash! I added LCD into it. you LCD library is awesome and easy to work with. But I have a question. How can I turn off the cursor if I want to?
pavel, good job.
plz give me ur modified hex code for this projt and also give me ur modified circuit diagram,
i will waiting for ur rply.
plzzzzzzz……
I am also facing the same problem with the circuit I made no blinking load LED I would be thankful if Mr. Pavel provide me the modification of the code. waiting for your kind reply
Hi, Pavel
I am also facing the same problem with the circuit I made no blinking load LED. I would be thankful if you provide me the modification of the code.
Waiting for your kind reply.
Same problem.. Need code..
Haii Pavel Sir
Can you please give the modified code and circuit please my Email is Nakzhatra@gmail.com
please sir
is it possible for Multi channel IR Remote with fan regulation…. if possible then please give me
Schematic for Multi channel IR Remote with fan regulation
with programme code
and all detail 🙂
i want project for college purpose….
Hello sir. I am interested in this Project . Can it be programmed such that when we power on the circuit, the status of the outputs remains same as the status of them when we power off the circuit previously.For example if relay 2 and 3 are in on state and i turn off the circuit. And when i again turn it on the Relay 2 and 3 should be in on state.
@Hem,
Yes it can be.
Sir,I have found my solution. I make 2 changes in my program.
.
.
.
void main()
{
//Main command received from remote.
uint8_t cmd;
//Set PORTB0 to 4 as output. Relays are connected here.
DDRB|=0b00011111;
PORTB=EEPROMRead(10); //I add this line to copy the content of location 10 of eeprom to portB.
//Initialize the IR Remote library.
RemoteInit();
.
.
.
.
And i also add
.
.
.
.
.
//Main program loop
while(1)
{
cmd=GetRemoteCmd(1);
uint8_t i;
for(i=0;i<5;i++)
{
if(cmd==KeyCodes[i])
{
PORTB^=(1<<i);//Toggle load
EEPROMWrite(10,PORTB); //It copies the status of output to eeprom location 10.
break;
}
}
_delay_loop_2(0);
_delay_loop_2(0);
}
.
.
.
sir
i didnt got it worked when i tried to do the work that youy said please help me
sir i didnt got my led blinks when i tried to start the project
hello sir,
this is nice project ,due to cheap wireless solution.
i want to ask that in this tutorial is it compulsory a 16Mhz oscillator, my board have 8 Mhz,and its not working!
thank you for sharing your knowledge.
hey Avinash , I’v have tried heart & soul about a month but failed.i have tried all of yours IR remote control project.Is it correct library for IR which you have included into all IR projects?IT always display a constant code number to lcd. why did you skip various questions of followers without replaying?Is it practically Tested project ?
Hi Avinash. 🙂
I am so glad that you are doing a great job.
I have followed all the instructions but still my led not blinking one by one, when I touch crystal then all the leds starts blinking very fastly. Please help me buddy I really want to make this project… 🙁
plz plz plz reply asap….
Thanx
Hiii Sir,
Is this fully assembled project available for buy?
hi
please explained “remot.c &remot.h ” Line by line
thanks
sir, I make this pcb at home but when I stated the circuit the circuit was on but after some time ic and 7805 hot.. and can not burn the programme