Hello friends,
In the previous tutorials of graphical lcd, we have learnt about the basic primitive and custom design functions. So drawing an analog clock on graphical lcd is a bit more advanced project. So it’s really exciting to do this project and for this we have to use a simple mathematical calculation and some programming techniques.
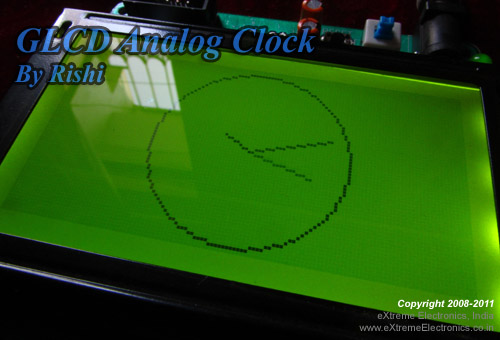 |
A GLCD Clock using ATmega32 |
Introduction:
Before going to clock design, we have to first understand its fundamentals. A clock has three hands i.e. hour, minute and second. For each hand, we have to include separate calculations but we have to also take care about the dependency of one hand upon another. That we will discuss in the later tutorials. For user’s simplicity, we have already designed a library including all functions suitable at user level. Now we will discuss the basic concept of the calculation of positioning the hands in a clock according to user level input.
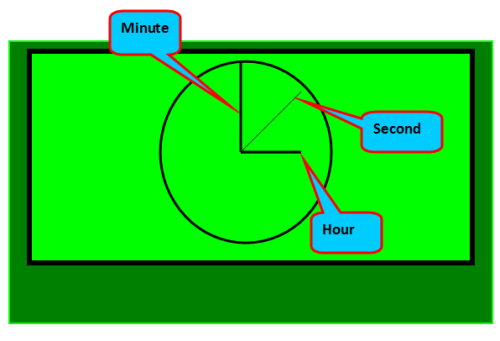 |
showing the layout of a clock on graphical lcd |
Explaining the Calculation part:
As previously mentioned, there is some mathematical and trigonometric calculation involved which will decide the position of the three hands on the clock according the user level input. So basically we have to decide the coordinate of the hands so that we will draw them properly. Lets come to some basic trigonometric formula for x-coordinate and y-coordinate calculation.
- x-coordinate=radius * cos(angle)
- y-coordinate= radius * sin(angle)
Angle should be in radians
radius will be predefined in the library for three different hands.
From above formula, we can decide the position of hands in pixel coordinates. But here we have to first calculate the angle and for there are different angles for three different hands. Here the angle will be measured in radian.
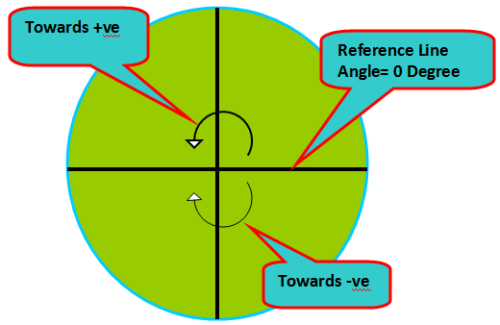 |
showing the reference line for the calculation |
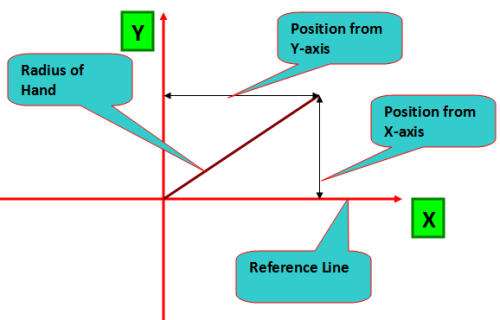 |
Diagram showing the hand position and its corresponding coordinates |
How to calculate angle
This is also not a big task until you are clear about the angle of rotation of the three hands. Now a simple formula will teach us how to decide the angle according to the user input values.
Angle-calculated (in degree)= (angle of rotation/no of total division it covers) * (no of division at which it is currently residing)
But as suggested in the picture, we have to calculate the actual angle from reference line.
So, actual-angle= 90- (angle-calculated)
To use the calculated actual-angle in calculation, we will properly convert it into radians.
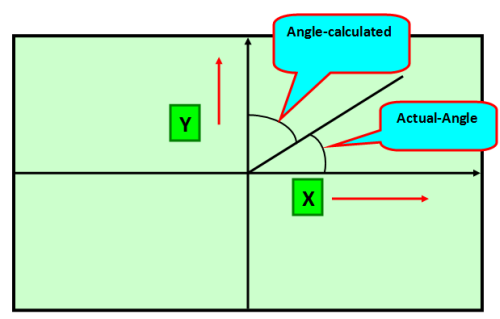 |
Diagram showing the different calculated angles of a hand |
Example:
For hour hand, it covers 360 degree in one rotation and at mean time it covers 12 divisions. So when at 3 o’clock, it’s angle will be
(360/12)* 3= 90 degree
So actual angle w.r.t. reference line= 90-(angle-calculated) =90-90=0 degree
By taking this concept of angle calculation, we can also do the same for minute and second hand.
Explaining the library function:
For user’s simplicity, we have already designed a library including all functions suitable at user level
void Draw_clock(uint16_t hr, uint16_t min,unit16_t sec);
We can draw the clock at the centre position(64,32) by using this function. So the input parameters will be hour, minute and second in two digit format. We have designed it according to our day to day practical situations.
Example:
void Draw_clock(20,10,15);
So the above will draw the clock according to the 24 hours time format. That means the time will be displayed as 08:10:10 and the clock hands positions will be adjusted accordingly.
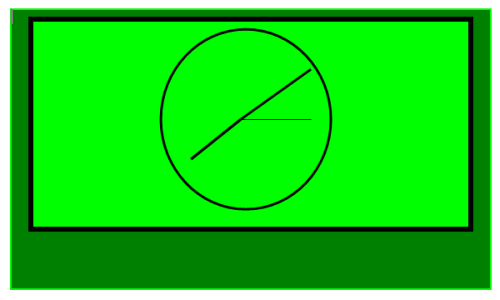 |
diagram showing the program output |
Program
/******************************************************************************

GLCD Analog Clock Demo.

   This demo shows how to draw an analog clock face with hour,
   min & sec hands.

 Visit
https://www.extremeelectronics.co.in for more details.

Author

   Rishikesh Tripathy

Copyright 2008-2011
eXtreme Electronics, India
All rights reserved.

***************************************************************************/

#include <avr/io.h>
#include <util/delay.h>
#include <gfx.h>

//include our already created header file for user level simplicity
#include "clock.h"

int main(void)
{


   //initialize the graphical lcd
   GFXInit();

   //write the function for drawing the clock
   Draw_clock(20,10,15);

   //update the graphical lcd
   GFXUpdate();

   //wait forever
   while(1)
    {

    }

}
Hardware
The hardware is our GLCD Development board but you can also make the circuit at home for that consult the following tutorial.
so with this tutorial, part-1 of the total series is completed. in the next part we will discuss, design of custom clock at user level. Will will be adding a RTC Module for time keeping purpose and also adding support for setting time using the push buttons.
Software
The program can be complied using AVR-Studio 4 (avr-gcc project), for a guide on installing AVR Studio and WinAVR please see the following tutorial.
The program requires the ProGFX graphic driver, please consult the following for more info
Finally the project needs the Clock Face Drawing library contained in the following files :-
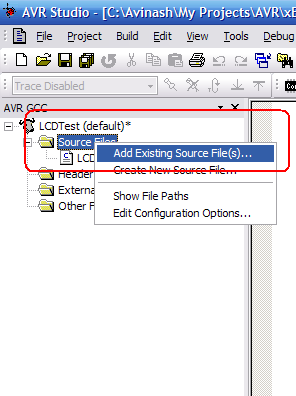
Copy both the files to your project folder and add clock.c to your AVR Studio Project. See image below. Please note that add .c in Source File section and .h file to header file sections only.
Finally we are giving away the HEX code ready to download to the GLCD Board and test the working quickly.
By
Rishi Tripathy
Facebook
Facing problem with your embedded, electronics or robotics project? We are here to help!
Post a help request.

nice one sir
Mr,Rishikesh Tripathy,
Very good application in GLCD, how to adjust clock with real time, also alarm , stop wathch fuction, conditioonal output etc are expected !!
regards,
Uttam
@Mr. Dutta,
Thanks for the suggestion. Since our GLCD board don’t have a I2C port, I have asked them to develop soft I2C routines. Once ready we will add a RTC module for real time display.
thank u so much for this great job
sir how we can read the value of any pixel from the graphic lcd using proGFX library….
graphical lcd data sheet & how to convert sting to binary conversion & image to binary conversion?
graphical lcd pin CS1 & CS2 works? and string to binary conversion & image to binary conversion?