RS232 is a asynchronous serial communication protocol widely used in computers and digital systems. It is called asynchronous because there is no separate synchronizing clock signal as there are in other serial protocols like SPI and I2C. The protocol is such that it automatically synchronize itself. We can use RS232 to easily create a data link between our MCU based projects and standard PC. Excellent example is a commercial Serial PC mouse (not popular these days, I had got one with my old PC which I bought in year 2000 in those days these were famous). You can make a data loggers that reads analog value(such as temperatures or light using proper sensors) using the ADC and send them to PC where a special program written by you shows the data using nice graphs and charts etc.. actually your imagination is the limit!
Basics of Serial Communication.
In serial communication the whole data unit, say a byte is transmitted one bit at a time. While in parallel transmission the whole data unit, say a byte (8bits) are transmitted at once. Obviously serial transmission requires a single wire while parallel transfer requires as many wires as there are in our data unit. So parallel transfer is used to transfer data within short range (e.g. inside the computer between graphic card and CPU) while serial transfer is preferable in long range.
As in serial transmission only one wire is used for data transfer. Its logic level changes according to bit being transmitted (0 or 1). But a serial communication need some way of synchronization. If you don’t understand what I mean by "synchronization" then don’t worry just read on it will become clear.
The animation below shows you how a serial transmission would look like (if you can see electricity).
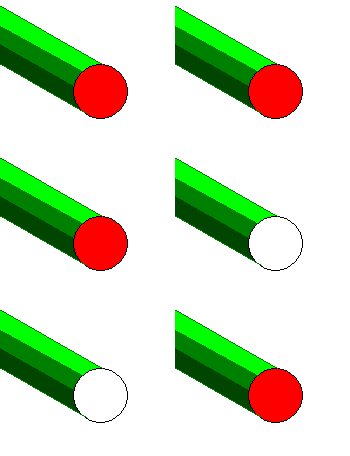 |
Fig- A Serial Line.(HIGH=RED & LOW=WHITE) |
Can you make out what data is coming? No because you are not synchronized. You need a way to know when a new byte start and when a bit ends and new bit start. Suppose the line is low for some time that means a ‘0’ but how many zeros? If we send data like 00001111 then line is first low for some time and high after that. Then how we know it is four ‘0’s and four ‘1’s?
Now if we add another line called the clock line to synchronize you then it will become very easy. You need to note down the value of data line only when you see the "clock line" high. Lets understand this with help of an animation.
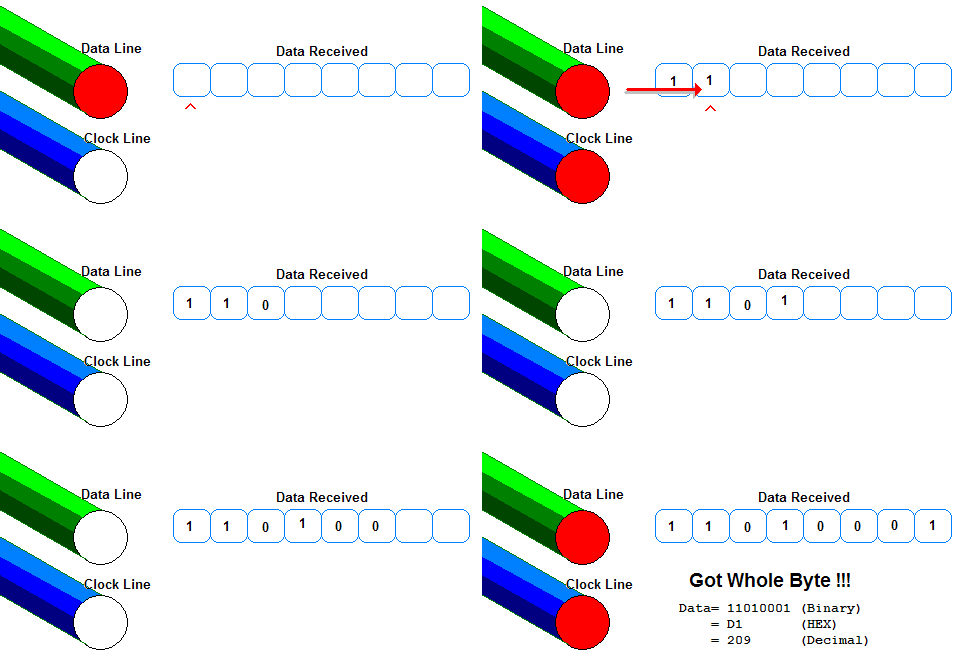 |
Fig- A Serial Line.(HIGH=RED & LOW=WHITE) |
Now you can see how the "clock" line helps you in "synchronizing" the incoming data. In this way many serial busses like SPI and I2C works. But USART is different in USART there is no clock line. So it is called UART – Universal Asynchronous Receiver Transmitter. In USART a start bit and stop bits are used to synchronize the incoming data the.
RS232
In RS232 there are two data lines RX and TX. TX is the wire in which data is sent out to other device. RX is the line in which other device put the data it need to sent to the device.
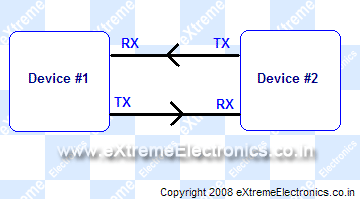 |
Fig- RS232 transmission. The arrows indicates the direction of data transfer. In addition to RX/TX lines there is a third line i.e. Ground (GND) or Common. |
One more thing about RS232. We know that a HIGH =+5v and LOW=0v in TTL / MCU circuits but in RS232 a HIGH=-12V and LOW=+12V. Ya this is bit weird but it increases the range and reliability of data transfer. Now you must be wondering how to interface this to MCUs who understand only 0 and 5v? But you will be very happy to know that there is a very popular IC which can do this for you! It is MAX232 from Maxim Semiconductors. I will show you how to make a level converter using MAX232 in next tutorial.
As there is no "clock" line so for synchronization accurate timing is required so transmissions are carried out with certain standard speeds. The speeds are measured in bits per second. Number of bits transmitted is also known as baud rate. Some standard baud rates are
- 1200
- 2400
- 4800
- 9600
- 19200
- 38400
- 57600
- 115200
- … etc
For our example for discussion of protocol we chose the speed as 9600bps(bits per second). As we are sending 9600 bits per second one bits takes 1/9600 seconds or 0.000104 sec or 104 uS (microsecond= 10^-6 sec).
To transmit a single byte we need to extra bits they are START BIT AND STOP BIT(more about them latter). Thus to send a byte a total of ten bits are required so we are sending 960 bytes per second.
Note: The number of stop bits can be one or two (for simplicity we will be using single stop bit)
There is one more bit the parity bit but again for simplicity we would not be using it)
RS232 Data Transmission.
The data transfer is done in following ways
Transmission
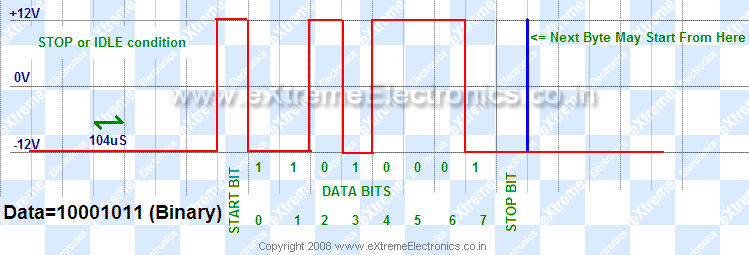
- When there is no transmission the TX line sits HIGH (-12V See above para) ( STOP CONDITION )
- When the device needs to send data it pulls the TX line low for 104uS (This is the start bit which is always 0)
- then it send each bits with duration = 104uS
- Finally it sets TX lines to HIGH for at least 104uS (This is stop bits and is always 1). I said "at least" because after you send the stop bit you can either start new transmission by sending a start bit or you let the TX line remain HIGH till next transmission begin in this case the last bit is more than 104uS.
Fig- Data Transmission on RS232 line. |
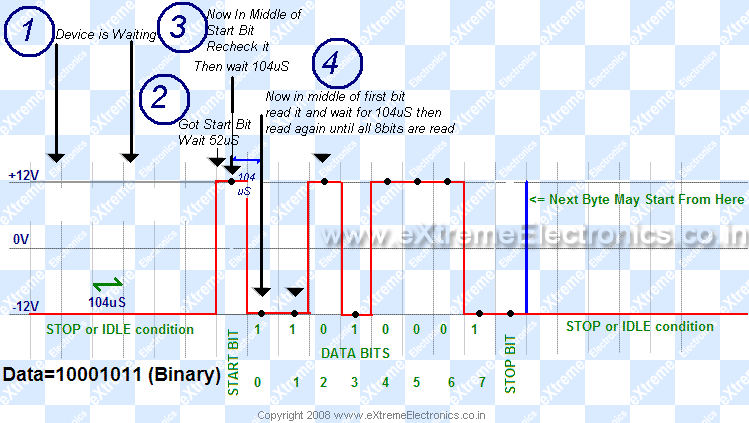
Reception
- The receiving device is waiting for the start bit i.e. the RX line to go LOW (+12V see above para).
- When it gets start bit it waits for half bit time i.e. 104/2 = 51uS now it is in middle of start bit it reads it again to make sure it is a valid start bit not a spike.
- Then it waits for 104uS and now it is in middle of first bit it now reads the value of RX line.
- In same way it reads all 8 bits
- Now the receiver has the data.
Fig- How the Receiver receives the data on RS232 RX line |
To be continued …
Ok friends that’s it for now meet you in next tutorial. Till then good bye!
If you are facing any difficulties in understanding the topic, feel free to post a comment and I will surly help you as soon as possible.
Other Parts of this Tutorial
- RS232 Communication – The Basics
- RS232 Communication – The Level Conversion
- Using the USART of AVR Microcontrollers.
- Using the USART of AVR Microcontrollers : Reading and Writing Data
- Visualize ADC data on PC Screen using USART – AVR Project
Facing problem with your embedded, electronics or robotics project? We are here to help!
Post a help request.



Pingback: Using the USART of AVR Microcontrollers. | eXtreme Electronics
its very very interesting…
Pingback: Using the USART of AVR Microcontrollers : Reading and Writing Data | eXtreme Electronics
Its very difficult to find the next tutorial, Is it possible for you to give the link of next tutorial when some tutorial finished . In the its only written this tutorial is finished meet in next tutorial but how to go for next tutorial is not given . CAN YOU PLZZZZ GIVE LINK FOR NEXT TUTORIAL not only for this but for all tutorial
Hello,
Go to “AVR Tutorials” section from the right sidebar navigation. There are all tutorials are listed.
thank you very much.
gud. thanx
Pingback: AVR ATMEGA8535 : USING USART [SERIAL COMM] « My English Blog
good tutorial.
any code for debounce problem.
can you suggest how to use TI cc2500 . i have Atmega 16L kit. it would be nice of you if you send me any link of Atmega16 schematic with cc2500.
nice work !!!
Avinash Gupta you are a Guru! I take my hat for you.
I am 48 years old, and only today i could really (really underlined) RS232.
Thanks man!
Its guys like you who make the Internet a great place to spend time and learn.
…much appreciation, from Sávio Gonçalves – PORTUGAL
@Savio
Thanks Mr Savio for your kind words !!!
Thank you so much…really interesting
Avinashji , hats off for u.
i hav done b.tech. but this type of explain i havenot seen anywhere. may this site live long life
Hi! frnds,
I have 3+ exp. in embedded domain and I have done lots of communication protocol base projects. I think this documents really gives you better gudeline. I am greatful to gives a thanx to technical person who Involved such great kind of activity.
Thanx & Regards
Sumit Gupta
hi ,
i want to know how can we send time using hyper terminal using rs 232
there is a minor error i found in the article is that in the reception example
Quote
“When it gets start bit it waits for half bit time i.e. 104/2 = 51uS now it is in middle of start bit it reads it again to make sure it is a valid start bit not a spike.”
well i m pretty sure that 104/2 is 52 and not 51.
the explanation of the articles are just aweinspiring(awesome+inspiring)and gr8 for beginners in the field of robotics and electronics.
Lastly,Thank you for your contribution.
Regards,
Gaurav Parida
Thanks for that excellent info. i never understood this comms protocol until now.
Dude! Thanks for this website! I love avr’s and your website and tutorials has helped me tonnes!!!!!!!!!!
Keep it up!!!
sir, thanx 4 all the info u provided……very useful…..
my ques is that wat does this mean….
baudrate=25; when baudrate is 2400….
wat hav to b writtten for 9600…. and by which criteria…
regards
@Kamran Where it is written ???
“baudrate=25; when baudrate is 2400”
Thanks a lot dear…
Such a gr8 tutorial!!!
Hi Avinash,
Thanks for the excellent information of RS232 basics.
It is really Awesome !!!!!!!
If one goes through this tutorial, then the he will never be in need to refer sometime later again on this protocol. It gets embedded permanently in the brains.
Thanks
Sunil
hi, may i ask u a question?
if following condition is satisfied,
start bit =0;
stop bit =1;
data bits=8;
no parity;
then rs232 may encounter some problems, when transmitting 10101010 followed by 10101111 as below.
0,10101010,1,0,10101111,1,…
Assume that rs232 missed start bit of “0,10101010,1”,then it will start at next “0”.It’s 101010,1,0,1.Now, rs232 will receive a wrong number but without error report.
How to resolve this kind of problems?Does it mean that rs232 is not so much reliabel?
Thanks a lot!
Regardly
xxgeneral
2010-04-08
Hi Avinash,
If you have any basic information on RS485, can you please post it.
Regards,
Sunil
Pingback: RS232 Communication using PIC18F4520's USART - PIC Microcontroller Tutorial | eXtreme Electronics
Hi Avinash,
If receiver is not ready and there is no handshaking, how transmitter and received can be synchronized? Receiver could be ready at any point during data bits also and can treat any low level as Start bit and thus will always read wrong data. Any idea about how to synchronize such a system without handshaking?
Regards,
Sameer
where is the next tutorial?
@Abhishek
The NEXT Tutorial is here
https://extremeelectronics.co.in/avr-tutorials/rs232-communication-the-level-conversion/
https://extremeelectronics.co.in/avr-tutorials/using-the-usart-of-avr-microcontrollers/
https://extremeelectronics.co.in/avr-tutorials/using-the-usart-of-avr-microcontrollers-reading-and-writing-data/
gud tutorial..
it really interesting….
your tutorials are good and have helped me a lot
Wow! Your tutorial is very good! Thank you so much for making me understand! Yeah! Yipee!
thanks a lot , really good and simple tutorial . i am starting with AVR , and i am glad that found your tutorial that soon ,
keep on!!!!
Pingback: Interfacing RFID Reader with AVR MCUs - AVR Tutorial | eXtreme Electronics
I found this really simple to understand an would like to see more tutorials .
i also would like to know how to interface a PIC18F MC o a breadboard to a PC an also wat software to use to see the desired output of the microcontroller . i need to know this for my project on eectronic glove using flex sensors which senses the finger movement and displays the coressponding alphabet on the screen .
thankyou
Pingback: RS232 Communication – The Level Conversion | eXtreme Electronics
I like to interface a RF module with PIC18f8722 through RS232. Hope you can help me in this.
thank you Avinash, this is a fantastic tutorial. I learned lots of thinks from this. So keep it up. Thank you very much again……
Thanks Avinash.
its super tutorial but i want the obvious details of the transmission and receivers its my wish…………………………. thx for ur clarification
I have a simple doubt here ,how it understands stop bit why it is not taking it 1 . How it understands that it is a stop bit only ??
hello.. will u please give me the description about usart,i2c,spi,rs232,max232 and the interfacing and use of them with mc. thank u.
“” You can make a data loggers that reads analog value(such as temperatures or light using proper sensors) using the ADC and send them to PC where a special program written by you shows the data using nice graphs and charts etc.. actually your imagination is the limit!””
SOMEBODY, PLS HELP ME… HOW TO WRITE A SPECIAL PROGRAM THAT SHOWS THE DATA USING NICE GRAPHS AND CHARTS
Pingback: GSM Module SIM300 Interface with AVR Amega32 | eXtreme Electronics
thanks sir this is really very helpful for begineers ….,includig for me…
Pingback: How can i call application of android mobile phone from Atmega32 using rs232 or usb?
Thank you so much , its very interesting and helpful
SAID from Morocco
thanks !
Science for better life.
Thanks a lot.
great job, it’s short,clear and free of ambiguities
sir,Amazing tutorial.the language is too easy and vary compatible.
Wonderful tutorial!
Well written for amateurs yet still rich. Amazing
Pingback: 17- SPI down, Uart on the way. | AESTE
Pingback: RF Communication Between Microcontrollers – Part III
Thanks for writing the RS232 explanation. Very well done. How about RS422 and RS485. Good Job!!!
Thank you for this , learnt a lot
thank you fo this details
“Reception
The receiving device is waiting for the start bit i.e. the RX line to go LOW (+12V see above para).
When it gets start bit it waits for half bit time i.e. 104/2 = 51uS now it is in middle of start bit it reads it again to make sure it is a valid start bit not a spike.
Then it waits for 104uS and now it is in middle of first bit it now reads the value of RX line.
In same way it reads all 8 bits
Now the receiver has the data.”
plz give me the source
hats off you man!!!!
very clearly explained.i really enjoyed it. thanks for such a nice tutorial.
Thanks…………very use full……….
Thank you
Great tutorial, broke it down perfectly for me, I have always struggled to fully grasp it. (Fist bump)
@Chris,
Thank you for letting us know your feedback!
Nice tutorial on RS232…thank you
Thank you too
superb….. u explained very clearly.
thanks avinash.
Thank you
Thanks a lot…!!!
Pingback: How to Read PIC Data-Sheet and Add a New Functionality to PSLab Firmware – Pocket Science Lab