ADC (Analog to digital converter) is a commonly used peripheral. We use it everyday to interface with several analog sensors. Many times a nice visualization of ADC data is required during learning about new sensors. For example you just bought a analog sound sensor, and try to do some fast experiments that how it performs. In this situation this valuable tool will come to your help. The tool I called is ADCGraph2, it is being with me from a long time but today I thought of sharing it publicly. I wrote this tool somewhere 4 years back to experiment with sensors like LDRs, Temperature Sensor, Audio input etc. The public version is improved form of my in-house tool.
The ADCGraph2 is a simple Windows Based Tool that connect with an ATmega32 microcontroller (running a special firmware) to receive ADC data from any selected channels (0-7) and show a nice graph on PC screen. You can connect the output of any analog sensor to any ADC input pin and view the sensors output on PC screen in form of a nice graph. The connection is over USART Port so you need a USB to UART Bridge.
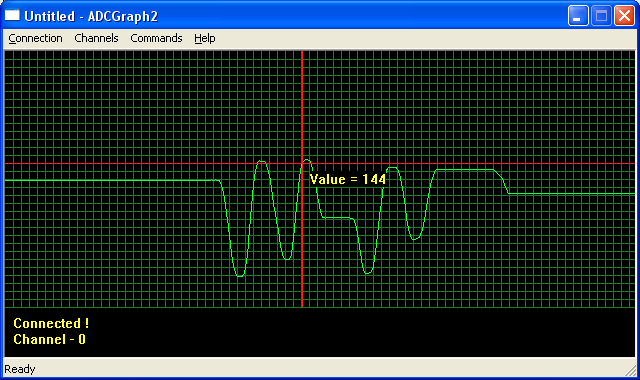 |
ADCGraph2 for Windows |
Using the software is simple. First make sure that xBoard v2.0 is flashed with the ADCGraph firmware (details on building the hardware is given below) and connected to USB to UART Bridge which is connected to your PC (Make sure drivers are installed, link to driver are given on this page).
Click "Connect" from the "Connection Menu"and select the COM Port where USB to UART Bridge is present. To find out which COM Port number is assigned to the USB to UART Bridge see this article(scroll to the end).
Select Baud Rate as 19200. And click OK.
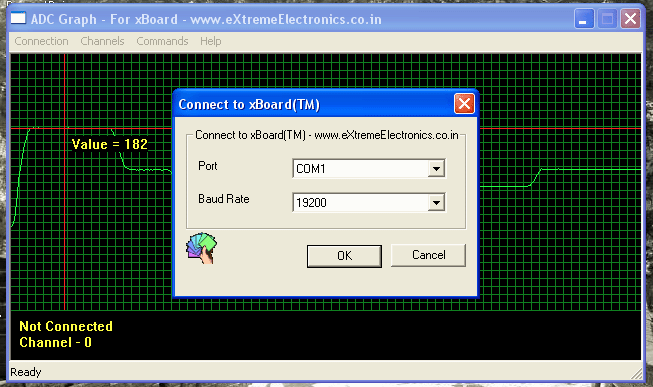 |
ADCGraph2 Connect Dialog |
If everything was OK then a success message will be shown.
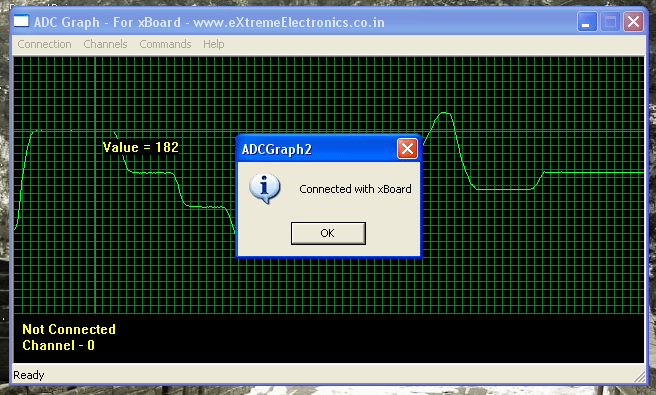 |
Connection Success! |
Now you can start sampling the ADC by Selecting "Start Sampling" from the "Command" menu. On start-up channel 0 is selected, so it will show the analog value that is present on ADC0 pin. The pin out of ADC port on xBoard v2.0 is given below.
PORTA/ADC Port |
You can change the input channel anytime by selecting it from "Channels" menu.
For testing purpose you may apply signals to the ADCx pins using a variable resistor (POT) as a potential divider as described below.
Connect the LEFT PIN to GND, RIGHT PIN to 5v and the CENTER PIN to INPUT of ADC with a 10K resistor in series. Now you can rotate the POT to vary the Input to ADC from 0v to 5v.
 |
Fig: POT Connected to ADC of AVR |
Hardware for ADCGraph2
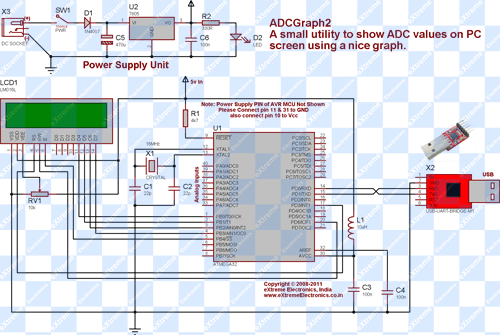
The complete schematic for the ADCGraph2 hardware is given below.
AVR ADCGraph2 Schematic |
After turning the system on, adjust RV1 until the display is clearly visible.
If you are using xBoard v2.0 then you do not need to solder anything. Just hook up the LCD module at its connector. And connect the USB to TTL Module using 3 burg wires. Please refer to the following article on how to connect LCD module to xBoard and locate the UART pins.
USART, JP4, JP2 and JP3 |
Make sure jumper JP4 is in Off position. (The image above shows JP4 in On position so make sure its reverse of that!)
Help Us!
We try to publish beginner friendly tutorials for latest subjects in embedded system as fast as we can. If you like these tutorials and they have helped you solve problems, please help us in return. You can donate any amount as you like securely using a Credit or Debit Card or Paypal.
We would be very thankful for your kind help.
Downloads
- ADCGraph2 Package (including PC Software, Firmware and this documentation)
You can then burn the firmware hex file to your target ATmega32 MCU using any AVR Programmer. You also need to set the two fuse bytes in the MCU to the following value.
- High Fuse Byte = 0xC9
- Low Fuse Byte = 0xFF
Important Notice: The project will NOT work at all if the Fuse bytes are NOT programmed.
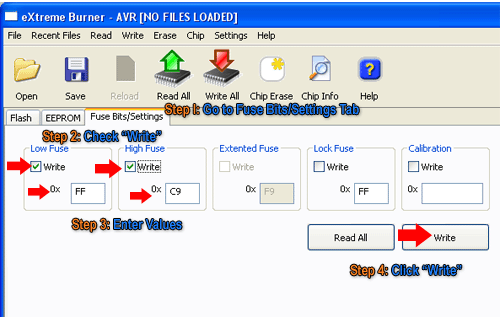 |
Fig.: Setting the Fuse bytes. |
By
Avinash Gupta
www.AvinashGupta.com
me@avinashgupta.com
![]()
![]()
Facing problem with your embedded, electronics or robotics project? We are here to help!
Post a help request.




Really, really an useful practical project,I am excited to experience it. Hope codes will be available. Few things I want to know,
(1)Can we see all ADC channels (suppose all are used)
(2)Is there any provision to buffer the data and can see the old recorded data.
(3)Where to scale the parameter value , is it in AVR software or in PC software,
Again I must say it is one of your most potential project than ever.
Regards,
Uttam Dutta
@Uttam Dutta,
Currently this is very basic project with NO support for buffers and simultaneous multichannel view. Data scaling is not provided.
Which software do you use to make the schematics?
It is very nice.
Regards,
electrojit
Widely used and most efficient (of course) software for not just creating schematics but also for simulating circuits is Proteus ISIS
can u please e-mail me the source code of the microcontroller? I hope to make it a dual channel one for my class project.
Regards,
Dhrubo
Please check out ADC and UART tutorials… u’ll be able to write your own code.. dey are superb.. !!!
Nice!!!
Can u please give me source code via E-mail.
It will be very helpful for my university project.
Best Regards,
Nazmul
Please check out ADC and UART tutorials… u’ll be able to write your own code.. dey are superb.. !!!
ur tutorials and comnents that u are seeling are very good thanks for providing such informative stuffs
Mr. Avinash,
I am getting nothing in”•ADCGraph2 Package ” after downloading, probably there is some problem with the ZIP folder. Please have look on this, Once files are avilable then I can try this project.
Regards,
Uttam
@Uttam Dutta
Check again. All files are OK.
Mr. Avinash,
Thank you, now it is there.
Regards,
Uttam
Mr. Avinash,
can u please e-mail me the source code of the microcontroller? I hope to make it
Regards,
buga
Please check out ADC and UART tutorials… u’ll be able to write your own code.. dey are superb.. !!! Only ADC values are forwarded to UART i guess….
very good tutorial, i need to enhance this tutorial so please i need the source code, would it possible to send it?
thanks
Mr. Avinash,
first of all, Thank you
just wanna know some
can i remove the LCD connection cuz what i only want is to view the results of the sensor on PC screen
so i connect only the usb connection
that’s right?
Thank you
Thats an interesting project. There are a few variations of this available on the net for those who are asking for the multi-channel ones. Just google AVR oscilloscope and you’ll be doing good.
What I majorly liked was the ‘scanalogic’ on http://www.ikalogic.com/scanalogic_home.php – Its a logic analyzer, not an oscilloscope but quite nice. I use it quite often to check signals.
Apart from that Avinash ji have you ever noticed the output of this graph when you connect an LDR under a tube light? It shows a graph as if there are two sin waves opposite each other. Its quite interesting. 🙂
Just for sharing…
Could you email me the source code, I would like to use something like this for a project at school?
Can you please mail me the source code anshumanyp007@gmail.com
I’ve sent you an email (to support@extremeelectronics.co.in) regarding the source code, a couple days ago, as you’ve told in the text file. but I don’t get any respond yet. please check out my mail..thanks.
Using LCD Module with xBoard v2.0
Take look! you posted the wrong picture, instead of LCD Receiver 434MHz! why?
Using LCD Module with xBoard v2.0
———————————
Take a look! you posted the wrong picture, instead of LCD, Receiver 434MHz! why?
the board has an option for both 434 Mhz reciever and LCD… try to look at more pics of board…. Using LCD or Reciever isnt mandatory but it helps in debugging and more…
Avinash, Hi. My name is steve. I have been following your tutorials and learned a lot so far! I admit, I am not using one of your boards but an STK500 connected to my laptop via a rs232 – usb converter cable. Can you tell me, is it possible to use your adc graphing software using an rs232 to usb cable or do i need the converter board? Could I just connect from the “Spare” rs232 output of the STK500 board??
Thanks v much.
Steve.
Can u please tell the format in which the ADC values must be send to UART inorder to get dem displayed making sure that selecting channel thing is working…
Hello Mr. Avinash, Your tutorials are fantastic, they have taught me a lot!
I really wanted to know as to how you made the terminal software which makes the graph on the pc.
It would be really nice if you posted a tutorial on that.
Thank You. 😀
Hi,
can you please send me the source code for the software? I would like to build a similar application for my university project and I am searching for example like yours.
Thanks
Paolo
Avinash sir,
Doesn’t this software work with ATmega16?
May I know why you waana make it with ATmega16 if I have told to make it with ATmega32 ?
mr avinash,
great job u r doing for present n future embed people.d way of ur tutorials r very nice. god bless u* gv reply to my e mail to donate in my level.by d by what is d cost extreme of v2.0?
come wid more stuff. all the best**
m.bangaru raju,
hyderabad,a.p
@Mr. Bangaru,
Thanks a lot 🙂
Pingback: Using the USART of AVR Microcontrollers. | eXtreme Electronics
Hello Avinash,
This project is just AWESOME. I tried connecting the software to the com port but it says “Cannot open port! COM1. But I am using COM1 to connect my PC with ATMEGA32 via RS232. I use 8Mhz clock. Can you please mail me the source code so that I can make necessary changes in setting baurd rate .
Thanks in advance.
Thank you for this project , It is very useful for developing sensors .
Between may i ask for following tutorials and blogs
1. How you deal with static and how you handle your microcontrollers ( like what precautions you take and what equipments you use antistatic wrist band , antistatic mats etc , how you connect these).
2. And this one a bit personal , what about your workspace , i am assuming it will be a great place to see and it is equipped with many instrumentations. since there are many blogs on internet about how they arrange their workspace and equipments . A little advice of do’s and donts form your personal experience will be very useful .
and we havent seen your photograph or any video , pardon me if I missed something . ( just assuming the prospect of meetng you accidently somewhere).
Thank you .
I have planned a tutorial on making a workspace for electronics, robotics and embedded development. But I personally feel that they way I work is NOT accepted by most people or students in India. What they want is cheapest setup and most crude way of doing thing. Most people I talked, prefer wasting their time than spending money on right tools! Even the most important of them! They say they don’t have much budget. But surely they have money when I comes to buying 8K Reebok shoes !
Quite true.I agree to disagree :).
Can you please mail me the source code 0503wlsdn@gmail.com
Hi, Im jeffery. Really appreciate for this software. Can i ask for the source code as i want to study how its works. Your help is appreciated. Thanks again.
Hi, can i request the source code. Your help is really really appreciated. Anyone can send it to me: kong_jeff@hotmail.com
Thanks again.
Best regards,
Jeffery Kong
Thank you for many tutorials.
The ADCGraph2 is very useful tool.
Would you explain about the communication protocol format for ADCGraph2?
Thanks in advance.
Your tutorial is really very good & I would like to get the code of it…
Can you please mail me the same…
Hello,
can you plz tell in which language you built this tool? This is good & I want to build similar for my thesis project…
I’m really amazed that in all these comments nobody ever asks what is the sample rate? I don’t see it anywhere in the documents or the web site. So, can you share that please? Thanks, –Phil M.
i need the source code, would it possible to send it?
Please send me the sourcecode to arun9584@yahoo.com
We send codes only to our customers!
Please send me the sourcecode to krezapasand@gmail.com.TU
Hi,
how can I edit the language file “avrprog.mo” in “eXtreme Burner” for me?
The German version has some erors.