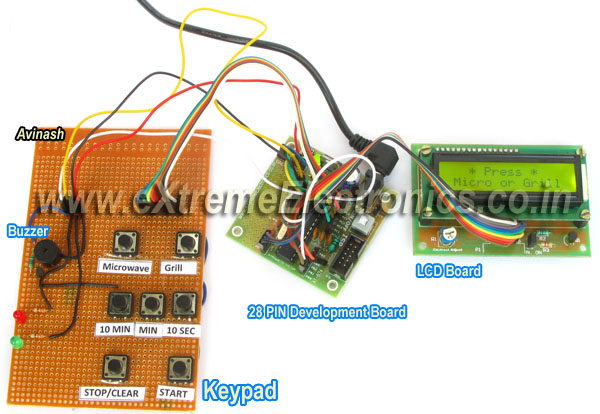
Microwave Controller’s User Interface
|
|
|
Fig. Microwave Timer using AVR ATmega8 |
The user interface has the following parts.
Output Device: A
16×2 alphanumeric LCD Module is used as the main output device. It can display numbers, alphabets and few symbols. It can show two line and each line can have 16 characters. The backlight enables the text to be visible even in dark.
A buzzer beeps when the system receive input from the user and the input is successfully processed. For example if the user presses
10 MIN button to increment timer by 10 min and this is successfully carried out the buzzer beeps. But if the timer is already at the maximum setting (90 minutes) the operation could be carried out, so the buzzer does not beeps.
This buzzer also beeps a few time when the food is ready (countdown is finished)
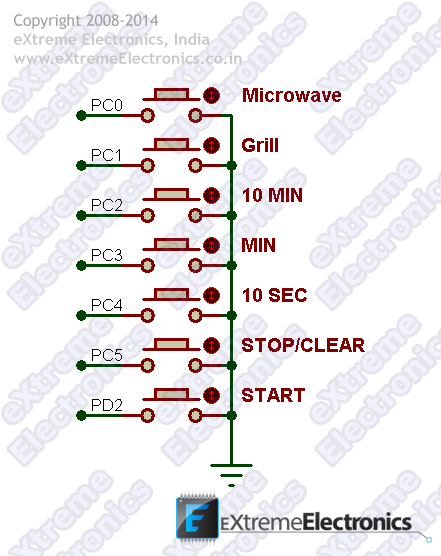
Input Device: Input from user is received by a keypad which has seven push buttons. The details of button is given below.
| Button |
Function |
| Microwave |
Selects Microwave mode. |
| Grill |
Selects Grill mode. |
| 10 MIN |
Increment timer by 10 minutes. |
| MIN |
Increment timer by 1 minute. |
| 10 SEC |
Increment timer by 1 sec. |
| STOP/Clear |
- If the microwave is in on condition, this button turns it off and pauses the timer count down.
- If you are setting the timer, this button clears the time to 00:00. Useful if you have made some mistake during setting.
|
| START |
- If you have paused the timer to open the oven and check the status of food, this button will resume the timer.
- After time is setup you need to press this to turn the microwave (or grill).
|
Controlling Relays
Their are two controlling relay
- The microwave relay: this controls power to the microwave function.
- The grill relay: this controls the power to the grill function.
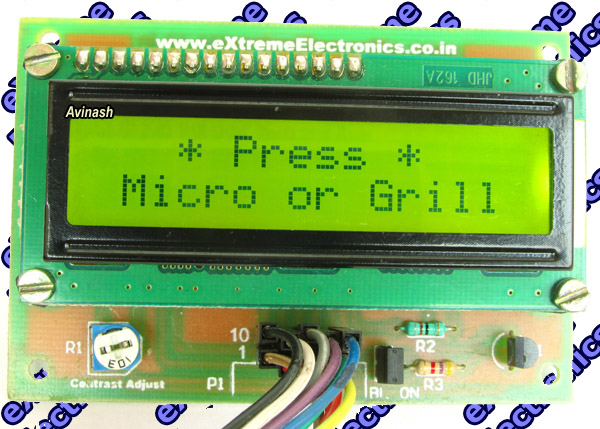
Using the Microwave Timer
The first screen of timer asks you to choose one of the operating modes. You can choose from
Microwave or
Grill functions. Press the respective button on the keypad to choose the mode.
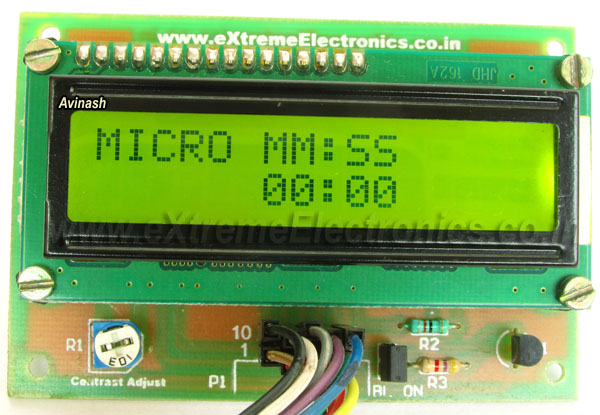
Then you are presented with the following screen.
At the top left it shows the mode i.e.
Micro for Microwave mode and
Grill for Grill mode. You can press the mode keys to change the mode in this stage too.
|
|
|
Fig. Switching between modes. |
In the center it shows the timer. Here you can set an “on” time for up to 90 minutes.
To set the time you can use the following buttons
| 10 MIN |
To increment the timer by 10 minutes |
| MIN |
To increment the timer by 1 minute |
| 10 SEC |
To increment the timer by 10 seconds |
three buttons are provided to quickly set up desired time.
Once you are satisfied with your set time, press the
START button. This will switch on the selected function (microwave or grill) and start the countdown. You can see the time decrementing on the LCD screen.
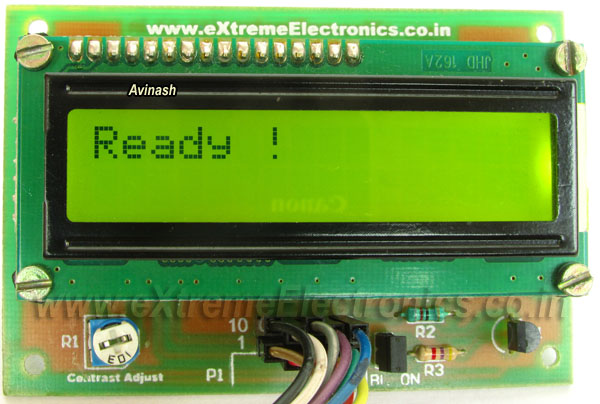
When the countdown reaches 00:00 the relay associated with the selected function (microwave or grill) will be switched off. And the screen will show
Ready ! Message. When the food is ready buzzer will give long beeps few times. So that the person cooking is alerted.
At this stage (Ready) press any key to go to home screen.
Clear Function
You can press
STOP/Clear button to reset the time to 00:00 during time entry.
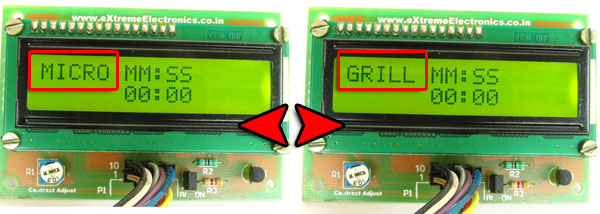
Change Mode Function
You can press
Microwave or Grill buttons (function select buttons) to change the function anytime during time entry.
|
|
|
Fig. Switching between modes. |
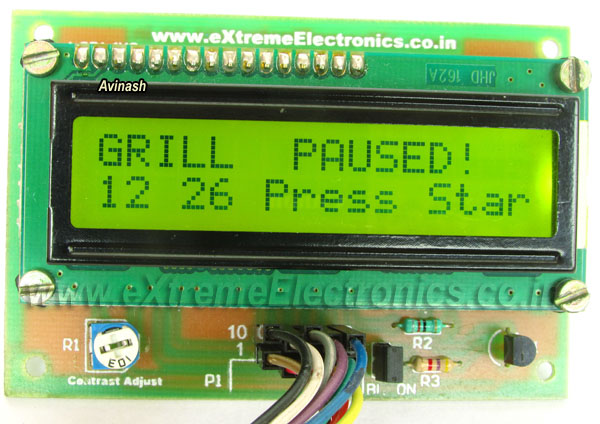
Pause Function
You can press
STOP/Clear button during countdown phase to pause the timer and to switch of the associated relay of selected function (microwave or grill). This will enable you to open the door of oven and have a look at the food being cooked. During this, a
PAUSED! message will be displayed on the LCD. Once you are done with your inspections you can close the door and press the
START button. This will resume the cooking process.
|
|
|
Fig. Switching between modes. |
Quick Start Function
Quick start function does the following tasks at the single press of button.
- Select mode Microwave.
- Set on time to 30 sec.
- Turn on the microwave.
- Start the countdown.
You can press
START button at the home screen to achieve quick start.
Once the count down has started you can press
START to increase on time by 30 seconds.
Hardware for Microwave Timer
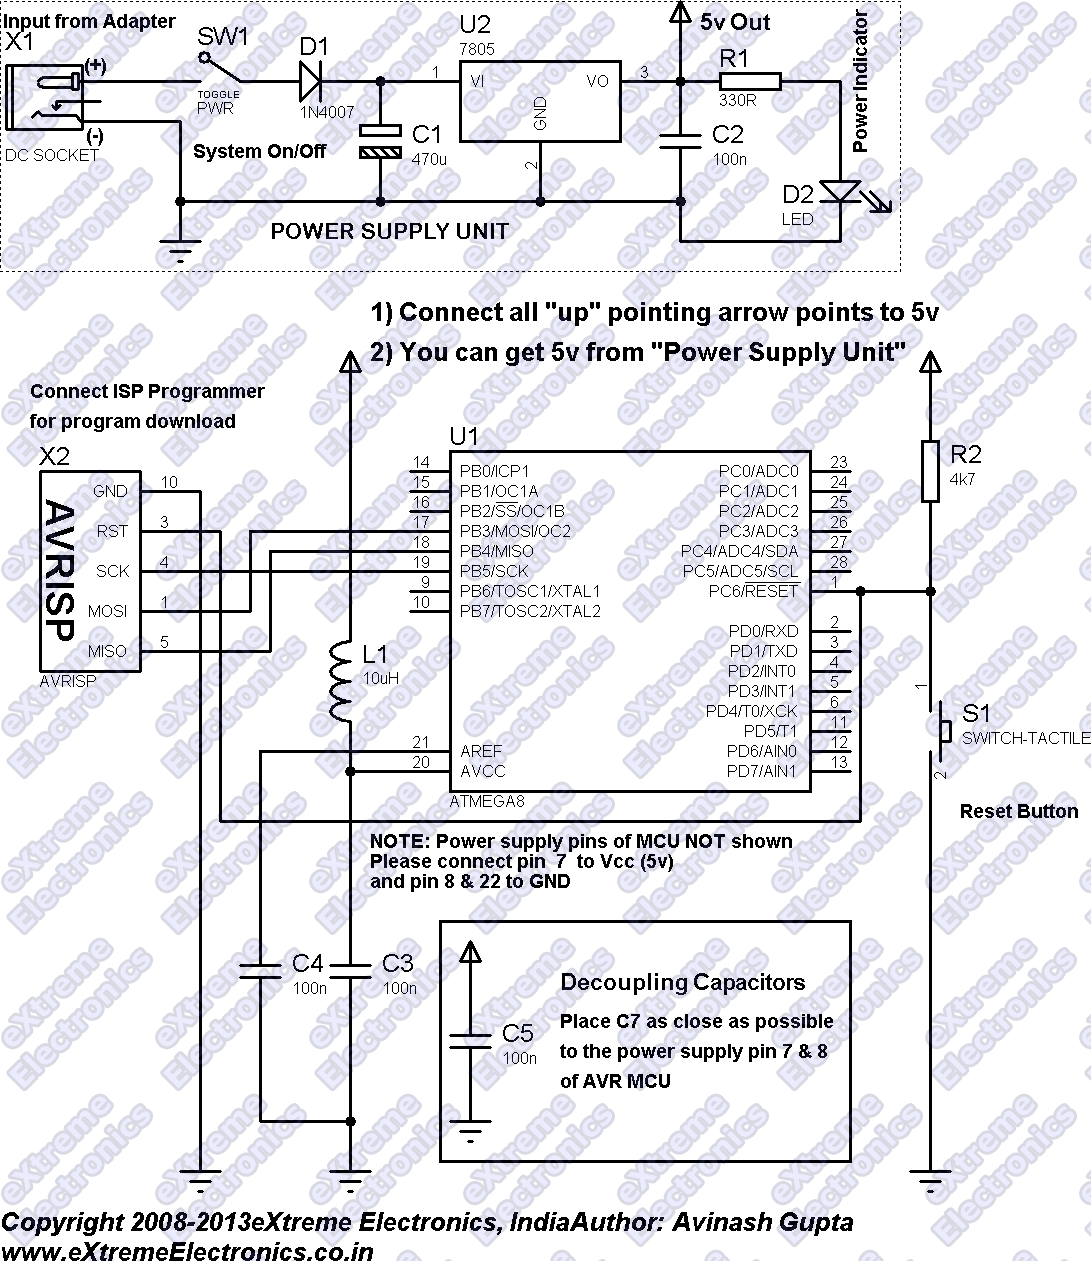
The timer is built around
ATmega8 AVR microcontroller. This is a very small single chip computer which runs a small program stored in its flash memory. This program provides all the functionalities of the timer.
Our
microcontroller controls the LCD Module, the relays and the buzzer. It receives user input from the keypad.
MCU Core
Microcontroller chip requires a basic circuitry for functioning. This consists of the following parts.
- Power supply: This provides 5v regulated DC power to the microcontroller. It receives input 12V DC from a 12V adapter.
- ISP Header: In circuit programming header. Used to easily connect an ISP Programmer to upload programs to the Microcontroller.
- Reset Circuit: A pull up resistor holds the RESET pin of MCU to high state. This is required for normal operation.
|
|
|
Fig. ATmega8 Basic Circuit |
Bill of Materials
We use a ready made
low cost development board for this purpose.
|
|
|
Fig. 28 pin AVR development board |
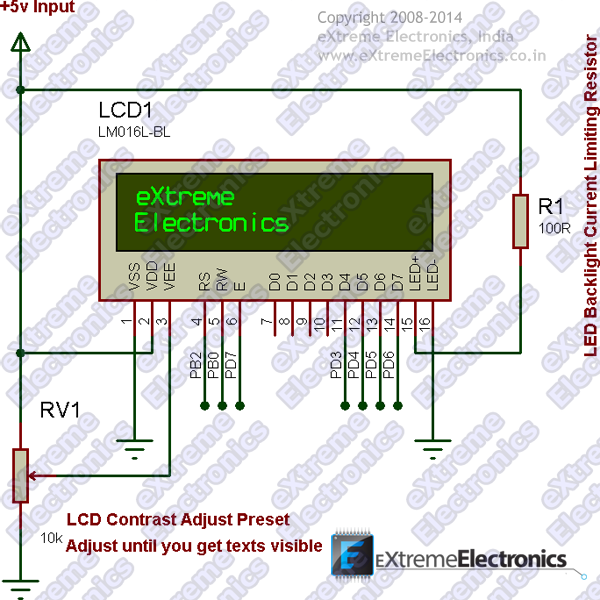
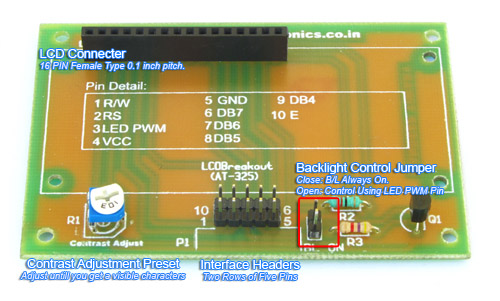
LCD Interface
The schematic for LCD interface is shown below.
Bill of Materials
| S. No. |
Item |
Reference |
Value |
Quantity |
| 1 |
1/4 Resistor |
R1 |
100 ohms |
1 |
| 2 |
Preset |
RV1 |
10K MAX |
1 |
| 3 |
16×2 LCD Module |
LCD1 |
– |
1 |
Again we use ready made
LCD Board for this purpose.
connect the LCD Board with development board with the help of
single pin female to female wires as per the table given below.
| Type |
LCD Board |
AVR Dev Board |
| Control Pins |
1 R/W |
PB0 |
| 2 RS |
PB2 |
| |
3 LED PWM |
NOT CONNECTED |
| Power Pins |
4 VCC |
5V OUT (VCC) |
| 5 GND |
GND |
| Data Pins |
6 DB7 |
PD6 |
| 7 DB6 |
PD5 |
| 8 DB5 |
PD4 |
| 9 DB4 |
PD3 |
| Control Pins |
10 E |
PD7 |
Keypad
Schematic for keypad is shown below.
This can be made by soldering
push buttons on a
general purpose PCB.
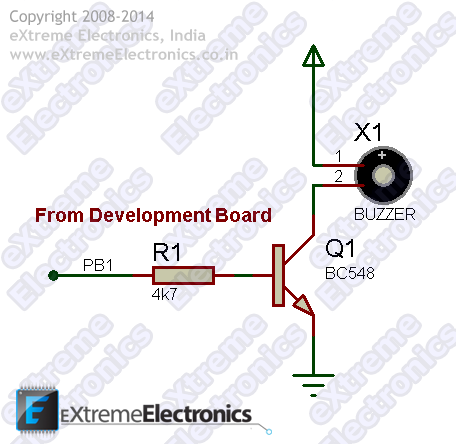
Buzzer Interface
Buzzer interface consists of a
5v PCB mountable buzzer, a driving transistor and base resistor.
Bill of Materials
| S. No. |
Item |
Reference |
Value |
Quantity |
| 1 |
1/4 Resistor |
R1 |
4.7K ohms |
1 |
| 2 |
Transistor |
Q1 |
BC547 |
1 |
| 3 |
5v Buzzer |
X1 |
– |
1 |
Program
/*
 * MicrowaveController.c
 *
 * Created: 12/17/2013 6:01:36 PM
 *  Author: Avinash Gupta
 */


#include <avr/io.h>
#include <avr/pgmspace.h>
#include <util/delay.h>
#include <avr/interrupt.h>

#include "lib/lcd/lcd_hd44780_avr.h"
#include "lib/keypad/keypad.h"

#define MICRO_DDR DDRD
#define MICRO_PORT   PORTD
#define MICRO_POS PD0

#define GRILL_DDR DDRD
#define GRILL_PORT   PORTD
#define GRILL_POS PD1

#define BUZZER_DDR   DDRB
#define BUZZER_PORT  PORTB
#define BUZZER_POS   PB1

#define ON  1
#define OFF 0

#define TYPE_MICRO   1
#define TYPE_GRILL   2

void Init();
void SetMicro(uint8_t state);
void SetGrill(uint8_t state);

void SetTime();
void CountDown();

void SetBuzzer(uint8_t);
void Beep();

volatile uint8_t m=0;
volatile uint8_t s=0;
volatile uint8_t timer_running=0;

uint8_t type=TYPE_MICRO;

int main(void)
{
   Init();

   while(1)
   {
      LCDClear();

      LCDWriteFStringXY(3,0,PSTR("* Press *"));
      LCDWriteFStringXY(1,1,PSTR("Micro or Grill"));

      uint8_t k=GetKeypadCmd(1);

      switch(k)
      {
         case KEY_MICRO:
         {
            Beep();
            type=TYPE_MICRO;
            SetTime();
            timer_running=1;

            if(type==TYPE_MICRO)
               SetMicro(ON);
            else
               SetGrill(ON);

            CountDown();

            break;
         }
         case KEY_GRILL:
         {
            Beep();
            type=TYPE_GRILL;
            SetTime();
            timer_running=1;

            if(type==TYPE_MICRO)
               SetMicro(ON);
            else
               SetGrill(ON);

            CountDown();
            break;
         }
         case KEY_START:
         {
            Beep();
            //QUICK START
            type=TYPE_MICRO;
            if(!timer_running)
            {
               s=30;
               timer_running=1;
               SetMicro(ON);
               CountDown();
               break;
            }

         }
      }

   }
}
void Beep()
{
   SetBuzzer(ON);
   _delay_ms(25);
   SetBuzzer(OFF);
   _delay_ms(25);
}
void Init()
{
   //Set relay io lines as out put
   MICRO_DDR|=(1<<MICRO_POS); //Microwave relay
   GRILL_DDR|=(1<<GRILL_POS); //Grill relay


   //Set Buzzer line as output
   BUZZER_DDR|=(1<<BUZZER_POS);

   //Initialize LCD Module
   LCDInit(LS_NONE);

   //Initiallize keypad lib
   KeypadInit();

   //Init TIMER1 for main timer operation
   TCCR1B=(1<<WGM12)|(1<<CS12)|(1<<CS10); //CTC Mode prescaller 1024
   OCR1A=976;
   TIMSK|=(1<<OCIE1A);
}
ISR(TIMER1_COMPA_vect)
{
   if(!timer_running)
      return;

   if(s==0)
   {
      if(m==0)
      {
         //off
         timer_running=0;
      }
      else
      {
         m--;
         s=59;
      }
   }
   else
   {
      s--;
   }

}
void SetMicro(uint8_t state)
{
   if(state==ON)
   {
      MICRO_PORT|=(1<<MICRO_POS);
   }
   else
   {
      MICRO_PORT&=~(1<<MICRO_POS);
   }
}
void SetBuzzer(uint8_t state)
{
   if(state==ON)
   {
      BUZZER_PORT|=(1<<BUZZER_POS);
   }
   else
   {
      BUZZER_PORT&=~(1<<BUZZER_POS);
   }
}
void SetGrill(uint8_t state)
{
   if(state==ON)
   {
      GRILL_PORT|=(1<<GRILL_POS);
   }
   else
   {
      GRILL_PORT&=~(1<<GRILL_POS);
   }
}

void SetTime()
{
   uint8_t min=0;
   uint8_t sec=0;

   LCDClear();

   while(1)
   {
      if(type==TYPE_MICRO)
      {
         LCDWriteFStringXY(0,0,PSTR("MICRO"));
      }
      else
      {
         LCDWriteFStringXY(0,0,PSTR("GRILL"));
      }

      LCDWriteFStringXY(6,0,PSTR("MM:SS      "));

      LCDWriteIntXY(6,1,min,2);
      LCDWriteIntXY(9,1,sec,2);

      LCDWriteFStringXY(8,1,PSTR(":"));

      uint8_t key=GetKeypadCmd(1);

      switch(key)
      {
         case KEY_TS:
            if(min<90)
            {
               Beep();
               sec+=10;
               if(sec==60)
               {
                  sec=0;
                  min++;

                  if(min==91)
                  min=90;
               }

            }

            break;
         case KEY_M:
         {

            if(min<90)
            {
               min++;
               Beep();
            }
            break;
         }

         case KEY_TM:
         {
            if(min<90)
            {
               min+=10;
               if(min>=90)
               {
                  min=90;
                  sec=0;
               }
               else
                  Beep();
            }

            break;
         }

         case KEY_STOP:
            Beep();
            min=0;
            sec=0;
         break;

         case KEY_GRILL:
            Beep();
            type=TYPE_GRILL;
            break;

         case KEY_MICRO:
            Beep();
            type=TYPE_MICRO;
            break;

         case KEY_START:
         {
            if(min>0 || sec>0)
            {
               Beep();
               m=min;
               s=sec;
               return;

            }

         }

      }


   }
}

void CountDown()
{
   LCDClear();

   while(1)
   {
      uint8_t k=GetKeypadCmd(0);

      if(k==KEY_STOP)
      {
         //Pause
         timer_running=0;

         SetMicro(OFF);
         SetGrill(OFF);

         LCDWriteFStringXY(7,0,PSTR("PAUSED!"));
         LCDWriteFStringXY(6,1,PSTR("Press Start"));

         Beep();

         while(1)
         {
            k=GetKeypadCmd(1);

            if(k==KEY_START)
            {
               Beep();
               break;
            }
         }

         timer_running=1;

         if(type==TYPE_MICRO)
            SetMicro(ON);
         else
            SetGrill(ON);

         LCDClear();

      }
      else if(k==KEY_START)
      {
            if(m<=89)
            {
               if(s<30)
               {
                  s+=30;
                  if(s>=60)
                  {
                     m++;
                     s=s-60;

                  }
                  Beep();

               }

            }
      }

      if(m==0 && s==0)
      {
         LCDClear();
         LCDWriteFStringXY(0,5,PSTR("Ready !"));


         SetMicro(OFF);
         SetGrill(OFF);

         //Alert
         for(uint8_t i=0;i<4;i++)
         {
            SetBuzzer(ON);
            _delay_ms(500);
            SetBuzzer(OFF);
            _delay_ms(500);
         }

         GetKeypadCmd(1);

         Beep();

         return;
      }
      LCDWriteIntXY(0,1,m,2);
      if(s%2)
      {
         LCDWriteStringXY(2,1,":");
      }
      else
      {
         LCDWriteStringXY(2,1," ");
      }

      LCDWriteIntXY(3,1,s,2);

      if(type==TYPE_MICRO)
      {
         LCDWriteFStringXY(0,0,PSTR("MICRO"));
      }
      else
      {
         LCDWriteFStringXY(0,0,PSTR("GRILL"));
      }
   }

}
Downloads
By
Avinash Gupta


This is Amazing Project 😀
I will wait next of porject..
SIR
PL SENT FULL DETAIL AND COST
hi sir,
I had seen the project”Microwave Controller using ATmega8 – AVR Project”,its very nice.i would like to by the project can you send the cost details of the project as soon as possible
thankyou
thanks you my avr weak
how to compile microwave-controller-using-atmega8-
AVR studio but hex file not create
Sir,
I use AVR Studio 4 & ‘eXtreeme burner” software, (with USB AVR Programer, obtained from ‘eXtreeme electronics’) to burn the chip, so can I use the same set-up for this project? Are the libraries used in this project, present in AVR Studio 4 ? Pl. give a hint…
Thanx & Regards….
how to connect relay,, wheres the ready connection for micro and grill relay? 😮
I cant find those two file included in the program from library lcd.can u please post that files
I cant find file “lib/keypad/keypad.h” which one is included in the program .can u please post that files
I cant find two files
“lib/lcd/lcd_hd44780_avr.h”
“lib/keypad/keypad.h”
can u please post this 2 files.i like this project very much.please post, its urgent for my final year project.
Hi
Very good job!
but can you share the file of library: keypad and lcd_hd44780_avr?
Regards mAx
unable to download the source code,pls help me
@saumen
Only customers and loyal readers are allowed to download.
Only customers and loyal readers are allowed to download???? HOW TO BECOME loyal readers PLEASE EXPLAIN
great project. Can u please send the fuse bit to burn .hex file
thanks
Sir, how to add a door switch function fo safety?.
thank you for this great article.
I have read this project. I will certainly build one. My microwave keys are now not working. will replace the controller. My micro/and Grill has exactly the same functionality described in the post. I will begin the build in December as presently I am travelling. As per loyalty I am associated with your store since around 2007. I find your posts very informative and useful
Sir very good project i need one more program to add this project same as girl program for convenience i add thermostat to control temperature please help me
Nice job ? …but now you change the Codes as per with Arduino Used simple language to benifit more people
Nice job ? …but now you change the Codes as per with Arduino IDE Used simple language to benifit more people
nice work
you had done nice job
Hello sir,
What is the Fuse bit for mega8…?
Thanks
can I use atmega328p instead of atmega8 ? what changes will be made in the code then?
Hello,
Thank you for your interest in our website. But this code is made for ATmega8 only and thus cannot be used with other models. Hope this solves your problem.
Very good project sir. Nice explanation.Many many thanks.