This tutorial deals with downloading and installing ProGFX graphic engine. ProGFX is a free and easy to use embedded graphic library that can control several display modules and can run on AVR, PIC and ARM MCUs. In this tutorial we will make a ProGFX graphical application with Atmel AVR ATmega32 MCU using AVR Studio and WinAVR (C Compiler). So lets begin.
Downloading ProGFX engine.
Please download the ProGFX engine from the following link.
- Download ProGFX v1.0
Installing ProGFX Engine.
You need WinZIP to extract the files to your hard disk. Please extract it to root of any drive like "C:". Following Folders will be created.
- C:\progfx\include
- C:\progfx\lib
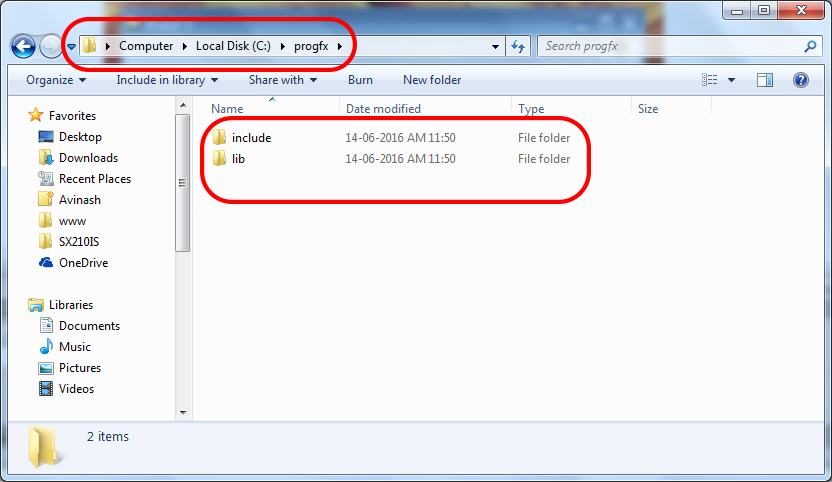 |
Folders Created after extracting the ProGFX package |
Note that core of the engine is contained in two folders named "include" and "lib" but there may be some others folders too, like "Help" depending on your version of ProGFX engine.
Creating a Graphical Project using AVR Studio.
The basic tools required for developing with AVRs are
- Atmel Studio (Integrated development environment with integrated C compiler)
- eXtreme Burner AVR (to transfer program files to chip)
These tools must be installed and set up correctly as described in the following tutorial.
Start AVR Studio and you will be presented with the following screen.

Atmel Studio 6 Startup Screen
The First screen shown up after the AS6 has started is the Start Page. The start page helps you quickly create a new project or load your previous project without wasting much time.
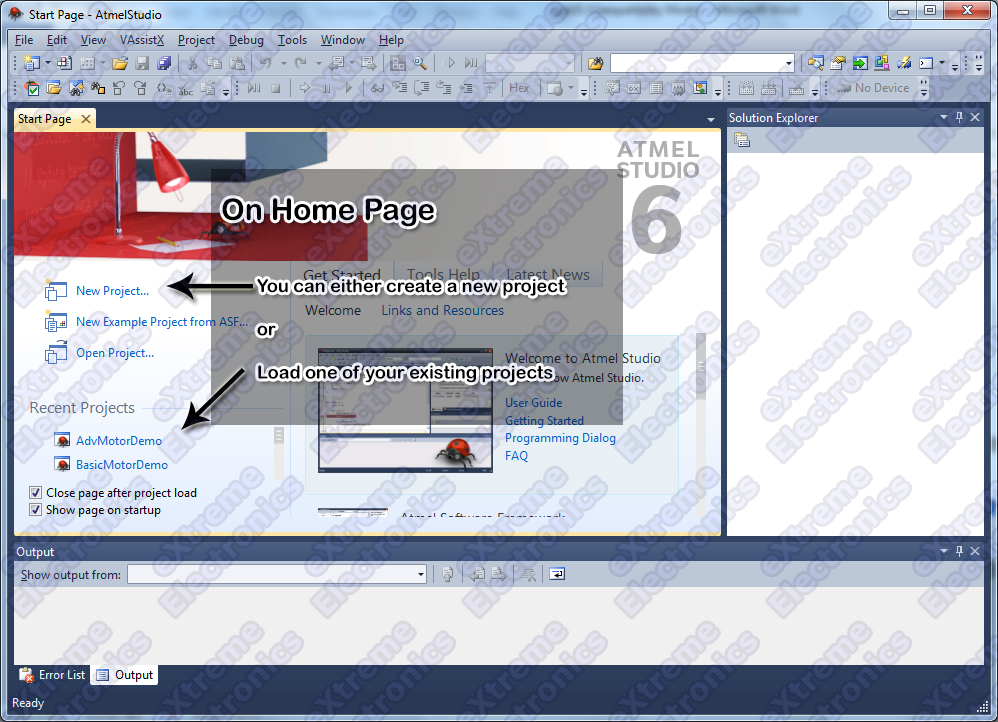
Atmel Studio 6 Home Screen
To create a new project we select New Project … option from the Start Page.

AS6 will show you the New Project Wizard as shown in the above image. From the project template area (Installed Templates) select C/C++ as the project template. From the project type area select “C Executable Project” . After that fill out the project details at the bottom like project name, its location on your PC etc. Finally Hit OK.
Name the project: hello_graphics
Next to the project detail window comes the Device Selection Window. That lets you choose the target MCU for your project. For GLCD projects we will use ATmega32, so select that from the device list.
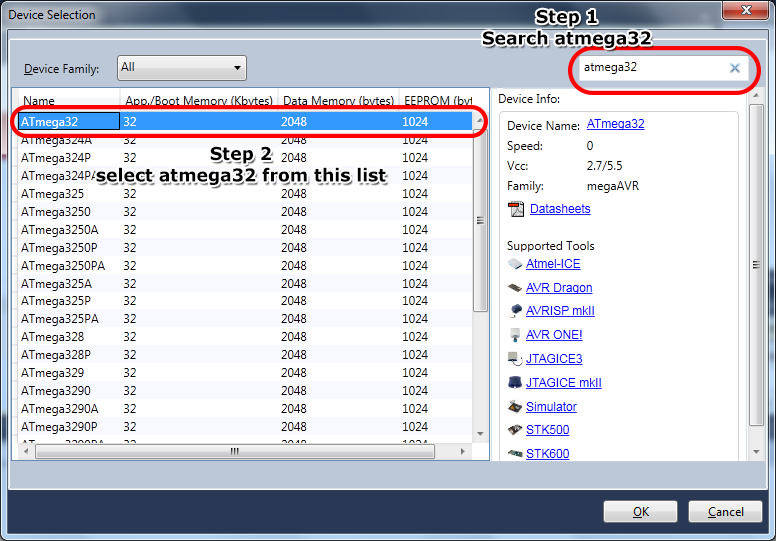
Device Selection (ATmega32 in this case)
After we completed the “New Project” wizard, we are presented with the Atmel Studio 6 main window. So let us get introduced with the various parts of Atmel Studio 6 window.
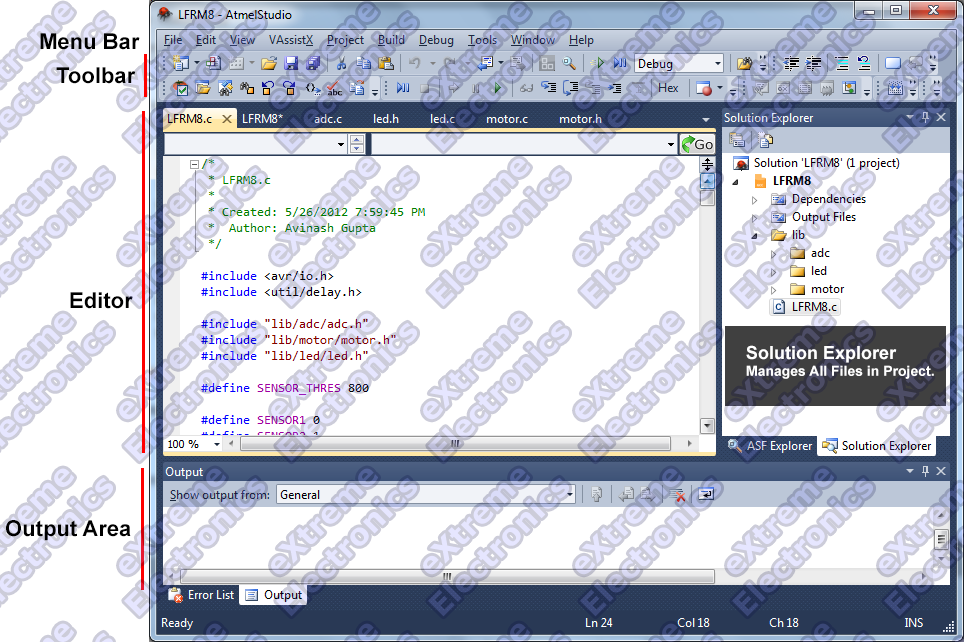
- The Menu Bar – Common in all application. This has commands for all tasks organized in sub menus like File , Edit, View etc.
- The Tool Bar – It is also common in all application. The tool bar has selected commands from the Menu Bar which the user uses often. They have small icons for each command.
- The Main Source Editor – This window is the main editor for the source files in the current project. you can load any file (in your current project) by double clicking it in the solution explorer (discussed shortly). The editor has spell check and auto complete features.
- Solution Explorer – In AVR Studio 6 a solution can house one or more projects. In our case we simply keep one project per solution. Solution Explorer is discussed in more detail in next section.
- Output Window – Most build tools like the compiler, linker etc are command line tools. When we issue command such as the Build command, their output is captured and shown in this area. Also errors or warning if any are also shown in this area.
The next very important thing you need to do is to configure the project. Some people thinks the program is a self contained entity. But this is wrong.
One another configuration required in project at which the target processor is running. Since Atmel AVR microcontrollers can be clocked from a variety of clock sources and can be made to run at any speed below 16MHz (newer AVRs can be clocked upto 20MHz!). So we must tell the compiler at what speed our chip is running to that it (the compiler) can calculate delays properly.
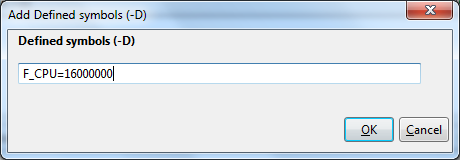
This is defined as a preprocessor symbol.
Don’t worry much about the name if you can’t get it. Simply understand it like a constant which is available in all you C source files in the project.
A preprocessor symbol has a name like F_CPU (which stands for frequency of the CPU) and a value like 16000000 (16MHz)
It can be defined using the project properties dialog.
To bring up the project properties dialog you can do any one of the following.
- Hit Alt+F7 from the keyboard.
- From Project menu select <project name> Properties (last item on Project menu).
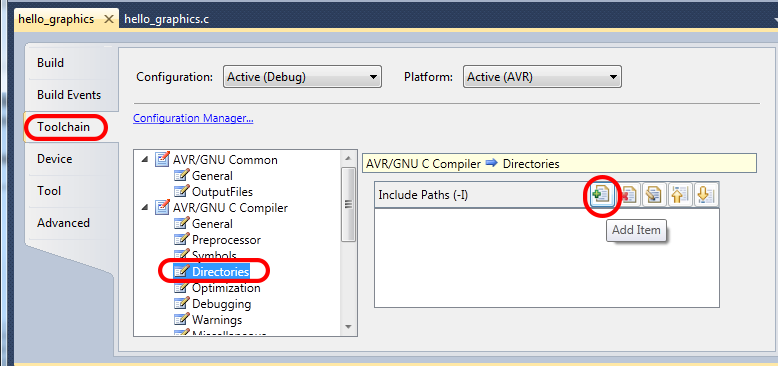
Once you have opened the project properties dialog. Navigate as shown in the image below.

This will open up the following dialog, where you can enter the symbol F_CPU and its value 16000000.
All of our AVR development boards are clocked using a 16MHz external crystal so we have defined F_CPU=16000000
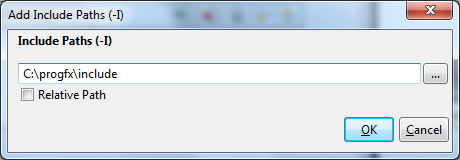
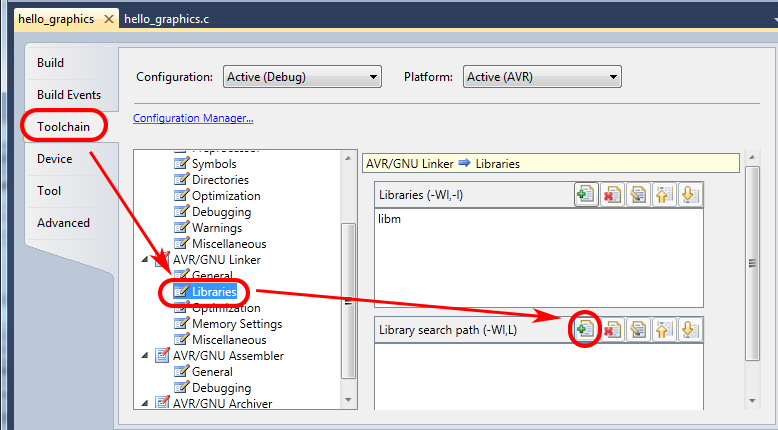
Next we will setup our project so that compiler can find include and library files of ProGFX.
Setting up include path
Similarly add folder for the library (lib)
The final step is the building the project. It means compiling all the c source files in the project to generate machine code file (.o files, or object files) and then finally linking all object files to generate the executable file (.hex) file. This hex file is ready to be loaded into the microcontroller chip.
To build the project, select Build Solution from the Build menu. You can also use keyboard shortcut F7 to build the project.
Double Click On the "HelloGraphics.c" from the project file area on the LEFT hand side of AVR Studio. You will be presented with a blank file. Just copy/paste the code given below.
/********************************************************************

Hello World Project Using ProGFX Engine. The application just prints

the text "Hello GraphicX!" at the center of 128x64 Graphical LCD
Module.

For More Information See

http://www.ProGFX.org

ProGFX makes it easy to interface graphical LCD modules with
embedded microcontrollers. Currently Atmel AVR MCUs are supported.

Latter PIC and ARM MCUs will also be supported.

Development Environment : AVR Studio v4.17
Compiler : WinAVR 20090313

Written By
Avinash Gupta
me@avinashgupta.com

********************************************************************/

#include <gfx.h>
#include <font.h>
#include <fonts/arial12.h>

void main()
{
   //Initialize ProGFX Engine
   GFXInit();

   //Select a font
   GFXSetFont(Arial12);

   //Write a simple string at center
   GFXCenterText("Hello GraphiX!",GFX_COLOR_BLACK);

   //Update the display
   GFXUpdate();

}
After entering code save the file. Then from the "Build" menu select "Rebuild All". If you did every steps carefully then the project will compile without any problem and you will be get a HEX file. The hex file is found inside the "default" folder inside your project folder. In this case the file should be "HelloGraphics.hex". You can program this hex file to the MCU using any standard ISP Programmer.
The hardware required to run this project is described in detail in the following tutorial.
After running the demo you will get an output similar similar to the images shown below.
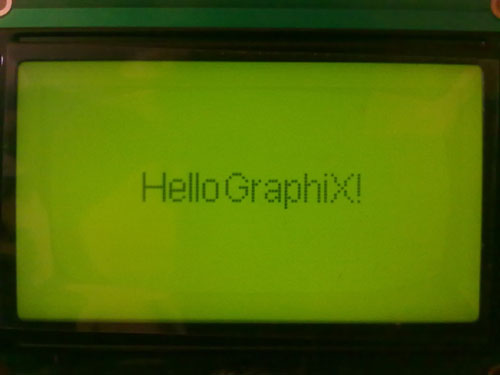 |
Atmel AVR Based Graphical LCD Demo |
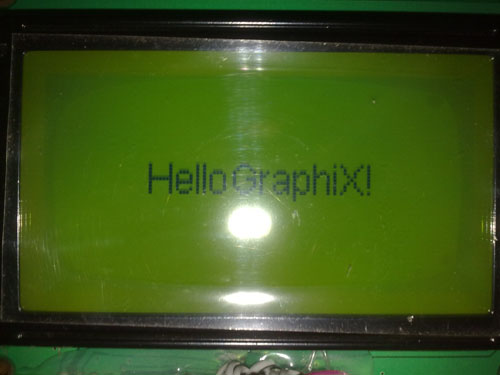 |
Atmel AVR Based Graphical LCD Demo |
If you get NO output on the LCD Panel then :-
- Adjust the RV1 variable resister until you get proper display.
- Confirm that HIGH fuse is programmed to C9 (HEX) and LOW fuse is programmed to FF (HEX)
- Check all connections.
- Check that 16MHz crystal is connected to AVR MCU
- Build Circuit exactly as shown in "Interfacing Graphical LCDs with AVR Microcontrollers."
About: ProGFX is a free project started by eXtreme Electronics India to promote use of graphical modules in new embedded projects. The development of ProGFX project requires money and LOTs of time. So please buy Graphical LCD Modules from our online store to help us in return. Currently these modules are only supplied within India.
Downloads
- Download ProGFX v1.01
- "HelloGraphics.hex" this hex file is ready to burn to ATmega32
Other Parts of the Tutorial Series
- Part I – Introduction to GLCD and Hardware Setup
- Part II – Downloading and Installing ProGFX!
- Part III – Explains Graphic Primitive Functions.
- Part IV – Font and Text Handling Functions.
By
Avinash Gupta
Facebook,
Follow on Twitter.
www.AvinashGupta.com
me@avinashgupta.com
Pingback: Interfacing KS0108 based 128x64 Graphical LCD with AVR Microcontroller. | eXtreme Electronics
Hello sir,
first of all I congratulates and thank u for your great and successful contribution in the field of embedded system.
I was eagerly waiting for this project and its very nicely explained.
Sorry in advance, but I want to ask you that how actually we are writing any words in GLCD. We are directly using the library function to write anything. I want to know exactly how things are going on just like you have explained for simple LCD, if possible.
Anywayz, thank you again for your help.
Hello Sir
Is there any way to modify the pins where the GLCD must be attached, or they are harcoded in the library? I think that being able to change them will make the library a lot more powerful and used.
Thanks,
W
Hi,
Nice demo, Please show the circuit diagram also. How i do i contribute myself to publish projects in this site.
Naveen
@Naveen
First of all please read the post carefully before Posing comment. The link to circuit diagram is given in the post itself.
If you want to contribute to this site you may mail your article to the webmaster. But remember we have very strict quality assurance so your article need to be of top quality to be accepted.
hello sir,
I want to know the basics of using graphics lcd, how to handle it.If possible.
Thank u.
Pingback: Interfacing Graphical LCD with AVR MCU | eXtreme Electronics
Do we have functions to display text from certain co-ordinates(x,y) in ProGFX library.
@Mohammed
For Text and Font handling details in ProGFX, consult this tutorial
https://extremeelectronics.co.in/avr-tutorials/handling-text-and-fonts-in-progfx/
Thankx I got it it was in the gfx.h file
but can you please explain me how to draw image using the function GFXDrawImage(UINT8 x,UINT8 y,prog_uint8_t *img)
what should be img here?
Pingback: Handling Text and Fonts in ProGFX | eXtreme Electronics
The lib file libgfx has the extension .a. how can i access this file to read the souce code of the functions. I have a windows OS.
@Kmil
Its closed source! So you cannot get the source code.
Hello Sir,
Thank you very much for these tutorials about AVR, and i have a question about this one. Can i use this ProGFX with Codevision, winavr compiler?, if yes how to do it. Thank you again for your help and your courses.
Pingback: Product Preview – AVR Graphical LCD Development Board | eXtreme Electronics
Pingback: AVR Graphic LCD and Accelerometer Demo | eXtreme Electronics
Hi Avinash ,
You have an awesome website and easily the best AVR tutorial on the internet . I have one question regarding the GLCD library . Is it possible to change the port connections ? For example , I want to connect my data pins to Port B instead of Port C . Thanx for the help !!
whether the library can be used by codevisionAVR?
@Wawak
No.
hi everybody
thanks for very useful tutorial . please dont connect AGND(pin 31) and AVCC(pin 30) otherwise you see nothing
@Reza
It is NOT correct.
you need to connect AGND and AVCC pins.
Pingback: Analog Clock on GLCD – Drawing the Face | eXtreme Electronics
hi avinash
i just wanna know that it is necessary to connect only 16 mhz
bcoz i’m using 10 mhz
is it possible to use 10 mhz instead of 16 mhz
Hi Avinash,
i tried out your tutorial and i am getting the progfx logo as output on the GLCD but it is displaying some random signs instead of “hello graphics” afterwards..what must be the problem
try running the pre-compiled hex file. Make sure you use ATmega32 only.
Also confirm that a valid font is selected.
ohh..coz i was using an atmega16 …thankz a lot
Hi Avinash,
I am using ATmega32A, if i burn the “HelloGraphics.hex” file or any readymade hex file provided by you , I get a continuous buss from the buzzer of my development board and nothing happens on the GLCD.
Could you please help me understand why is there a problem like this ?
Did i make any mistakes?
@Hemant Jha ,
Why do u guys make me supper irritate ?
U guys now nothing about the what you are doing and then ask me silly questions!!!
If u can’t even do experiments given in this site only one that can help you is GOD !!!
You guys buy crap development board from other vendor and try to run our code !!! Go ask the guy who sold u the crap ! I don’t have free time.
Hello Avinash,
Thanks for such a cordial response. Your response says everything about you as a person. I have seen some of your posts where you have been very arrogant and harsh dealing with other people interacting with you. Yesterday when I called you at your office … you were equally rude.
Just a small word of advise which will definitely help you in future .. “People with real expertise, intellect and talent are not and need not be arrogant”.
BTW – I teach system designing to some of the worlds best technology companies that a person can think of … but I have no shame in saying that I was experimenting with GLCD for the first time and I am not a expert of the same and I dont mind saying that I dont know certain things in this world.
Thanks and Regards,
Hemant Jha
@Hemant Jha,
I cannot “please” every people every time, that was what I was taught at my school ! What ever you think of me ! I don’t like peoples creating problems out of nowhere ! Remember that not all people are compatible in this world ! I say what I like, don’t add much cheese! Bye 🙁
Sir,
I am working on a fingerprint based attendence system using SM-630 module.
I tested it successfully with atmega16 and 16×2 LCD.
Even i a made an efficient fingerprint library to interface with SM-630 module that can add,delete and store fingerprints, using Extreme UART library.
Now i am using atmega128 and graphic lcd to make it more of my Major project.
Graphic LCD Connections
=======================
Data -PORT A (D0:D7,PIN0:PIN7)
CS1- C2
CS2- C7
RST- C6
RS- C5
RW- C4
E- C3
I have made my pcb.
Please i need pro-gfx configured to upper configuration as my other pins are used for ethernet and sensor and keypad.
Kindly help.Please guide.
And there is a need of software uart library in hobby electronics for AVR,its not available online.You(avinash sir) always have made unique and easy to use libraries n tools not available online.Kindly take this into your consideration
Sir,
I have worked out whole day,as i need both two uarts on atmega128.
And the only pin that is a problem for me is PD3(TX1) connected to RS pin of graphic lcd in progfx.
Please map it to PD4 and compile new progfx library.My whole major project is now struck on this one pin.Please help.
And if you have software uart library,it would be of great help too.
Hello Sir,
While using your library,I am also trying to run ADC0.but whenever i enable adc my code is reset.can you tell what the problem is?
sir i will use avr studio5 . i am unable to use profix library in my project ,
how to use this library in avr studio5 pl.help me
i recent purchase 2nos glcd from extreme electronics store .. your code work fine but new project cant compile with library..
Dear Friends,
Thank you very much for this library and tutorial. I want to ask something about porting this library to be used with MSP430 chips (TI devices). I’m doing some tutorials and stuff at spanish language at my blog, and this library is important to be promoted in the community, that’s why my interest on using it with other microcontrollers. Thanks!
Hello Avinash
I tried all the above steps one by one in atmel studio 6 but during compilation it throws an error that glcd.h not found.
Please suggest the possible solution for the error
@Prashan ok if you are NOT able to do it your self you can get help from me by paying the proper amount. Everything I could do for free is written above! If you need any more you have to pay, other wise I have no free time.
Hey Prashant. I am not sure as i dont use avr studio but you can try pasting the header file in the folder in which ur .c file exists and in place of #include write #include “glcd.h” . Hope it helps.
sir, i bought glcd from u…and i am using it to interface with atmega32………sir i want to ask is it necessary to give it 16MHz frequency…….can we give it 1MHz frequency………..pls help me…..
sir these tutrial have been very useful in studying glcd and helpful for other projects
please remember the spelling of “You” is Y O U and NOT u ! Your comment will be deleted in 24 hours !
And why are you asking what is necessary and what is NOT? is their any problem following everything I say?
Why the hell you wanna use 1MHz if I told to use 16MHz ? Are you used to failures or in love with them? Their os NO point in asking such silly things ! If tutorials says use 16MHz use 16MHz without any questions !
I am unable to compile it on atmel studio 6. here is the included log :
—— Rebuild All started: Project: graphical lcd project, Configuration: Debug AVR ——
Build started.
Project “graphical lcd project.cproj” (ReBuild target(s)):
Target “PreBuildEvent” skipped, due to false condition; (‘$(PreBuildEvent)’!=”) was evaluated as (”!=”).
Target “CoreRebuild” in file “C:\Program Files (x86)\Atmel\Atmel Studio 6.0\Vs\Compiler.targets” from project “D:\workarea\Mindfield\graphical lcd project\graphical lcd project\graphical lcd project.cproj” (target “ReBuild” depends on it):
Task “RunCompilerTask”
C:\Program Files (x86)\Atmel\Atmel Studio 6.0\make\make.exe clean all
rm -rf “graphical lcd project.o” “graphical lcd project.d”
rm -rf “graphical lcd project.elf” “graphical lcd project.a” “graphical lcd project.hex” “graphical lcd project.lss” “graphical lcd project.eep” “graphical lcd project.map” “graphical lcd project.srec”
Building file: .././graphical lcd project.c
Invoking: AVR/GNU C Compiler : (AVR_8_bit_GNU_Toolchain_3.4.1_830) 4.6.2
“C:\Program Files (x86)\Atmel\Atmel Studio 6.0\extensions\Atmel\AVRGCC\3.4.1.95\AVRToolchain\bin\avr-gcc.exe” -funsigned-char -funsigned-bitfields -I”../ProGFX/include” -O2 -fpack-struct -fshort-enums -g2 -Wall -c -std=gnu99 -MD -MP -MF “graphical lcd project.d” -MT”graphical lcd project.d” -MT”graphical lcd project.o” -mmcu=atmega32 -o”graphical lcd project.o” “.././graphical lcd project.c”
D:\workarea\Mindfield\graphical lcd project\graphical lcd project\graphical lcd project.c(31,6): return type of ‘main’ is not ‘int’ [-Wmain]
Finished building: .././graphical lcd project.c
Building target: graphical lcd project.elf
Invoking: AVR/GNU Linker : (AVR_8_bit_GNU_Toolchain_3.4.1_830) 4.6.2
“C:\Program Files (x86)\Atmel\Atmel Studio 6.0\extensions\Atmel\AVRGCC\3.4.1.95\AVRToolchain\bin\avr-gcc.exe” -o “graphical lcd project.elf” “graphical lcd project.o” -Wl,-Map=”graphical lcd project.map” -Wl,–start-group -Wl,-lm -Wl,-l-Wl, Ldir -Wl,–end-group -Wl,-L”../ProGFX/lib” -mmcu=atmega32
avr-gcc.exe(0,0): Ldir: No such file or directory
make: *** [graphical lcd project.elf] Error 1
The command exited with code 2.
Done executing task “RunCompilerTask” — FAILED.
Done building target “CoreRebuild” in project “graphical lcd project.cproj” — FAILED.
Done building project “graphical lcd project.cproj” — FAILED.
Build FAILED.
========== Rebuild All: 0 succeeded, 1 failed, 0 skipped ==========
the error is ldr: no such file or direcory. please help me out of this.
@Rohit,
Sorry. But support is PAID here.
If you can pay us the fees then we can help you solve the problem.
The cost to teach you how to compile this project personally will be around Rs. 5000/-
plzz provide me the library for touchscreen
Nice sir, I need to interface GLCD with ATmega16 then what changes i will have to make.? and what is the purpose of the inductor in the circuit?
@Gursahib Singh,
If you wish to use ATmega16 then you need to add at-least 1KB more external RAM to it. The purpose of the Inductor is to keep noise generated by fast digital part away from the built in ADC.
hi
how can i add libgfx.a library in atmel studio 6 ?
Thanks
@Mehrdad,
Tutorial for using ProGFX with Atmel Studio 6 coming soon !
Hello Avinash,
I am waiting eagerly for this tutorial. By when do you think it will be posted?
Regards.
Deepak Nair
I want to get different patterns like flowers and cars using atmega 8. What s d best idea? Help me out
@Ravali,
First wait till you grow up to 8 years old.
I want to get different patterns like flowers and cars using atmega 8. What s d best idea? Help me out plz
Hello Avinash,
Is the uC Atmega 128 supported?
If not, what modification can be made?
Thank you!
Hello Avinash,
I am having a problem in compiling this “Hello Graphics” source code. I get the following error message:
Build started 31.12.2014 at 19:26:57
lloGraphics.o.d -c ../HelloGraphics.c
../HelloGraphics.c: In function ‘main’:
../HelloGraphics.c:44: warning: control reaches end of non-void function
c:/winavr-20100110/bin/../lib/gcc/avr/4.3.3/../../../../avr/bin/ld.exe: cannot find -lC:\ProGFX_v1_0\ProGFX\include\font
make: *** [HelloGraphics.elf] Error 1
Build failed with 1 errors and 1 warnings…
What am I doing wrong?
Regards.
Deepak Nair
@ Deepak Jee,
If you can come online on Team Viewer, over high speed internet then I can show you live setup on AS6
Thank you Avinash. I will do so tomorrow. HAPPY NEW YEAR to you and Team Extreme!
Deepak Nair
But don’t forget to install AS6 first!
I have stopped writting much because of few mad peoples here in India.
Now I will share works only with selected peoples.
I hope you will include me in your list of “selected people!”
Regards.
Deepak Nair
Hello Avinash,
Thank you so much for demonstrating how to use the GLCD with AV6. Although I have yet to come to grips with the procedure (complex for me), I have been able to modify your sample program for my project.
Actually, I am working on a humanoid robot and wish to use the GLCD module for the animated face. So far, I have been able to make good progress, thanks to you!
I know it would mean a lot of work for you, but a tutorial on using the GLCD with AV6 would be appreciated by many of your fans.
God Bless You!
Deepak Nair
please what steps like me install library ” libgfx.a” in Atmel Studio 7 ?
thank you so much