Here I will highlight some features of C language commonly used in 8 bit embedded platforms like 8051, AVR and PICs. While programming microcontrollers in C most of the time we have to deal with registers. Most common tasks are setting and clearing bits in a register and check whether a bit is 0 or 1 in a given register. So here I will give detail on those topics, it will help you if you are new to embedded programming in C and if you get confused when you see some codes.
A Register
A register is simply a collection of some bits (mostly 8 bits in case of 8bit MCUs). Either each different bit in a register has some purpose or the register as a whole holds a value. Registers serves as connection between a CPU and a Peripheral device (like ADC or TIMER). By modifying the register the CPU is actually instructing the PERIPHERAL to do something or it is configuring it in some way. And by reading a register, the CPU can know the state of peripheral or read associated data.
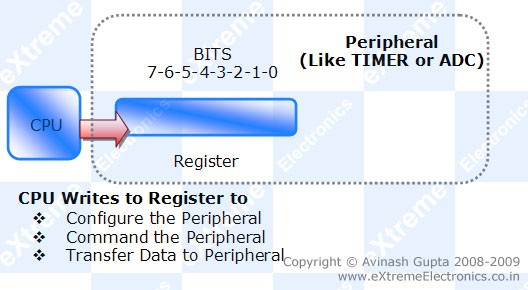 |
Fig.: CPU writing to Peripheral Register |
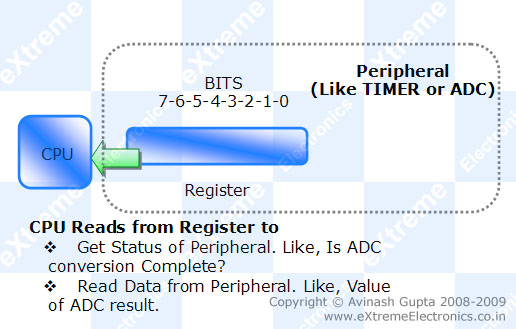 |
Fig.: CPU Reading from Peripheral Register |
Binary Numbers in C
When you write a=110; in C it means you are setting the value of variable"a" to "one hundred and ten" (in decimal). Many time in embedded programming we are not interested in the value of a variable but the state of each bits in the variable. Like when you want to set the bits of a register (MYREG) to a bit pattern like 10010111 (binary). Then you cannot write MYREG=10010111. Because compiler will interpret 10010111 as decimal. To specify a binary number in C program you have to prefix it with 0b (zero followed by b). So if you write
MYREG=0b10010111;
it assigns the bit pattern 10010111 to the bits of Register MYREG.
HEX Numbers in C
In same way if you prefix a number by 0x (a zero followed by x) then compiler interpret it like a HEX number. So
MYREG=0x10; (10 in HEX is 16 in decimal)
MYREG=0xFF;(Set all bits to 11111111 or decimal 255)
Setting a BIT in Register
Here our aim is to set (set to logical 1) any given bit (say bit 5) of a given register (say MYREG). The syntax is
MYREG=MYREG | 0b00100000;
The above code will SET bit 5 to 1 leaving all other bits unchanged. What the above code does is that it ORs each Bit of MYREG with each bit of 0b00100000 and store the value back in MYREG. If you know how logical OR works then you will get it.
In short you can write the same code as
MYREG|=0b00100000;
Now lets come to practical usage. In practice each bit has got a name according to its work/function. Say our BIT (the 5th bit) has got name ENABLE, and what it does is clear by its name,when we set it to 1 it enables the peripheral and when cleared (0) it disables it. So the right way to set it is.
MYREG|=(1<<ENABLE);
The << is called left shift operator. It shifts the bits of LHS variable left by the amount on its RHS variable. If you write
b=1<<3;
then, 1 whose binary value is 00000001 is shifted 3 places to left which results in 00001000
So if ENABLE is defined as 5 (as enable is 5th bit) then
MYREG|=(1<<ENABLE);
will result in
MYREG|=(1<<5);
which again result in
MYREG|=(0b00100000);
Now a beginner would ask "What’s the Advantage ?". And once you know it you would realize that advantage is immense!
- Readability of code: MYREG|=(1<<ENABLE); gives a clue that we are enabling the peripheral while MYREG|=0b00100000; does not give any clue what it is doing, we have to go to data sheet and find out which bit actually ENABLEs the peripheral. While ENABLE=5 is already defined in header files by the developer of compiler by carefully studying the datasheets of device.
- Easier Portability: Suppose you use this code many times in your program (and your program is reasonably large and uses other register also) and you now want the same code to run on some other MCU model. The new MCU is of similar family but has slightly different bit scheme, say ENABLE is bit 2 instead of bit 5. Then you have to find all occurrence of MYREG|=(0b00100000); and change that to MYREG|=(0b00000100); But if you have used the other method then you simply need to inform the compiler (by its setting options) that you are going to use the other MCU and compiler will automatically get the definitions for the new device. And in this definition ENABLE=2 will already be defined by the compiler developer. So it will be lot easier.
Clearing a BIT in Register
For clearing a bit logical AND(symbol &) operator is used in place of logical OR (symbol |). The syntax is as follows
MYREG&=~(1<<ENABLE);
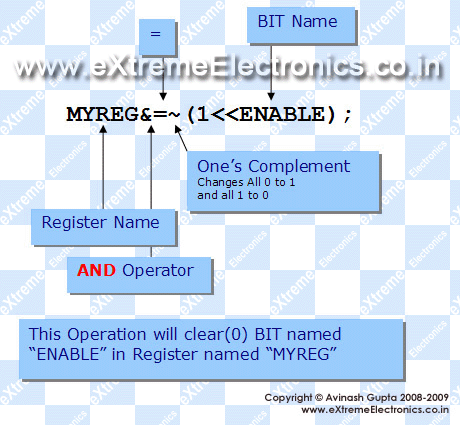 |
Fig.: How to clear (0) a bit in C language. |
This will clear (i.e. set to value 0) a given bit (identified by name ENABLE) in a register called MYREG. This operation will not affect any other bits of register except ENABLE.
Let us see how it works with the help of following diagram.
 |
Fig.: "Clearing a BIT" how it works? |
So now you know how you can selectively clear any bit in any given register. If you want to clear more than one bit at a time you can write like this
//This will clear bits ENABLE,FAST_MODE and BUSY, leaving all other bits untouched
MYREG&=(~((1<<ENABLE)|(1<<FAST_MODE)|(1<<BUSY)));
Similarly the syntax for setting(set to 1) multiple bits at a time is as follows
//This will set bits ENABLE,FAST_MODE and BUSY, leaving all other bits untouched
MYREG|=((1<<ENABLE)|(1<<FAST_MODE)|(1<<BUSY));
Testing The Status of a Bit.
Till now we were modifying the registers either setting or clearing bits. Now we will learn how can be know that a specific bit is 0 or 1. To Know if a bit is 0 or 1 we AND it with a AND MASK. Suppose if we want to check bit 5 of a register MYREG then the AND MASK would be 0b00100000. If we AND this value with the current value of MYREG then result will be non-zero only if the 5th bit in MYREG is ‘1’ else the result will be ‘0’.
The syntax would be like this.
if(MYREG & (1<<ENABLE))
{
	//ENABLE is '1' in MYREG
	...
}
else
{
	//ENABLE is '0' in MYREG
}
So now you know the basic operation on bits, they are widely used in firmware programming and will help you understand other codes on my web site. And Please don’t forget to post your comment regarding any doubts, or reporting errors in the above article, or simply to tell how you liked the stuff.
By
Avinash Gupta
me@avinashgupta.com
Nice introduction to embedded programming and registers! Maybe for beginners a little more detailed introduction to binary system and logical operations would be needed, otherwise very simple and clear.
@AVR Freak
Yes,a little more detailed introduction to binary system and logical operations would be needed. But I don’t wanted to go deep in C programming as I assumed user know C, so I left them. But I think I would make a new page for it.
🙂
Thanks for your kind suggestion!
I think it is great as it is. It is always tedious if one wants to go a bit deeper that many tutorials first hash up an introduction to the binary system again. I mean…. u are also not first teaching them English
i want to learn about lpc2148 mc . can you tell me which books are helpful to me please
No, it’s perfect, more detailed will long stuff unrequiredly. It’s perfect. Abslute beginners, no C no nothing, must go to learn C then comeback.
nice work
@Anthony
Thanks!!!
Very nice tips for Embedded C programming…Thanks a lot..
Good job, thanks.
Cy
its good avinash.. thank u its lot useful to embedded programmers.. we wish to you produce good info like theses…
Hi
would like to learn AVR C programming in detail could you suggest me any site or books?
thanks
Hello,
See the detailed AVR Tutorial here
https://extremeelectronics.co.in/category/avr-tutorials/
They starts from the very basic introduction and move to PWM,LCD, EEPROM interfacing etc
Need any thing more???
Good Work…& Thanks…
Good introduction, however it would be nice to point to IDEs like Micro C Pro for AVR,Micro basic pro for avr and bascom too. I found esier to deal with libraries in Micro C pro for AVR, but you know that depends on the programmer.
Thats a great see through for beginners. This shows the strength of Embedded C programming.
And great work Mr. Avinash Gupta. Keep coming with such more stuffs in future.
Good Luck for your futuristic scope.
KK Singh
BARC, Mumbai
Very good explanation. Thanks
Awesome… Hats off two you Mr. Avinash!!!
You are are Great Avinash.
I being from commerce line is able to understand everything. You have made it simple for me.
Thanks a lot and please keep this up.
People like we are dependent on people like you.
Really Thanks a lot
Very simple and nicely explained aout setting a bit in register,clearing a bit in register and testing the status of a bit.
Nice job.
Keep up the good work.
Your effort is greatly appreciated
Thank you so much for explaining this in such a clear way. I have been wondering what this notation means for ages!
Woow very nice and clear.i wish you could give me a very good site where i can go and learn this stuff
I’m new to microcontroller programming. very helpful tutorial. Thanks a lot.
well…………… gud job… clearing basic concepts of programming….thanks keep it up
Great start for a newcomer………….well done Mr.Avinash….KEEP IT UP!
Very nice job! Well done and free!
thanks extreme electronics. u r doing a nice work for the bignners
dude … tuts are awesome ..especially this one
evrything is simple and sweet 😛 …continue with the same work and forgot to mention …learning a lot from all this stuff
love your work
cheers,
your student in kind a way 😛
wishing you a happy new year in advance
I’ve been trying to learn i2c, SMBus, 2-wire, whatever you want to call it and have confronted code that has little documentation. TWSR. TWDR, what were they? I thought it might a secret club 🙂
Now, Christmas Eve, you’ve just given a much cherished present to a stranger. THANK YOU! I look forward to diving back into i2c tomorrow with a fighting chance of getting it to work. I look forward to enjoying your site in the new year.
@Max
TWSR (Two Wire Status Register) TWDR (Two Wire Data Register) are the interface register between the TWI module and the AVR Core CPU nothing else !!!
All peripherals have similar interface !
Atmel datasheed gives very good documentation of the TWI module go see them
Merry Christmas and a happy new year to all
Great tutorial – simple, clear and quick, just what i was looking for. Thank You!
thank you
THIS TUTORIAL HAS HELPED ME IN MY UNDERGOING PROJECT.
THANKS TO AVINASH.
Hi Avinash,
To clear a bit, could i not just write:
MYREG =(0<<ENABLE); //?????
What are the differences/advantages of the method you described?
hi Avi,
Great tutorial, as i am fresher in embedded programming, i carefully understand what you explain in your tutorial. thanks alot
Nice tutorial
sir,
I own a website http://www.superrobot.net.ms .I want to publish some of the contents found in your website in mine along with a link to your website.can i do it or not
thank you
@Sudarshan
Direct Copying is NOT allowed. Please give links in place of DIRECT Copy. No use of publishing same contents at another place.
thanks a lot sir it helped a lot to understand the logic
Thank you a lot it really helped me to catch up with the classes!!!!
thanks a lot sir, you have done a splendid job for a beginner like me…
thanks a lot …. nice work done…
Good work….! Nice explanation regarding the basics..
@Norm:
[
To clear a bit, could i not just write:
MYREG =(0<<ENABLE); //?????
]
It will not work
In general, all your tutorials are great. They are especially so for me. I’m a beginner as far as embedded electronics goes, so these tutorials are very useful to me.
Any chance you will start selling your boards in the US or Canada? I would love to see them at robotshop.com.
Dennis
@Dennis
Thanks!
Thanks Avinash! Your tutorials are very well constructed. This site is my favorite place for learning about AVR programming.
hi and hello avinash sir ,ur informations are very useful for me thank u very much for ur hard work ,i am a begginer for this embedded world ,i have pic, atmel proggramers but i dnt know how to start my embedded studies and proggram the microcontrollers but i know electronic hardware working pcb designing etc plz guide me to shine in this field from where i should be started ,
good job….all d best
a very good explanation, cleared a lot of doubts
thanks 😀
keep up the good work
very informative
nice work avinash,
thanks a lot.
Thanks Dude :), i was searching for such type of article from many days
Very lucid tutorial.
i got good knowledge by this article…..
Pingback: Interfacing Ultrasonic Rangefinder with AVR MCUs | eXtreme Electronics
Its Really nice job since last 1yr I was looking for this stuff. It is having much more information for bit manipulation and it is required for every program. Even there are alternative to this bus mostly preferred and standard one is what you have explained.
Its our tradition to thanks, one who gives us knowledge.
so accept my nod(Pranaam)……….Guruji……
where could get stuff for function pointer?
@GyaanSeeker
where could get stuff for function pointer?
in a C text book! (What a hideout even Gyaan Seeker can’t Find it!)
Thanks Avinash…it will give me a gud start in programming….thanks for explaining it in a perfect way…..cheers!!!!!
sir, i got a very good knowledge in bit manupulation………
explanation is nice sir
thank you sir………
GREAT WORK!!! THAT WAS SO SIMPLE AND CLEAR! REALLY HELPFUL!
THANK YOU AVINASH.
Thanks Avinash.
I very like about your article that make beginner like me understand the basic.
Excellent stuff from you. Great work!!!! Concepts are crystal clear
Excellent for a beginner…cant’ be better.
Excellent!!! Just thanks! =)
Very helpful tutorial. Concept is clear to clear and set a specific bit. How can toggle a specific bit?
@Shoeb You can use xor operation to toggle a bit.
GREAT GREAT GREAT!!!!
Awesome tutorials…Hats off to you Gupta Ji…
Awesome Tutorials….!!
we were looking for this for so long and we finally get a detailed sensible level explanation..!
Please introduce some keywords so that people find it easily on the google…!!
we had much trouble..
It’s really simple and good and very useful for beginners
Lucid explanation especially regarding setting and resetting of bits. Such explanation cannot be found in books and the reason given was very good
hi..,
Avinash sir,
ur tutorial increases curiosity to learn mcu programming.
NICE WORK..:D
SIR..
In b/w your tutorial you said DATA SHEET of a mcu…from data sheet what all the information that we need to gather for better programming mcu..??
Thank you sir… it’s very help me… 🙂
Really thanks for your good explanation of this part. i need some more information after this can you do?
great stuff…very clear and straight explanation….i really loved the last part of blog( testing status of bit)…..keep going..
hi Avinash..
i have no words to say about this article..no one can be explain like this..hats of to you..am very proud to be say this..keep it up
good…. akhirnya aku tahu setelah rasa penasaran yang panjang…. thanks
great work…
z really helpful for a begginer..
oh yea indeed… Dis site is helpful
:p
ya i agree wid Amrit ……its cool n gud…
btw amrit i didnt know dat u wer a geek n dats supercool
it matches wid ur image
ya i agree wid amrit too … its cool n good…
btw amrit i didnt know dat u are a geek n dats supercool
superb dude
THE DATA IS TOO GOOD BUT
@SUBHRA AMRIT IS A BEGINNER BUT I AM COOL N A PRO IN ELECTRONICS..
THANKS TO EXTREME ELECTRONICS ITS SUPERCOOL…
wow…
nice i learnt good from it.thanks buddy
It is very good and helpful for beginners like me. Thanks a lot!!
very very good tutorial—thx lot–
Thank u sir,
Way u have given it’s very interactive and making interest to learn..
Sir its a request kindly suggest how to read the datasheet while coding for microcontroller as software engineer what are the things we need to take care because sir if we go through the entire datasheet it is very very confusing sir please suggest …..wating for ur reply sir ……..
With regards
rakesh Kumar
Just download the full datasheet from the manufacturer. Keep it for future reference. Whenever you feel stuck, just search for what you are trying to do in the datasheet. Most of the times it would be given clearly in steps.
very nice
dat was really nice of u 2 hav explained d basic stuff so perfectly, u get it fixed in ur heads in d second reading itself. 🙂
Excellent stuff.
awesome…………
Great, this stuff help me in my project .
Thank lots
thnkx… It d best concept i evr read..
great for a beginner…….
keep it up…..
printf(“really helpful ,like it “);
THANKS…..
Thanks for your good explanation.
REally nice….thanks a lot
pure awesomeness !
awesome…
Super – your skills of explaining things are excellent. Maybe you will try to write a book. It’s really amazingly simple and easy-to-understand explanation. Thank you very much.
Andrzej,
Thanks,_it’s_easy_to_understand.
Can_you_give_me_tips_on_atmega64_register
(c_programming)
Thanks for your simple and lucid explaination about the C programming.Very easy for the beginner like me to understand.but one request from my side.can u please give some more guidelines about the C language which will enable person like me to write codes independently for any project made by me.I mean some more basic things that you would like to add regarding hardware coding.please sir.
Thanks.:)
Helped me a lot in understanding the basics of avr c programming.
fentastic work….
grt wrk…
Nicely explained the basics of registers…..!!
kudos ..
Thank you Avinash for the great intro article…i am a BEGINNER,i really need anyone who knows what a good pratical tutorila for Embedded C beginner??or any resources where you can learn industrial Embedded C??Thank you Friends..:)
thank you very much, it’s very clear and understable,.
Very much helped and cleared doubts…
a real awesome work done.
thanks a lot.
A very well-illustrated article.
It was easy for me, a novice to understand.
Maybe if you would provide references for your statements and further readings, that could make the tutorial more effective.
Realy, it was a very helpful tutorial.
Thanks a lot
Thanks for guiding me
Hi Avinash!
Thank you very much for making all these tutorials. its very great of you.. cheers!
Jayashan from Sri Lanka
Great work done, I am basically a Embedded Hardware designer,so this tutorial was a good guide for me in understanding some basics of embedded C…
HI, myself rupa, i am working on a DSP controller
am i unable to convert a floating point to fixed point
Please send me C codes for floating point which would help my project.
Thank You very much. This is a very good start for me.
Very instructive. Thank You.
Great Work I have been searching for this type of tutor,
Its really helpful ..
Thanks a lot !!!!!!
Keep it up!!
sir pls could you provide me with the code of avr microcontrollers used for rotating the rod (via dc motors) in one direction for 30 seconds and then again rotating it in opposite direction for 30 seconds
thank you
@Priya,
Why don’t you make it your self? What is the problem?
i would love to do that but am a beginner having no idea about programming in past i had referred some books and asked many faculties about my problems regarding the same but everything seems fruitless now..
@Priya,
So if you are in this field then I better suggest you learn programming as it will come to your use in the future. So what is your experience level in C? How much do you know?
sir i have read your tutorials on avr they are really helpful though it took some time to understand each and everything but finally i was able to understand most of it and it would have been a more enriching experience if the pdf versions for all the tutorials are available anyways i enjoyed the parts i had read thank you for replying and all the wonderful tutorials
Thank you !
I tried to make PDFs in the beginning but the problem was that web article were constantly updated with new information and corrections made. And PDFs soon became obsolete. Thats why I dropped the idea.
thank you sir once again for replying
i am familiar with the basic concepts of c(C++)
but its my bad luck i couldn’t find any such tutorials of c like these avr tutorials of yours 🙂
@Priya,
To complete what you are trying to make you need the following info:-
Basic details of AVR Studio 6 it is explained here
https://extremeelectronics.co.in/lfrm8/Help/AS6.htm
Then you need the basic info about i/o ports
https://extremeelectronics.co.in/avr-tutorials/part-v-digital-io-in-avrs/
Finally you need info about DC motor control for that you can refer to
https://extremeelectronics.co.in/avr-tutorials/dc-motor-control/
After reading all those I think you can easily implement the solution 🙂
How much experience you have working with AVRs? Do you have some setup to do the experiment?
thank you sir
these links were helpful…
i have all the basic knowledge of working with AVRs given in your tutorials..and had bought usb avr programmer, avr development board and atmega 16 microcontroller
i and one of my friend( pursuing mechanical engineering) are trying to develop a book scanner for which i needed
the programming code for rotating the rod (as mentioned earlier) the whole setup of the book scanner is as follows-
we have 2 rods at right angle to each other(say one along the x axis and another one along the y axis) the rod along the y axis rotates 60 degree clockwise(cw) and anticlockwise(acw) direction with time delay of 10 seconds as the rod rotates cw and acw the glass panel(which is moulded in the shape of an open book) attached to the rod along the x axis moves up and down….now moving the rod in 60 degree cw for 10 seconds then moving it acw is the 1st mechanism we need to build…nextly we need some automatic setup to turn the pages of the books which are to be scanned (since as the glass panel moves up there is a provision to turn the pages manually or through some automatic setup so that the further pages can be scanned)this automatic setup for turning the pages is the 2nd mechanism we need to build..third we need an speed regulator to make the rod move slow and fast as and when needed..
i request you if you could help us out in this..thank you once again and sorry for replying so late..
@Priya,
Okay, I will have a look at your description when I have some free time.
This is probably the best bit shifting tutorial I have read. I have a much clearer idea now. I wish I had read this a month ago then I could have stopped pulling my hair out.
@Steve
Thanks!
thank you sir
Nice info.!! thanks a lot sir…
I want to know about the embedded C program codings. please send me sir
As noticed tutorial quite complete the knowledge of any basic learner of Embeded System…
Pingback: Microcontroller Programming in C Language Tutorial | Building Robotics News
hii,
i am sadasiba, i am highly interested in embedded c but i am not so strong in coding
now i am learning embedded c, i have a question that no one is getting able to answer it or some of did not want to answer it, whom i asked yet
and i could not leave that question out of my mind and the question is”why there is no match between hex code generated after compiling and the previous original c code,if i am taking the ASCII equivalent of both charter used in c code and hex code generated” .is there any fact regarding compiler designing?.please kindly give a reply i am waiting for your reply.
loved da way u thaught
nice explanation
Thanks alot sir ,that was really helpful
Hey Avinash,
Your tutorial turned out to be silver lining for me when I was in a confused state. I was browsing a lot to clear my doubts. I don’t know how I landed at your site but it cleared tons of my doubts and made me regain my lost interest in embedded systems. Thanks a ton for bringing up such wonderful tutorials.
Nice explanation.
Please send some notes on embedded C.
Thanks.
Sir i want to study more about Embedded c please guide me this stuff was very sourcefull and i am very thankfull to you
Thank u very much !!! nice explanation !!
really nice explanation….helpful to begginer…and i really appritiate you because u are not motivated by money for this stuff..
HI,
really nice explanation.i can easily understand.please give me a whole embedded system notes or links,like that …..please
very good job yo!
very nice tutorial buddy….keep it up (y)
Thank you sir….!
your artical will be helpfull for me…
but, can you explain more about HEX….
i am very unfamiliar with this word yet…
plz reply me by mail….
Great tutorial and very heedful, thanks a lot
BTW: I was asked questions that its answers are you article in two different job interviews.
gr8 introduction thanks!
Thanks a lot!
It was really helpful!
Dear Sir Avinash,
Do you have a book written on “Microcontrollers” or “Embedded Programming”. Please give us details of your books. Thanks.
@Fahim
Sorry I have not 🙁
thanks a lot……….i was trying to understand that over 2 days.at last i found it here .thank you so much…………..
Very good and useful
@Guru, thank you.
can we use a single micro controller board to program many ic s?
Thanks a lot,Excellent tutorial for setting, clearing a bit in register,got cleared why left Shift is used for setting a bit and why we can’t directly copy the value to register.
you can write a Ebook on AVR Programming in C.
Hi Avinash Gupta,
I am new to embedded coding and I want to know how to set and read peripherals like I/0 ports , timers etc in c, do have any material means plz share me
reply me by mail.
thank u very much sir….
I really appreciate your support to all beginners in Embedded C programming…..I have learnt a great deal. I
will keep reading to learn more. Thanks a lot.
@Taofeek,
Thank you 🙂 I am pleased to know they are helpful!
thanx a lot,it’s exactly the article that I was searching for.It cleared all my doubts regarding setting of bits by << operator in embedded c,a very simple and to the point article
sir i have to learn a lot in electronics what should i do sir help me
what are bit wise operator and how they are used in embedded c?
@Manjeet Singh, purchase a book in C.
It was great & helpful.
thanks
really helpful man… thanx…
@Achi,
Welcome
Great piece of information for beginners in Embedded world. Thanks!!
it really helpful
thanks
It’s really helpful to me thank you sir
hi avinash long time remeber wud7elecs@gmail.com
here ihave mix varible types of math:
int pulse=0;
#define sw portd.rd0
void main(){
trisc=0x00;
portc=0;
trisd.f0=1;
if(sw==1)
while(sw==1);
pulse++;
}
if(pulse>=500)pulse=0;
if(rd0_bit==1)pulse++;
if(pulse==pulse=52){
while(pulse==52);
pulse=pulse *(52/60);
pulse=0.8666667;
}
if(pulse>=0.8666667&&pulse<=125){
portc.f4=1;
}
help me which is wrong ineed speed until become 52/60 then do something
pulse=pulse *(52/60);
pulse=0.8666667;