
In this article I will describe how to interface a Ultrasonic Range Finder Module with a AVR ATmega8 microcontroller. I will provide a HEX file which you can burn into your ATmega8 directly to quickly test this whole setup.
Ultrasonic range finder modules helps find the exact distance to an object. This can have vast application in robotics.
These are more expensive than IR based obstacle detectors but the advantage is that they give accurate distance to the obstacle and also their performance is not affected by the colour of obstacle.
 |
Ultrasonic Range Finder HC-SR04 |
Things Required
| S. No. | Item | Image |
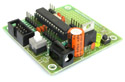
| 1 |
Contains the core AVR circuit including 5v regulator, reset, ISP. |
 |
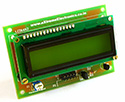
| 2 |
Alphanumeric LCD Module subsystem on board. |
 |
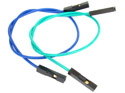
| 3 | Single Pin Female to Female Burg Wires Used to interconnect the two boards. And the sensor.
|
 |
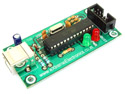
| 4 |
To upload the program to the development board. |
 |
| 5 | Ultrasonic Range Finder Module | 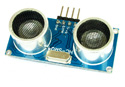 |
| 6 |
|
 |
Connect LCD Board
Please read this article on interfacing alphanumeric lcd module with AVR microcontrollers.
Connect the LCD Board with the development board using single pin f/f burg wires according to the table given below.
| LCD Board | AVR Dev Board | |
| 1 R/W | PB0 | |
| 2 RS | PB2 | |
| 3 LED PWM | NOT CONNECTED | |
| 4 VCC | 5V OUT (VCC) | |
| 5 GND | GND | |
| 6 DB7 | PD6 | |
| 7 DB6 | PD5 | |
| 8 DB5 | PD4 | |
| 9 DB4 | PD3 | |
| 10 E | PD7 |
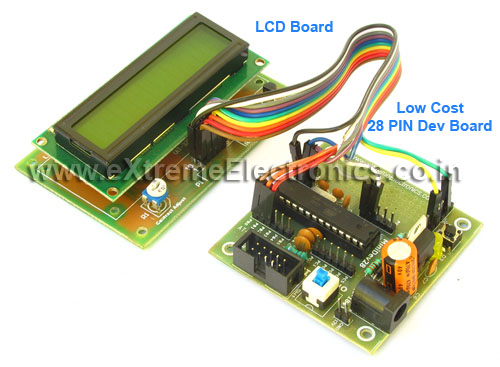 |
Fig. LCD Board and Dev Board Connected |
Connect the Ultrasonic Sensor Module.
Connect the Ultrasonic Sensor Module with AVR Dev Board according to the table given below.
| Sensor | AVR Dev Board | |
| 1 VCC | VCC | |
| 2 Trig | PC0 | |
| 3 Echo | PC1 | |
| 4 GND | GND |
Connection for xBoard MINI v2.1
You can also use the xBoard MINI v2.1 development board to run this demo. The connection is same as the 28 PIN Development board with a difference that you don’t need the LCD board because xBoard MINI v2.1 has built in LCD Module. So you just need to connect the sensor module on PORTC pins and supply the module from 5 volt output pins. See the image below.
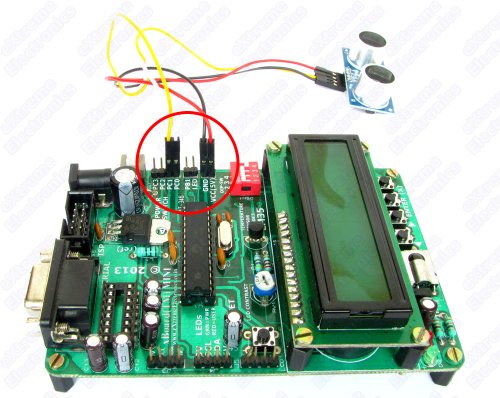 |
Fig. xBoard MINI and HC-SR04 Sensor |
Supplying External Boards
External boards such as the LCD Board and Ultrasonic Range Finder Module requires 5v supply. You can easily supply them from the extra power output from the development board. The image below shows their position.
 |
Fig. Extra Power Output |
Burn the Program
Download the ready made program given below and burn it into your development board.
to burn the program you need a USB AVR Programmer as shown below. This will help you transfer the program from your PC to your development board.
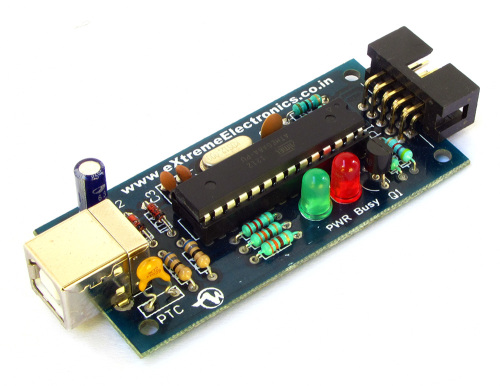 |
Fig. AVR Programmer |
Connect the programmer with the development board using a 10 pin FRC cable, then connect the programmer with your PC using USB Cable. On PC, launch eXtreme Burner – AVR, it is the software interface to command the programmer.
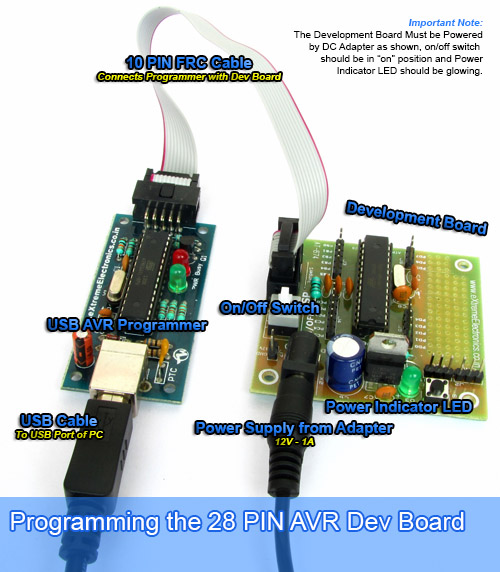 |
Fig. Programming Setup |
 |
Fig. eXtreme Burner – AVR |
Verify the Performance
To verify the performance, keep the sensor horizontally over a flat surface. Put a measuring scale in from of the sensor on the same surface. Then bring your palm in from of the sensor. You can know the distance of your palm from the sensor by the measuring scale. This same reading (in cm) should be shown on the LCD. This verifies that the demo is working perfectly !
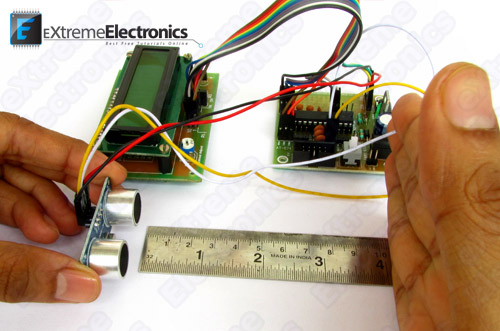 |
Fig. Testing HC-SR04 |
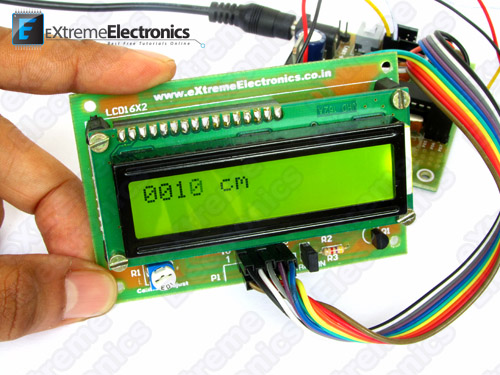 |
Fig. Testing HC-SR04 |
Schematic
 |
Fig. Schematic for HC-SR04 interfaced with ATmega8 |
Part List
| S. No. | Reference | Value | Part | Qty |
| 1 | R1 | 100 Ohms | Resistor 1/4 watt | 1 |
| 2 | R2 | 330 Ohms | Resistor 1/4 watt | 1 |
| 3 | R3 | 4.7K Ohms | Resistor 1/4 watt | 1 |
| 4 | C1 | 470uF | Electrolytic Capacitor 25V | 1 |
| 5 | C2,C5,C6,C7 |
0.1uF(100nF) | Ceramic disk type capacitor | 4 |
| 6 | C3,C4 | 22pF | Ceramic disk type capacitor | 2 |
| 7 | D1 | 1N4007 | Diode | 1 |
| 8 | D2 | – | 5mm LED – Round – RED | 1 |
| 9 | U1 | ATmega8 | ATmega8 MCU | 1 |
| 10 | U2 | 7805 | 5V Voltage Regulator | 1 |
| 11 | L1 | 10uH | Inductor | 1 |
| 12 | RV1 | 10K Ohms | Preset (Variable Resistor) | 1 |
| 13 | SW1 | – | On/Off Switch | 1 |
| 14 | X1 | – | DC Socket | 1 |
| 15 | X3 | 16MHz | Crystal | 1 |
| 16 | X4 | HC-SR04 Sensor | 1 | |
| 17 | – | – | 28 PIN IC Socket | 1 |
| 18 | – | – | 16 PIN Female Connecter | 1 |
| 19 | – | – | 4 PIN Female Connecter | 1 |
| 20 | – | – | 16 PIN Male Connecter | 1 |
| 21 | DISP1 | – | LCD Module 16×2 GREEN B/L | 1 |
Downloads
Video Demo
Buy this project
Buy this project fully assembled and tested !
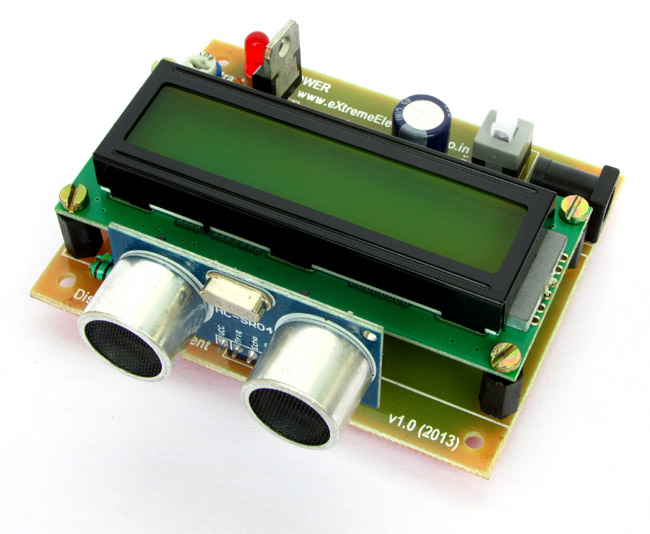 |
Fig. Made on custom PCB |
Pingback: Interfacing Ultrasonic Rangefinder with AVR MCUseXtreme Electronics
Hello, this is good.I haven’t tried the code yet but from looking through it, I can tell it works fine. A few days ago I built mine using multiplexed 7 segment display because I had problems connecting my 20×4 lcd with your lcd library which I have being using for my 16×2 lcd projects.I am really grateful for all the time you spend in creating these projects.
I will now try this one hoping that the lcd library in the project will work for my 20×4 lcd. Thank you very much….
Thank you.
I would like to use 3 seven segment displays instead of LCD.. could this be easily modified and how?
i am final year student,my project is on ultra sonic distance meter….so,i want programming code for this……but without using arduino kit,plese reply me fast
@Bhavsar,
This project don’t use Arduino ! baby! Please read bit carefully before vomiting !
Bonjour ,
je veut savoir le code de la carte atmega8. Pouvez vous m’aidez s.v.p
I just built it using a 20×4 lcd and it works just fine. thank you
Hello , i’ve got an idea to build stairs light using this ultrasonic sensor. This sensor will tell me quite exactly the position of anyone stepping up or down the stairs , then controller will decide which stair light will be turned on. Thank you for your demo.
can u give us tutorial on smart cards .. it’s design
or u can even give me the link where i can study about it
Good Job Abhinash !!!!!
Awesome website Sir…
Sir, I want to know how the Echo Sensor works
and want o/p it produces And how Atmega 8 is able to recognize it.
I want the whole method Not jst the code so that i can connect to somewhere else except PC0 , PC1
Hi Avinash, if you can see this question and answer it as soon as you could it will be mostly appreciated! i have a univeristy project due right 2days fron now and was using this sensor to do some distance measurements, but I am using a plain Atmega 32 without 16MHz Cystal. i tried running this code but it only keeps displaying 112 cm on screen this seems to me like some sort of bad timming so i tried to change TCNT1 to 30000 insteady of 60000 in my case but i still get LCD displays error! plz help me as it’s a matter of time before it’s too late.
Many Thanks.
Hello,
it’s a very fine projekt and works well!
Is it possibel to get the quellcode ??? I hope so
Because i’d like to use this projekt on an Atmega32-Board for an additional applikation.
@µOnkel
Thanks for feedback !
i have to buy this project how much is its price??
kindly inform me..
and reply
@Sherjeel,
Buy this kit from here
http://store.extremeelectronics.co.in/Distance-Measurement-Using-Ultrasonic-Waves.html
Price Rs. 1368 (Free shipping)
kindly send me the programme ist
please
Hey,
i wanted to know whether i can build this whole project with the 6 things that you listed above in “things required” or do i need some other parts along with these…..
please reply fast as i have to order these things latest by tomorrow….and also can you please tell me how much time would it take you guys to deliver these to my address in Delhi.
@Gaurav,
Yes, you need only those six parts only.
delivery in New Delhi will take about 4-6 working days.
can u provide the c code for reference?
@Nirmal,
You should have had a look at the download section (that means read the article “PROPERLY”).
If you should have looked their.
Their was the “Complete Atmel Studio 6 Project”
that means the whole project can be loaded on AS6 (Atmel Studio 6)
That project will contain the C code of the application and the libraries.
sorry thanks 🙂
hi avinash,
can i burn the program using avr studio 4??
if not than what changes should i make in the program to burn into the ic using as4.
thanks in advance
Sir..can you tell me if use glcd 128×65..and progaraming with cvavr…
Can you please tell me how i can get the HC-SR04 in proteus for simulation?
Download Ultrasonic sensor library of Proteus from google
Here is the link of the Library.
https://www.theengineeringprojects.com/2015/02/ultrasonic-sensor-library-proteus.html
which one will you prefer to do with atmega 16 or 8.. becuase we are trying to incorporate this code with line follower code and we r using atmega 16.. thank you 🙂
sir,
I am using gh 311 rt ultrasonic sensor, 3 pin sensor, giving pwm output, can u please help me at finding distance using same.
can u plz tell how to multiplex the leds
Plz give the working principle of the sensor and explanation of the c code.
thanks 🙂
Hey!
you get a working principle since july?
greetings.
Kim
hello
I have a wonder that employ a loop of 600,000 in the first ‘for’ ??
and the second?
and because you expect the timer is greater than 60000?
thanks
Dear sir:
Thanks a lot for your useful circuit offered to us in your web page. I hope I could make it and use it in the back of my car to see how far I have to run into the back car parked behind mine. Again, so cordially I thank you specially for the HEX file attached to your web page. It was very kind of you
I hope to see such circuits more and more in your web site.
Your Sincerely Saeed M.
Dear Avinash:
fortunately I managed to build your project, however to my surprise I saw the distance shown on the LCD screen is 1/16 of the real distance, would you please let me know what the reason is and how I can fix this problem?
Cordially thankful
Saeed Mahdavi
I am having a similar problem. I didn’t use a development board. I just burned the hex to Atmega8 using AVRDUDE. It shows 0000cm until about 15 cm and starts showing 0001cm. When you move the object 10 – 15 cm further it shows 0002cm. Move another 10-15 cm further and it shows 0003cm and so on. These changes take about 5 seconds to update the LCD so the response is very slow as well. What am I doing wrong? Or could there be something to do with the code? I have tried the circuit with 3 different HCSR04 modules and all the same.
@Mehmet, ok we will help you with that. But please tell us from how long you are reading our site?
i think the problem is with your external clock.please use 16 MHz clock to get the exact results,as the timer pre scaler and other things are optimised for 16Mhz clock.by default the atmega8 will be clocked at 1MHz.which is 16 times slower than 16 Mhz.
Mr. Avishal
i am still awaiting your guidance.
Hello dear.
I have used the site and your content so thank you. Please leave a tutorial about how ARM microcontroller thanks
salam agha fardin afzali:
man saeed hastam ahle esfahan, kheili alagheh mand be microcontroller ha hastam. va az kar kardan ba oon ha lazzat mibaram.
shoma ahle koja hastid ?
dar barehe micro controller ha cheghadr midoonid ?
rastesh in madar ro man montaj kardam vali meghdar neshoon dadeh shodeh dar rooye LCD 1/16 meghdare vaghehi bood fekr konam dar neveshtane barnameh eshtebehi kardeh bashand.
montazere javabetoo nhastam
saeed mahdavi
salam agha fardin azadi:
man saeed hastam ahle esfahan, kheili alagheh mand be microcontroller ha hastam. va az kar kardan ba oon ha lazzat mibaram.
shoma ahle koja hastid ?
dar barehe micro controller ha cheghadr midoonid ?
rastesh in madar ro man montaj kardam vali meghdar neshoon dadeh shodeh dar rooye LCD 1/16 meghdare vaghehi bood fekr konam dar neveshtane barnameh eshtebehi kardeh bashand.
montazere javabetoo nhastam
saeed mahdavi
Hi Avinash, My interest in electronics started a few years ago. I must have come across your site but probably didn’t spend much time as I was just beginning and most of this site’s content is about MCUs. When I was searching about distance measurement projects a few weeks ago, I have seen this project. I already had the HCSR04 module so I ordered an Atmega8 and set it up on breadboard. Thanks
Hi Avinash, I sorted it out. In the forum of this website, I found the fusebits settings for Atmega8 for 16mhz external crystal ( lowfuse 0xFF , highfuse 0xC9 ), applied them to Atmega8 and voi la , it works perfectly now. I found everything I need here. Thanks for everything.
hello
Thanks for this tutorial. its very useful to beginners.
i have update your code in Atmega16 micocontroller thanks once again .
Instead of atmega 8 m using atmega 16. so pls provide me the hex file for it.
Dear Avinash sir i am working with ultrasonic module HC-SR04 can u please provide the code for interfacing atmega32 with this ultrasonic sensor module………..
thanking you sir,
yours faith fully,
mahendra.
I read your tutorials, and took a clear idea for AVR. Great great work!!!
Thank’s a lot Avinash and rest of the team.
its really good
can I get the code that I can use on atmega 8 oor 16
Thanks for the manual and files, The program worked but it’s slow in response and the measurement is inaccurate e.g a distance of over 1m will show 7cm. Please you assist on what to do
Your MCU is running slow, this is because either you are using a slower crystal oscillator or have NOT configured the MCU to use the external oscillator.
Is it possible to give me a new link where I can download the program, because the link in this article doesn’t work any longer.
Thanks, Pieter
Hello Avinash,
Can you guide to interface LCD,LED & Buzzer on the response of Ultrasonic sensor?
How can i make a program ?
Guide me please.
Thank you,
Neerendra Singh
sir i am unable to download the code..it says account is banned. what to do?
my email id is nikhilpnp@yahoo.com
@Nikhil,
Where do you live? Address?
Mumbai, Maharashtra
@nikhil,
Sorry but we only give files to our friendly customers.
Hii, I need a program code to detect crack on railway track using atmega8 and hc sr04.Please send me
thank you
hello sir,
when I go on your review page link and try to publish my review, the site says “we are temporarily unable to publish your review”
What to do?
I really found your code extremely helpful.
@Ninny,
Thank you.
You may try this link
https://www.google.co.in/search?q=extreme+electronics&ie=utf-8&oe=utf-8&gws_rd=cr&ei=16ffVvXnDYuRuATT-bP4AQ#gws_rd=cr&lrd=0x39f5e30130d1ee61:0x472c4ea91ff8e6a5,2,,
I have used 8MHz crystal in ATMEGA32 so where i have to change the code because it shows wrong distance.
please attach the lcd file of the above program
wow this good modules thank you for the share
Thanks for the assistance but i aint getting few of the things like why are we taking the factor of 6000000? and that what is this line doing in the loop?
if(!(US_PIN & (1<<US_POS))) continue; else break;
i mean what are we checking here?
Secondly,why and how are this 0xffff and 0xfffe used for here?
Hello, I tried to make this project in Proteus 8, but it’s not working. And if I have ATMEGA328P-PU, the hex file will work on my Microcontroller? Thanx!
Please post here http://digital-wizard.net/helpdesk/ask
Hi avinash,
There are lot of articles about avr vs arduino. Would required your suggestion in this?
very useful article it was very helpul
what factor can i use for 8MHZ crystal instead of 6000000 Thanx in advance
@Mr. Nagesh,
May I know what is the reason to use a 8MHz crystal in place of a 16MHz?