Internal peripherals.
Now you know the basics of peripherals, lets see what peripherals are available in ATmega16 MCU.
- Two 8-bit Timer/Counters with Separate Prescalers and Compare Modes
- One 16-bit Timer/Counter with Separate Prescaler, Compare Mode, and Capture Mode
- Real Time Counter with Separate Oscillator
- Four PWM Channels
- 8-channel, 10-bit ADC 8 Single-ended Channels 7 Differential Channels in TQFP Package Only 2 Differential Channels with Programmable Gain at 1x, 10x, or 200x
- Byte-oriented Two-wire Serial Interface
- Programmable Serial USART
- Master/Slave SPI Serial Interface
- Programmable Watchdog Timer with Separate On-chip Oscillator
- On-chip Analog Comparator
Interfacing Technique.
|
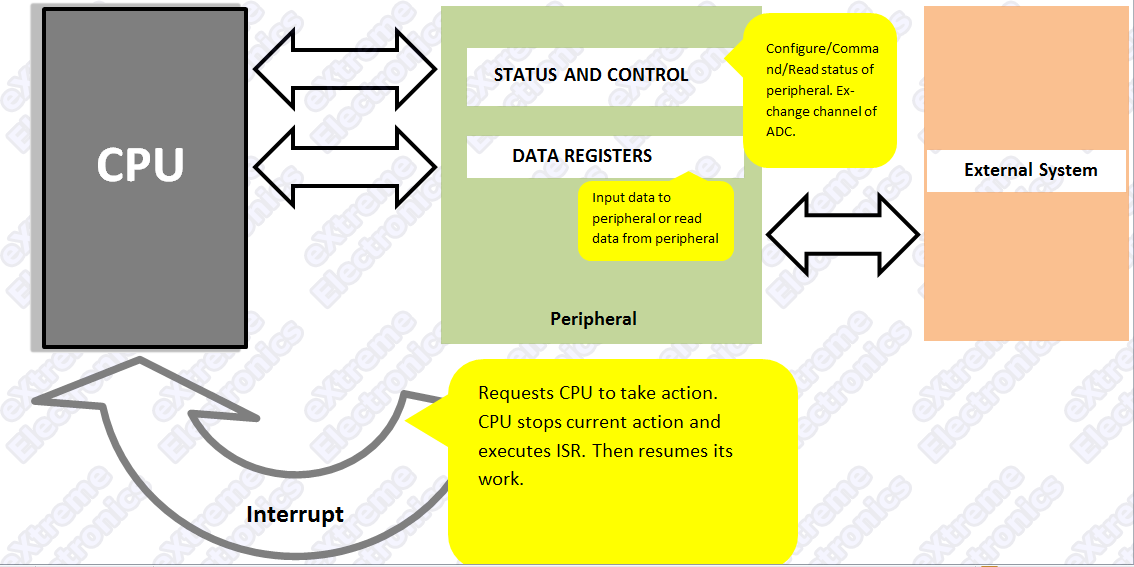
Fig: Using internal peripherals of AVR MCUs. |
A peripheral is connected to MCU by some special registers. The different registers of any peripherals can be logically of two types-
1)Data registers – which usually contains some data, say byte received from USART or data just read from internal EEPROM.
2)STATUS and CONTROL register – these are used to configure the peripheral according to your need, and to control them from your program. For example the ADMUX register has following bits.
Bit No. |
7 |
6 |
5 |
4 |
3 |
2 |
1 |
0 |
| Name | REFS1 | REFS0 | ADLAR | MUX4 | MUX3 | MUX2 | MUX1 | MUX0 |
Interrupts.
As we saw the you can use the STATUS registers to see the what the peripheral has to say to the CPU, like it has just completed the conversion Analog value to digital and the data is ready. But in this way you have to constantly poll the registers. But one more advance feature is INTERRUPTs. Where the peripheral halts the CPU whenever it has something interesting. Then the CPU will jumps to a function called ISR (interrupt service routine) which is provided by you. You can configure which events should interrupt the CPU and also provide the ISR.Steps to use peripherals.
- First setup the peripheral according to your need.
- Set interrupts and ISRs (Optional)(beginners may skip for simplicity).
- Command the peripheral or read / write data.
Download PDF version| Get Adobe Reader Free !!!
| What’s Next |
| We will use a very useful peripheral of AVR – The ADC (analog to digital converter). |
Good introduction.
Please try to include some example codes too (preferably in WinAVR C) to make it useful!
Hi Abhijeet,
ThanX for you comments.
This is just an introduction so that you have the overview when we jump start using the actual peripheral. This tutorial only provides the concepts that will help beginners. The later tutorials will have all the CODES !!!
So don’t worry.
The tutorial is so simple and so good.It makes things so easy for a beginner.Thanks a lot.keep postin.I’m eagerly waitin for the next post.
Hi Atiya,
Thanx
Many tutorials comming up !
Please do post comments and share your thoughts. This makes me improve the site
ThanX again
Pingback: Using the Analog To Digital Converter. | eXtreme Electronics
Pingback: AVR Timers - An Introduction. | eXtreme Electronics
Pingback: Timers in Compare Mode - Part I | eXtreme Electronics
Pingback: Using the USART of AVR Microcontrollers. | eXtreme Electronics
Hello I have read all you have write about AVR, because I must program in Atmega32.
You have help my very much.
Can you recommend mi a book for learn AVR “Atmega 32” or a page in internet?
Thanks for the help!!!!
@Percy
Welcome!
Best way to learn deeply about AVRs is their datasheets. Go through tutorial on my site and then when you have basic knowledge abt a topic go an explore the datasheets!
I also program with ATmega32 and all example you get here applies directly to ATmega8 , ATmega16 and ATmega32. These chips are best to get started with AVRs
i m very impressed with your website .. d tutorials written y u r so simple .n can b understood anyone ..me myself being a beginner can tell u that u have done an amazing job coz making things simple for others is the tougest job !!! keep it up !!!
simple, easy to understand , short tutorials
so these tutorials have all the qualities of good tutorial. you must write a book on avr fo beginners (hint: just combine the tutorials)
🙂 liked them
This tutorial very simple and good for beginners. i think you include some programe example in assambly language because there are many people include me we are use assembly language.
hello sir your portal is superb!
here i am beginner in avr atmega32
here got confused with term uint16_t,why we used or is this type we used for specific platform.
so please guide me.
thanks in advance
I’m learning a lot from this page :). Thanks…
Thank for ur information,I have learn a lot from this but I need detail of free running mode since am beginner for Atmega32 avr.
and I need it badly to do summer project by this controller..thank in advance
hello thax 4 the intro can you recommend any good books on the subject?
@AvrBestever,
If you wait for a book to come out, then you will find that chip in Museum.
Tech world is fast and furious.
It’s great site for me to learn everything i want…thanks a lot for this effort..
excellent tutorials ! i became a fan of you !! cheers !!! what will be the difference between the MCU’s.eg: difference between atmega88 and atmega32 etc bro?
Hi…..
nice work, i started working on AVR microcontrollers after reading ur tutorials and they made it easy…….can u upload a tutorial related to concepts of UART programming………..and I am always in doubt related to PIND register…can u elaborate it with some more examples…????
Thanks
@Divyansh Khunteta
Hey man ! U need “UART Programming” concept ? Put “UART Programming avr” in google before asking me …
Their my “elaboration” already done comes on the 1st rank !
I never help anybody catch fish, rather I teach him/her how to catch a fish so he/she can catch it all their life time !
@ Avinash,No doubt your work deserves appreciation, i’m following your website from a while i admire your work, i cant help but notice one thing constantly, why are you so cocky? i mean why do you give this attitude when some one(mostly newbies) ask you something which in most of the cases sounds “stupid” to you.
May be i’ll be getting one of those replies but, i cant understand why would you do that, on the one hand you’ve formed this very informative site, you’ve included tutorials so i believe you want to help people who are new at this, than giving them such harsh replies that’s kind of an irony to me.
@Ankit,
Because those stupids need that only !
Avinash
believe me when you deal with people with good ethics ,that’s better
and remember God will not waste the reward of your work and helping people.:)
So I wish GOD helps you in a good life for helping us dear 🙂
@Shenawy,
Ethics does not implies I have to please all the people in this world. Only the bird of same wing folk together. Ask my close people so know about my ethics.
:)u r honest man
@Shenawy,
This world is and always will be divided ! Sometimes race and religion or some times good and bad !
Not people are same, not all people follow same approach.
I don’t talk with Those who have approach or solution different than me!
They may be right or wrong I don’t know.
Their is no absolute in this world except life and death. Only those to are common between all the being of this world, those are common between worst of enemies!
Everything else is relative good, bad, brightness darkness everything.
u r right ,I agree with u 🙂
and I wish 4 u and my self to be good,helpful,beloved people and a happy life in this world 🙂
very usefull, thanks,
really nice man,any one can understand this tutorial.thank u so much
Thanks for the information
you have written it easily
Thanks for your tutorials. Please provide a detailed tutorial on FUSE BIT programming of AVR.
Thank you very much! Great help for a beginner…
Thanks! Since I am intended to learn µc by my own. It helped me a lot.
does the timer feature works same for atmega8 or is there any specific difference between atmega16 and atmega8 timers.