A large number of embedded project require some type of user interface. This includes displaying numerical, textual and graphical data to user. For very simple numerical display we can use 7 segment displays. If the requirement is little more than that, like displaying some alphanumeric text, we can use LCD Modules. They are cheap enough to be used in low cost projects. They come in various sizes for different requirement. A very popular one is 16×2 model. It can display 2 lines of 16 characters. Other models are 16×4,20×4, 8×1,8×2 etc.
In this tutorial we will learn how we can use such modules with Microchip PIC Microcontrollers. Here I will present my LCD library which you can use to create LCD based application/projects quickly. For demo I will use PIC18F4520 Microcontroller but you can use any PIC18 MCU. But you have to calculate the CONFIG values for correct setting and CPU clock selection etc. That means the chip should be configured correctly. See datasheet for more info on CONFIG bytes.
MPLAB Project Creation
First create a MPLAB project as described in this tutorial. Name the project LCD. Also add a main file called "lcd_test.c". To use my LCD library you need to add it to your project. Just copy/paste the following files to your project folder.
Header Files
- lcd.h
- myutils.h
Source File
- lcd.c
How to add files to MPLAB Project is described here.
Now you are ready to the library functions to interact with the LCD module.
Sample Program (lcd_test.c)
/********************************************************************

16X2 ALPHANEUMERIC LCD INTERFACING LIBRARY TEST PROGRAM

---------------------------------------------------------

A testing program for our LCD library.

Easy to use library for interfacing 16x2 lcd in 4 bit mode.
MCU: PIC18FXXXX Series from Microchip.
Compiler: HI-TECH C Compiler for PIC18 MCUs (http://www.htsoft.com/)

Copyrights 2008-2009 Avinash Gupta
eXtreme Electronics, India

For More Info visit
http://www.eXtremeElectronics.co.in

Mail: me@avinashgupta.com

********************************************************************/
#include <htc.h>

#include "lcd.h"

//Chip Settings
__CONFIG(1,0x0200);
__CONFIG(2,0X1E1F);
__CONFIG(3,0X8100);
__CONFIG(4,0X00C1);
__CONFIG(5,0XC00F);


//Simple Delay Routine
void Wait(unsigned int delay)
{
   for(;delay;delay--)
      __delay_us(100);
}

void main()
{
   //Let the Module start up

   Wait(100);

   //Initialize the LCD Module
   LCDInit(LS_BLINK);

   //Clear the Module
   LCDClear();

   //Write a string at current cursor pos
   LCDWriteString("Good Is Great !!");

   Wait(20000);

   //Now Clear the display

   LCDClear();

   LCDWriteString("God Bless all !!");

   //Goto POS (X=0,Y=1 i.e. Line 2)
   //And Write a string
   LCDWriteStringXY(0,1,"<**************>");

   Wait(20000);

   //Write Some Numbers

   for(char i=0;i<100;i++)
   {
         LCDClear();
         LCDWriteInt(i,3);
         Wait(3000);
   }

   LCDClear();
   LCDWriteString("    The  End    ");

   //Loop Forever

   while(1);


}
The First thing you should do is to Initialize the LCD Module by calling the fuction LCDInit(). This will setup the LCD module. Now you can use the various functions like…
- LCDClear() – For Clearing the screen.
- LCDWriteString(unsigned char *) – For Writing Text Message at Current cursor position.
- LCDWriteStringXY(x,y,msg) – For Writing Text Message at position x,y
- LCDWriteInt() – For printing integer numbers at Current cursor position.
- LCDWriteIntXY() – For printing integer numbers at position x,y.
For detailed information on these functions please refer to this tutorial. It is for the AVR microcontrollers but the functions are same for PIC mcus also.
Hardware Connections
Connect the LCD Module with PIC Microcontroller as shown below.
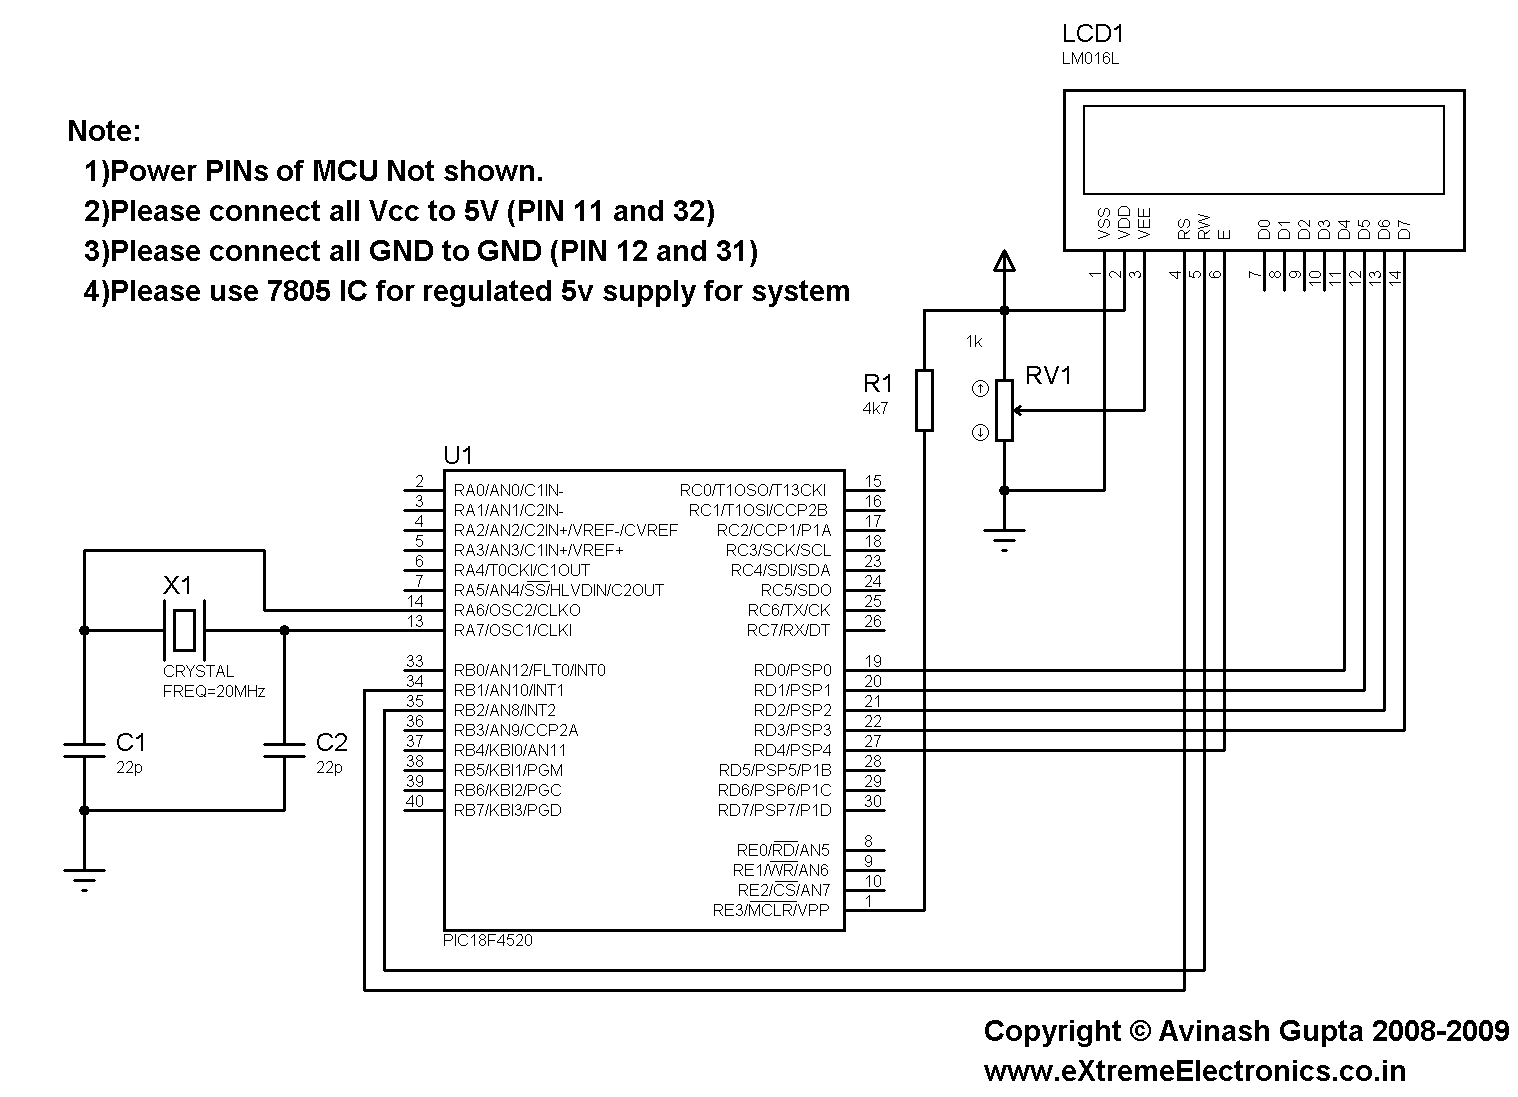 |
Fig.: LCD Module Interface with PIC Microcontroller. |
If you are using our PIC development board then you don’t need to care for crystal or power supply (they are already on board). You just need to connect the LCD to PIC micro by using 7 i/o lines. 5v supply for LCD and Variable Resistor (10K) can be easily drawn from the board.
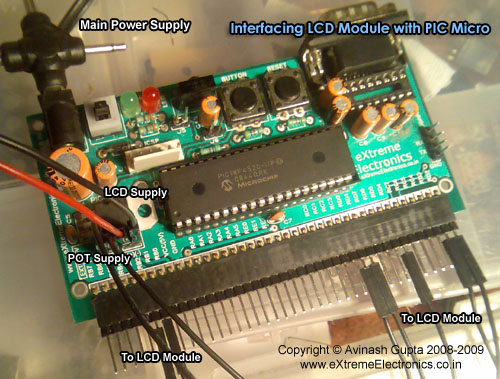 |
Fig.: LCD Module Interface with PIC Microcontroller. |
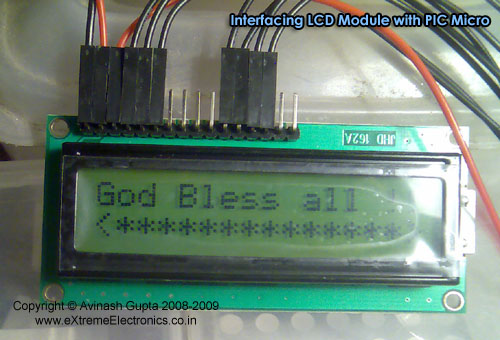 |
Fig.: LCD Module Interface with PIC Microcontroller. |
Program the Micro controller with the HEX code using the ICSP method described here. Then adjust the Variable resistor until the display is clearly visible.
Videos
Coming Up !!!
Downloads
All files required for this experiment.
Fantastic!
This is how a website for beginners should look like. Simple projects with clear explanation.
Pingback: Interfacing DS1307 RTC Chip with AVR Microcontroller | eXtreme Electronics
This code is really useful for me I am an Engineering student and this code is very important for me Thank you very much for this useful post.
Thanxz dude….
This site is very useful to the beginners…. Thank u…
Thanku so much…
dis was realy helpful…
but can we do the same ussing pic16f876a????
how to include lcd.h header file.???
pl rply
Thanks man! I used your tutorial long before I learnt embedded C and I always refer to it. I wrote a tutorial how to do the same in C, enjoy!
http://hubpages.com/hub/How-to-write-text-to-an-LCD-using-a-pic-chip
i am beginner in pic microcontroller and want some more info untill now what ever we got from your site i complttly sutisfy.
Pingback: Problem with Hi tech C and pic18f4550+lcd
Guys, I tried the write a string to LCD function but kept failing.
My function was
void Print_Word(const char *Word)
{
SendLCDdata(0x80, 0) //Starts first line
while(*Word)
SendLCDdata(*Word++, 1); //sends letters one by one
}
then in main i send something liek this
Print_Word(“Hello World!”);
I use MPLAB and MCC18 to compile in, I dont receive anything on my LCD, what is going wrong?
I tried using MPLAB SIM debugger and check the *Word value, weirdly, it gave me “Restricted Memory”
Would be much appreciated if someone can help me out with this.
use this function:
#include
//Function definition
void LCD_Cmd(unsigned char);
void LCD_Print(const unsigned char *)
//Function Declaration
void LCD_Print(const unsigned char *dat)
{
int i;
for(i=0;i<strlen(dat);i++)
LCD_Cmd(dat[i]);
}
############## OR ##################
But this function doesn't works sometimes due to some factors with high speed controllers
void LCD_Print(const unsigned char *dat)
{
int i;
for(i=0;dat[i]!='';i++)
LCD_Cmd(dat[i]);
}
Pingback: Making “The LCD Expansion Board” for PIC18F4520 | eXtreme Electronics
Pingback: Interfacing LM35 Temperature Sensor with PIC Microcontroller. | eXtreme Electronics
Thank you, it was wery helpful!
Köszi…
Pingback: need data code for 8 by 8 dot matrix display
nice tutorial.
rather i would like to share an another good tutorial for Interfacing LCD with 8051 Microcontroller
http://www.engineersgarage.com/microcontroller/8051projects/interface-lcd-at89c51
check this link out
Can this be used on the PIC 18F4550??
Hi, i have a problem on the 1st line of my lcd, apparently its offset by 2 box to the left. But not a problem on the remaining line. I am using a 4×20 lcd. And everything works fine except for the offset part. It only occurs on the words but not the counting number part. Help? thx!
Ty for all, this webpage is so awesome!!!!
Pingback: [SOLVED] 16x2 lcd display problem
Nice Tutorial!!!
I want to interface Graphical LCD based on two KS0108 Controller,
with my PIC16F877A micro-controller.
Do you have any tutorial for that.
thanks a lot for your circuit i got a lot of ideas for my project design,,,,,
IF i am not wrong then if i have to PIC18f4550 inspite of PCI18f4520 then all I have to do is to set config according to PIC18f4550 …
am i right?
Please provide the config bytes for pic18f4550 the CONFIG of pic18f4550 is in the from something like
;Configuration bits
CONFIG OSC = HS
CONFIG FCMENB = OFF
CONFIG IESOB = OFF
CONFIG PWRT = ON
CONFIG BOR = BOACTIVE
CONFIG BORV = 27
CONFIG WDT = OFF
CONFIG WDTPS = 128
CONFIG MCLRE = ON
CONFIG LPT1OSC = OFF
CONFIG PBADEN = OFF
CONFIG DEBUG = OFF
CONFIG XINST = OFF
CONFIG BBSIZ = 1024
CONFIG LVP = OFF
CONFIG STVREN = OFF
CONFIG CP0 = OFF etc etc
But in your code it is some other. I couldn’t find and understand much of datasheet for pic18f4550.
Please provide chip setting with a short desc
Thanks 🙂
Here is a very basic question. This LCD example contains a header file named lcd.h Hi Tech C also has a lcd.h file. How does the compiler know to use the included lcd.h or the one that is part of Hi Tech C?
@Eric
See this
http://gcc.gnu.org/onlinedocs/cpp/Include-Syntax.html
You should notice that in my program I have writtem
this syntax searches lcd.h in the same directory first where the source file contain the #include directive.
I request all users to jump into Embedded system only after knowing C very well, or be confused over the basic at every line.
notice the difference between
including of htc.h and lcd.h
I want to interfacing LCD with PIC16F628A using Hi Tech C. Where I can get the library files?
Hi, I would like to ask if it is possible to tie the R/W pin to GND(Logic 0) as i will only be writing to the LCD and not going to read from it, and also a fixed resistor at 10k Ohms instead of a variable resistor?
@Alpha,
If we don’t read the LCD how we know when it busy or free? We cannot send command when its busy!
If you use fixed resistor how will you adjust the contrast. In worst case without proper contrast you cannot see any thing on LCD.
Okay, thank you so much, Avinash!
Dear how can i use this code in MPLAB C30.
for dsPIC33F
hi
from the program that is given,which part i need to change if I use the pic16f877a?
Hi the lcd hex file works. but when i tried to compile the lcd_test.h file, the compiler says “extended cpu mode is enabled,the compiled file doesn’t work”.how can i configure mplab ide hitech so that it can work? am waiting ur help. thank u.
can you please temme will this circuit will workout for an LCD display to get connected with an microcontroler…. please help me out
can anyone suggest good programmer for pic16f877a
can u please send me the code for lcd interfacing for pic 18f452..am using mplab with c18 compiler
@Akhil
“can u please send me the code for lcd interfacing for pic 18f452..am using mplab with c18 compiler”
I don’t get you! Why would I send anything to someone I don’t know ?
i amnewbie to pic and have a doubt..wat all changes will be required to program a pic18f4550 using mplab and mplab c-lite compiler..?plz help
Hi,
I like to know if i wanted to display decimal integer on the LCD. what should i do?
Hi Avinash,
I am new to embedded programming and got benefited a lot from your tutorials. My sincere thanks to you. I have one doubt about below lines your program,
//Chip Settings
__CONFIG(1,0×0200);
__CONFIG(2,0X1E1F);
__CONFIG(3,0X8100);
__CONFIG(4,0X00C1);
__CONFIG(5,0XC00F);
Could you kindly explain purpose of these settings? And also could you kindly explain how to calculate these settings for other 18FXXXX PIC micro-controllers?
Thanks in advance.
I have a noritake 20×4 VFD-model#: CU20045-UW5A,which I’m going to attempt to get this to work using the source code you have here. However, putting this code into MPLABv8.84 and using the HIGH TECH C Compiler,I get a host of errors. I’m wanting to eventually get a pic18f458 MCU, CP-PIC V3 to run the display.
Error [0] H:\EVERYTHING!!! 2376\ 5-LCD htc extrm electrns 04-25-12.c; 8.31 Cannot use literal values (0x0200) with __CONFIG(), use __PROG_CONFIG() instead
Error [0] H:\EVERYTHING!!! 2376\ 5-LCD htc extrm electrns 04-25-12.c; 9.31 Cannot use literal values (0X1E1F) with __CONFIG(), use __PROG_CONFIG() instead
Error [0] H:\EVERYTHING!!! 2376\ 5-LCD htc extrm electrns 04-25-12.c; 10.31 Cannot use literal values (0X8100) with __CONFIG(), use __PROG_CONFIG() instead
Error [0] H:\EVERYTHING!!! 2376\ 5-LCD htc extrm electrns 04-25-12.c; 11.31 Cannot use literal values (0X00C1) with __CONFIG(), use __PROG_CONFIG() instead
Error [0] H:\EVERYTHING!!! 2376\ 5-LCD htc extrm electrns 04-25-12.c; 12.31 Cannot use literal values (0XC00F) with __CONFIG(), use __PROG_CONFIG() instead
Error [285] H:\EVERYTHING!!! 2376\ 5-LCD htc extrm electrns 04-25-12.c; 14.1 no identifier in declaration
Warning [374] H:\EVERYTHING!!! 2376\ 5-LCD htc extrm electrns 04-25-12.c; 14.1 missing basic type; int assumed
Error [314] H:\EVERYTHING!!! 2376\ 5-LCD htc extrm electrns 04-25-12.c; 14.1 “;” expected
Warning [374] H:\EVERYTHING!!! 2376\ 5-LCD htc extrm electrns 04-25-12.c; 16.11 missing basic type; int assumed
Warning [374] H:\EVERYTHING!!! 2376\ 5-LCD htc extrm electrns 04-25-12.c; 16.17 missing basic type; int assumed
Error [314] H:\EVERYTHING!!! 2376\ 5-LCD htc extrm electrns 04-25-12.c; 16.17 “;” expected
Error [285] H:\EVERYTHING!!! 2376\ 5-LCD htc extrm electrns 04-25-12.c; 18.1 no identifier in declaration
Warning [374] H:\EVERYTHING!!! 2376\ 5-LCD htc extrm electrns 04-25-12.c; 18.1 missing basic type; int assumed
Error [314] H:\EVERYTHING!!! 2376\ 5-LCD htc extrm electrns 04-25-12.c; 18.1 “;” expected
Warning [361] H:\EVERYTHING!!! 2376\ 5-LCD htc extrm electrns 04-25-12.c; 23.1 function declared implicit int
Warning [361] H:\EVERYTHING!!! 2376\ 5-LCD htc extrm electrns 04-25-12.c; 26.1 function declared implicit int
Error [192] H:\EVERYTHING!!! 2376\ 5-LCD htc extrm electrns 04-25-12.c; 26.9 undefined identifier “LS_BLINK”
Warning [361] H:\EVERYTHING!!! 2376\ 5-LCD htc extrm electrns 04-25-12.c; 29.1 function declared implicit int
Warning [361] H:\EVERYTHING!!! 2376\ 5-LCD htc extrm electrns 04-25-12.c; 32.1 function declared implicit int
Warning [361] H:\EVERYTHING!!! 2376\ 5-LCD htc extrm electrns 04-25-12.c; 43.1 function declared implicit int
Warning [361] H:\EVERYTHING!!! 2376\ 5-LCD htc extrm electrns 04-25-12.c; 50.1 function declared implicit int
********** Build failed! **********
god bless u for this wonderful example and help
Can I use this code for PIC C18 compiler ?
Pics are cool, inspiring.
Pingback: PIC16F877A MPLAB and LCD 2x16
OK first of all thanks for such a nice explanation.
i just started with PIC micro-controller and the first thing clicked to my mind is extremeelectronis.. so i m here…
well i know about Micro-controllers as i have programmed AVR’s but PIC micro-controllers are totally new to me..
the thing i m concern about is the DELAY function that you are using…
i mean how accurate they are…and the logic behind that????
I m dealing with PIC16873A with 20MHZ Crystal.. in HS mode.
I have tried my LCD lib the one i made for AVR micro-controllers(Tested and working fine with them) Done all the modification required for PIC.
LED’s are Blinking like never before but LCD is not allowing me to move further…
Can u tell me where i m going wrong?….
hi,
i want to do for PIC18F4550 but when i compile the program it seems “No chip name specified; use PICC –CHIPINFO to see aviable chip names”
or if i load the hex file in PIC18F4550 it shows nothing.
please help me. I am new in this side. I am failed to interfacing LCD with PIC18F4550…………….:(
Thanks for the help.
Hello, i cant extract the files from the folder is there any other way i can obtain the headers and stuff for the program to compile, please 🙂
@Johannes, first learn how to download files from web and extract a zip package then proceed with other things.
i using 10mhz. so what i have to change..help me..thnks
hello
i’ve tried this code for pic16f877 while compiling undefined identifier “LATB” error is occuring what should i do
How to set configuration bits for pic18f452, but __config(0x0200), etc not work in mplab x ide, xc8
I have a problem with
//Chip Settings
__CONFIG(1,0×0200);
__CONFIG(2,0X1E1F);
__CONFIG(3,0X8100);
__CONFIG(4,0X00C1);
__CONFIG(5,0XC00F);
My mplabx does not recognize this
Which version of MPLAB? What C compiler you are using?
i don’t know how to configure this kind LCD 2×16 display GDM12232A ?