Tag Archives: atmega16

Simple Single Motor Control using AVR ATmega16

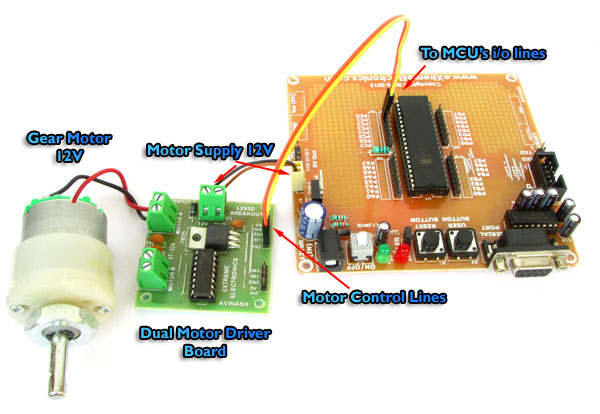
Microcontrollers are good when it comes to brain, but to do anything in real world they need muscles too ! Their muscles are electromechanical actuators like motors. Their are several types of motor available to do various type of motion. The simplest of them are DC motors. They can generate rotary motion and when wheels are attached to their shaft they can be used to move a body. Applications include motion of a robot on flat surface like a floor. Normally a DC motors runs at a high RPM, so to slow it down a gear head is attached in front of it. This makes RPM come down to values such as 50 RPM to 500 RPM. This also increase the torque online casino no deposit generated by the motor. The image below shows a 12v DC Gear Motor. The front black portion contains the gear assembly. Fig. A DC Gear Motor In this tutorial we will learn the basics about these motors and how to control them using a microcontroller. DC Motor Rotates in one direction when you apply power to its terminals. When you reverse the polarity of the supply it will rotate in opposite direction. Since a DC Motor requires current in the range of 400ma to 1000ma we cannot supply them directly from the MCUs I/O […]

Comparing Low Cost AVR Dev Boards

Over the years I have seen people just open up the mouth without thinking. This is more common in the young age group like those of students. Often this also miss leads others. Recently we posted and ad on Facebook for our low cost development board which was priced at Rs. 299. Some guy without thinking a minute, compared it with a even lower cost product from some other vendor. What my point is that those two products are NOT similar ! Their are HUGE differences ! So I thought I should make out those differences stand out. Power Supply Our Board Probots’ Board Has built in 12V to 5V regulator circuit built using 7805 IC. No regulator. Advantage   You can power up the board using an adapter of any voltage output between 9v to 18v Using higher voltage adapter has the advantage that power from it can be used to driver higher voltage devices like relays or motors. You can power up using a 5v adapter only! If you need 12v supply to power relays or motors you need a separate adapter or battery.   Power Switch Our Board Probots’ Board Has an on/off switch No on/off switch Advantage   Easy power control. Frustration on long run.   Prototyping Area Our Board Probots’ Board Has large prototyping area […]

RF Communication Between Microcontrollers – Part III

Welcome to the 3rd part of RF Communication tutorial. In the last two parts I have introduced the basics of RF Communication. RF Communication Between Microcontrollers – Part I : Introduction to RF Communication and Modules. RF Communication Between Microcontrollers – Part II : Algorithm and general description of data transfer. Part III will be covering mostly the practical part, i.e. we will build a complete & working data transfer system. Here you will get circuit and program to implement the solution. The application is very simple in this case, just to transfer a byte of data from Tx station to the Rx station. Once you implement it and get it working you will have enough information and experience to make other RF based projects. I request all users to follows the instruction exactly as given (unless they are smart enough to know what they are doing). The most important thing in this article is timing of the MCU, so Use the exact frequency crystals as used in the designs. Write High Fuse = C9 (HEX Value) and Low Fuse FF (HEX Value) to enable external crystal. Hardware We will have two units. One is Tx (Transmitter) and Other is Rx (Receiver). Both units are based around ATmega16 MCU(you can use ATmega32 also) on external 16MHz crystal. On the Tx […]

AVR Development Board – Assembly Instructions

A well designed development board is always essential for smooth development/experimentation with microcontrollers. Every hobbyist must have some kind of development setup. Some people use breadboard while others use veroboard to fabricate their development system. Many also use ready made off the self development board. Development is not very easy if you use only bread boards or veroboard. If you use bread board, after few days of use the wire will become loose or come out of hole. While making large circuit in a veroboard is a tedious job. To solve these problem I decided to make a low cost development board that has the following features. Low Cost All Basic connection required for developing application with AVR MCUs A Serial Port Prototyping area (like a veroboard) Incircuit Programmable with USB AVR Programmer Supports 40 PIN MCUs like ATmega16 and ATmega32. Buy Fully Assembled and Tested AVR Development Board So if you use this board, its lots easier. The basic circuit for MCU (like power supply,reset,ISP,serial port etc) are already done on a high quality PCB and some space is left for you to add other project specific components. You can also design other part of your project in bread board. But this time your bread board will be lot cleaner as major tested circuit is on the development board. […]

Easy 24C I2C Serial EEPROM Interfacing with AVR Microcontrollers

In this turorial we will see how we can easily interface a 24C series serial EEPROM with AVR microcontrollers. What is an EEPROM? An EEPROM is kinds of novalatile memory, that means it is used for storing digital data permanently without any power suply. EEPROM stands for Electrically Erasable Programmable Read Only Memory. The advantage of these kind of ROMs is that they can be erased Electrically to make them ready for storing new data. Compare this with a CD R disks they can be recorded only once. A small amount of EEPROM is also available internally on the AVR chips. So if the volume of data you want to store is small (say few user names and password) then you can use it. The internal eeprom makes design small and simple. But if the amount of data you want to store is large, say in order of few tens of kilobytes then you have to interface a External EEPROM chip with your AVR MCU. You can store pictures, sound and long texts in these eeproms. Their are many kinds of EEPROM chip available from many manufactures. One very common family is 24C series serial EEPROMs. They are available upto 128KB in size. They uses I2C interface with host controller (MCU) which is a very popular serial communication standard. I […]

PWM Signal Generation by Using AVR Timers.

In the last tutorial you saw how the PWM technique helps us generate analog signals from a microcontroller. In this tutorial we will see how PWM generation is implemented with microcontrollers. Before you begin please see Introduction to PWM Introduction to AVR Timers Generation of PWM signals is such a common need that all modern microcontrollers like AVR has dedicated hardware for that. The dedicated hardware eliminates the load of generation of PWM signal from software (thus frees the CPU ). Its like asking the hardware to generate a PWM signal of a specific duty cycle and the task of CPU is over. The PWM hardware with start delivering the required signal from one of its PINs while the CPU can continue with other tasks. In AVR microcontrolers PWM signals are generated by the TIMER units. (See AVR Timer Tutorials) . In this tutorial I will give you the basic idea of how PWM signals are generated by AVR timers. Their are two methods by which you can generate PWM from AVR TIMER0 (for ATmega16 and ATmega32 MCUs). Fast PWM Phase Correct PWM Don’t worry from their names they will become clear to you as we go on. First we will be considering the Fast PWM mode. PWM Generation Fundas We will use the simplest timer, TIMER0 for PWM generation.(Note […]

Using the USART of AVR Microcontrollers : Reading and Writing Data

Till now we have seen the basics of RS232 communication, the function of level converter and the internal USART of AVR micro. After understanding the USART of AVR we have also written a easy to use function to initialize the USART. That was the first step to use RS232. Now we will see how we can actually send/receive data via rs232. As this tutorial is intended for those who are never used USART we will keep the things simple so as to just concentrate on the "USART" part. Of course after you are comfortable with usart you can make it more usable my using interrupt driven mechanism rather than "polling" the usart. So lets get started! In this section we will make two functions :- USARTReadChar() : To read the data (char) from the USART buffer. USARTWriteChar(): To write a given data (char) to the USART. This two functions will demonstrate the use of USART in the most basic and simplest way. After that you can easily write functions that can write strings to USART. Reading From The USART : USARTReadChar() Function. This function will help you read data from the USART. For example if you use your PC to send data to your micro the data is automatically received by the USART of AVR and put in a buffer […]