Tag Archives: mplab

USART Library for PIC – Setup on MPLAB X IDE

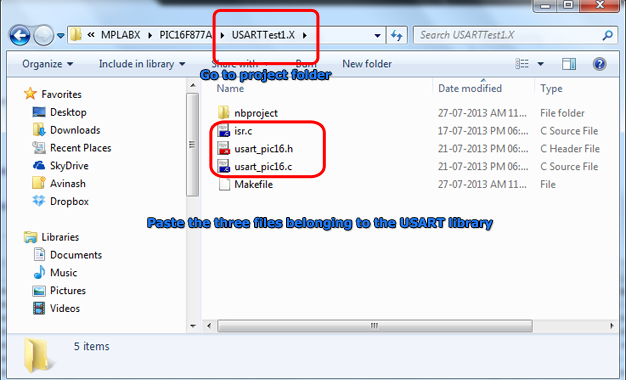
This article describes the setup and use of the C library for serial communication. We focus on its usage with PIC16F series of MCUs from Microchip. Here we describe how to setup a MPLAB X project with support for serial communication related functions. The library is designed for compilation and use with Microchip’s XC8 C Compiler. Fig. Serial Communication Demo   Creating a New Project in MPLAB X You can create a new project using the MPLAB’s Start page as shown below. Fig. MPLAB X Start Page Alternatively you can use menu File->New Project Fig. Select New Project from File Menu And for those who love the Keyboard over mouse can hit <Ctrl>+<Shift>+<N> Any of the three method will launch the New Project Wizard as shown below. The first step is the selection of project type. From the Categories list select Microchip Embedded and from Projects select Standalone Project. Fig. Project Type Selection Second step is the selection of device for which the project is targeted. Select Mid Range 8-bit MCUs (PIC12/16/MCP) in Family and PIC16F877A in Device. Fig. Device Selection Third step is the selection of debug tool. For that select Simulator. Fig. Tool Selection Microchip MPLAB lets you install more that one compiler. It also lets you install more that one version of the same compiler. So their […]

Serial Communication with PIC16F877A

This article series aims at teaching serial communication between a PIC microcontroller and a PC. We first introduce you with what is serial communication is and how it can used. Then we tell you how to perform serial communication using PIC microcontroller and how we use the USART peripheral for the purpose. We will tell you how our usart library for PIC16F series can be used for easy serial communication, in this part we also discuss how to set up a MPLAB X project for using the USART library. After that we will build a demo project to explore the library. Finally we will burn this demo in a PIC16F877A and establish a serial communication with PC. Serial Communication Their are several serial communication standards like RS232, SPI, I2C etc. Of which RS232 is a asynchronous method. That means it does NOT have a synchronizing clock line. One way data requires only one conductor line. Since it is a two way communication their are two lines between the two device. One for sending data called the Tx and one for receiving data called the Rx. The communication is full duplex, that means data can be sent at the same time data is being received. generally other serial communication like SPI and I2C are used for short range communication like between […]

Introduction to PIC18’s Timers – PIC Microcontroller Tutorial

Timers are common features of most microcontroller. In simplified terms a timer is just a register whose value keeps increasing (or decreasing) by a constant rate without the help of the CPU. The CPU can read or write this register any time. It reads it find out how much time has elapsed. The Timer register can have the following bit length 8 bit timers – These can count between between 0-255 16 bit timers – These can count between 0-65536 32 bit timers – These can count between 0-4294967296 A timer has a clock source, for example of the clock source of 10KHz is input to a timer then one increment will take 100uS (micro second). This clock source can be obtained from the CPU clock. The CPU clock of popular MCU ranges from 1 MHz to 20Mhz, this can be sometimes too fast. To help us out their is a thing called prescaler in the MCU. The job of prescaler is to divide the CPU clock to obtain a smaller frequency. The PIC Micro that we will use in this example has the following prescaler division factors available. 256 128 64 32 16 8 4 2 1 (Prescaler by-passed) Timers are also called Counters this is because they can be used to count external events. The following example illustrate […]

RS232 Communication using PIC18F4520’s USART – PIC Microcontroller Tutorial

Hello Friends! In this tutorial I will discuss how to practically do a simple communication over RS232 interface. For those who are completely new to this I clarify that the motive is to send and receive data between two device using a standard called RS232. RS232 is serial interface that means that data is transferred BIT by BIT at a time. Since data is transferred BIT by BIT so we need only a single wire two send data and an another one to receive data. One more common wire (called GND) is required between two separate circuit to enable current flow. So a total of three wire are required for communication. RS232 can be used to communicate between a variety of devices. Like your MCU and a GSM module or a PC. In this tutorial we will demonstrate a link between a PIC18F4520 MCU and a standard PC. On PC we will run a terminal program like RealTerm or Hyperterminal. A terminal program is used to send and receive text data. So any text send by the MCU will be visible on Terminal Screen and Any keypress you make on the PC keyboard will be send over RS232 to your MCU. This configuration is the simplest setup to test and understand RS232 communication. When you have enough knowledge you can […]

PIC Development Board – Hello World Project

Hello friends, welcome to this exciting tutorial were we will begin our journey with latest PIC18F micros from Microchip Technologies. This tutorial will give you information on what software/hardware you will require and basic steps on how to get, install, configure and use them. After going through this tutorial you will have a complete setup and knowledge to experiment with these powerful chips !           What you will learn ? MPLab as a powerful IDE. HI-TECH C for PIC18 MCUs as a powerful C Compiler. Creating a new HI-TECH C project in MPLab. Write a C Code to blink LED and compile it to get a HEX code. Configure the MCU for proper oscillator selection. Basic Use for PIC development board from eXtreme Electronics Burn the HEX code to MCU using eXtreme Burner PIC from eXtreme Electronics. Use the programmed MCU to actually blink the LED ! So lets get started !!! First get these stuffs Microchip’s MPLab IDE or Integrated development Environment. This is the central tool from where you can access most of other tools, like the C Compiler. This also lets you create and edit program files and projects. Download this from Microchips Web site and Install it in your computer. Download MPLAB IDE Free. HI-TECH C Pro for PIC18 MCUs – This […]

Hello World Project With PIC Microcontroller – Part I

Hello friends, welcome to this exciting tutorial were we will begin our journey with latest PIC18F micros from Microchip Technologies. This tutorial will give you information on what software/hardware you will require and basic steps on how to get, install, configure and use them. After going through this tutorial you will have a complete setup and knowledge to experiment with these powerful chips !         What you will learn ? MPLab as a powerful IDE. HI-TECH C for PIC18 MCUs as a powerful C Compiler. Creating a new HI-TECH C project in MPLab. Write a C Code to blink LED and compile it to get a HEX code. Configure the MCU for proper oscillator selection. Burn the HEX code to MCU using eXtreme Burner PIC from eXtreme Electronics. Use the programmed MCU to actually blink the LED ! So lets get started !!! First get these stuffs Microchip’s MPLab IDE or Integrated development Environment. This is the central tool from where you can access most of other tools, like the C Compiler. This also lets you create and edit program files and projects. Download this from Microchips Web site and Install it in your computer. Download MPLAB IDE Free. HI-TECH C Pro for PIC18 MCUs – This is will compile the high level human readable programs (in […]

Tutorial 0 – Getting Started with Microchip PIC Microcontrollers.

After my tutorial series on Atmel AVR Microcontrollers and I have planed to start a similar tutorial series on Microchip PIC Microcontrollers. PIC Family of Micros are popular among hobbyists as they are easily available, easy to use and are low cost. In the first couple of tutorial we will make/collect hardware and software tools which will be required to experiment with PIC MCUs. Once you have the basic tools up and running we will proceed to learning how to do basic stuffs with PICs, like setting and using PORTs, Controlling LEDs, Relays, Motors etc. These will help you as building blocks that will help you develop your own project and understand and implement thousands of PIC MCU projects out there in Magazines and Internet. These tutorials assumes that you are a beginner with Microcontroller i.e. having no or little experience with them. What is a Microcontroller? Ans: For information of "What is a microcontroller?" and how it can help you see this link. Selecting A Microcontroller We will start our journey with PIC16F877A and PIC16F628A Microcontrollers. Then we will move to high performance 18F core microcontrollers like PIC18F2550 and PIC18F4550. Tools Required What hardware and software tools you will need is described in this page. The article also gives you the over all process of development with MCUs. The […]