LCD Interfacing
xBoard MINI v2.0
Easy to Use learning and development tool for Atmel AVR family of MCUs.
 |
Fig - Onboard LCD Module of xBoard MINI. |
When you start working with LCD modules you will start feeling the real power of MCU and your imaginations will be touching sky you will wonder how many exciting a powerful gadgets you can create and thats so very easily.
LCD Modules can present textual information to user. Its like a cheap monitor that you can hook in all of your gadgets. They come in various types. The most popular one can display 2 lines of 16 characters. These can be easily interfaced to MCU's, thanks to the API( Functions used to easily access the modules) we provide. LCD interfacing is just fun !
 |
Fig: A 16x2 LCD Module |
PIN Configurations.
The lcd modules has 16 PINs for interfacing. The details are given below.
| LCD Module Pin Configuration |
Connected
with (AVR Port) |
| 1 VSS (GND Supply) |
|
| 2 VCC (+5V) |
|
| 3 VEE (Contrast Adjust) |
|
4 RS |
PB2 |
5 R/W |
PB0 |
6 E |
PD7 |
7 DB0 |
Not Connected |
8 DB1 |
Not Connected |
9 DB2 |
Not Connected |
10 DB3 |
Not Connected |
11 DB4 |
PD3 |
12 DB5 |
PD4 |
13 DB6 |
PD5 |
14 DB7 |
PD6 |
15 LED + |
|
16 LED - |
Connection with xBoard MINI.
A 16x2 LCD Module comes preinstalled with the xBoard MINI. The above table shows how the LCD is connected. Please have a look at the schematic of xBoard MINI for more detailed information.
Lets Do it !
Step I : Create a New AVR Studio Project, name it "LCDTest".
Step II: Copy the following files from the Folder LCD inside the folder xAPI on Support Disk.
lcd.c,lcd.h,myutils.h
Place them in the new project folder.
Step III: Now add the files you just copied to your project. In the left part of AVR Studio there is the Project display.
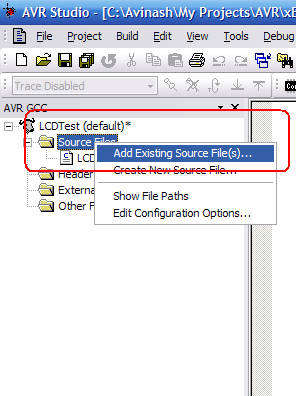 |
Adding a Source file to project. |
Right Click On the Source File And Select Add Existing Source File(s) ... Option and select the lcd.c file.
Similarly add "lcd.h" and "myutils.h" in the Header File Section.
Step IV: Open the file "LCDTest.c" (created automatically by AVR Studio), this file should be blank. Now type the following program in it.
Programming.
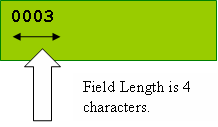
In your main C file include the file lcd.h as #include lcd.h then initialize the LCD subsystem using a call to LCDInit(LS_BLINK|LS_ULINE); the argument specify the type of cursor required the LS_BLINK gives a blinking cursor. LS_ULINE gives a underlined cursor. To write any text call LCDWriteString("Welcome"); To write any number call void LCDWriteInt(int val,unsigned int field_length); This will print a integer contained in varriable val . The field length is the length of field in which the number is printed.
For example LCDWriteInt(3,4); will print as follows
 |
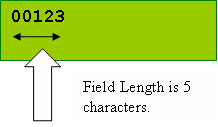
While LCDWriteInt(123,5) will print as follows.
 |
To goto any particular position on screen call.
| void LCDGotoXY(uint8_t x,uint8_t y); |
| LCDGotoXY(11,1); |
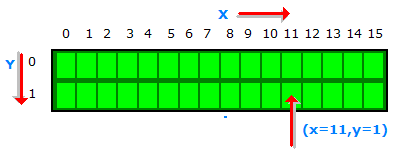 |
Fig: Cursor Positioning. |
Now anything you write to LCD will be printed at (11,1).
Clearing the display
| LCDClear(); |
LCDWriteStringXY(x,y,msg);
____________________________
x,y : the location where to print msg msg : the message to print Ex: LCDWriteStringXY(3,0,hello); LCDWriteStringXY(8,1,world); Output:
|

Similarly there is a function for integers.
LCDWriteIntXY(x,y,num,field_length); ____________________________________ x,y : the location where to print num num : the integer number to print field_length : the length of field (see LCDWriteInt() function above). |
Sample Program
/*********************************************************************

                 xBoard(TM) MINI v2.0 Sample Programs

               ------------------------------------


Description : Demonstrate the use of LCD interfacing functions.

Author      : Avinash Gupta 2008
Web         : www.eXtremeElectronics.co.in

**********************************************************************/

#include <avr/io.h>
#include <util/delay.h>

#include "lcd.h"

void main()
{
   unsigned char i;

   //Initialize LCD module

   LCDInit(LS_BLINK|LS_ULINE);

   //Clear the screen
   LCDClear();

   //Simple string printing
   LCDWriteString("Congrats ");

   //A string on line 2
   LCDWriteStringXY(0,1,"Loading ");

   //Print some numbers

   for (i=0;i<99;i+=1)
   {
      //First argument is column i.e. 9
      //Second is line number.
      //0 - for first line

      //1 - for second line
      //Third arg is int to print
      LCDWriteIntXY(9,1,i,3);
      LCDWriteStringXY(12,1,"%");

      _delay_loop_2(0);
      _delay_loop_2(0);
      _delay_loop_2(0);
      _delay_loop_2(0);


   }

   //Clear the screen

   LCDClear();

   //Some more text

   LCDWriteString("Hello world");
   LCDWriteStringXY(0,1,"By Avinash");    // <--- Write ur NAME HERE !!!!!!!!!!!

   //Wait
   for(i=0;i<100;i++) _delay_loop_2(0);

   //Some More ......
   LCDClear();
   LCDWriteString("    eXtreme");
   LCDWriteStringXY(0,1,"  Electronics");

   //YET Some More ......

   LCDClear();
   LCDWriteString("xBoard MINI v2.0");
   LCDWriteStringXY(0,1,"*** ROCKS !! ***");

}
Note: The sample programs are available under “Samples” folder in support CD. The HEX files ready to burn are available under “HEX” folder.