Timers are widely used in industrial and domestic application for automating tasks. Microcontrollers can be used to design versatile and accurate timers with ease. Here I present a simple timer that can be used to turn on/off a load after user specified time.
The Timer uses a standard 16×2 lcd module for user interface (UI). User can set the time using a 3 button keypad.
After that Timer is started. While count down is in progress, the time left is displayed on screen.
The program use our LCD driver library more details of which can be found in here. Use avr-gcc + AVR Studio to compile.
The prototype was developed using xBoard MINI, a low cost easy to use ATmega8 development board. The program was burned to the MCU’s flash memory using eXtreme Burner – AVR Software and Hardware. A basic knowledge of working with different tools of AVR development is required, so please refer to following articles.
Note:
- Fuse Must be set as follows, HIGH FUSE=C9 LOW FUSE=FF (Very Important)
- If display is blank please adjust RV1
Part List |
||
| 01 | ATmega8-16 PU | U1 |
| 02 | 16×2 LCD Module | LCD1 |
| 03 | 16 MHz Crystal | X1 |
| 04 | BC548 Transistor | Q1 |
| 05 | 1N4007 Diode | D1 |
| 06 | 4.7K Resistor | R1,R2 |
| 07 | 10K Variable Resistor | VR1 |
| 08 | 22pF Disk Capacitor | c1,c2 |
| 09 | 0.1uF Disk Capacitor | c3,c4 |
| 10 | Large Push Buttons | s1,s2,s3 |
| 11 | PCB Mountable Relay | RL1 |
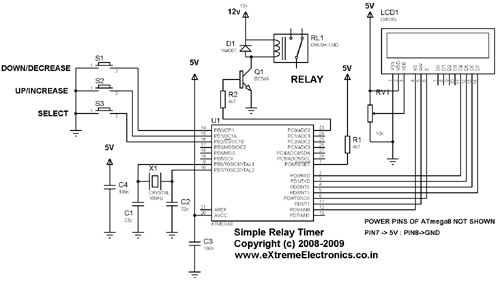
Schematic (Circuit Diagram)
Fig.: Relay Timer with AVR ATmega8 |
Program
/******************************************************

A Simple Device Timer project designed using ATmega8

AVR MVU. The Timer is usefully for keeping a device
"ON" for a specific period of time. After the set time
elapse the timer automatically turns the load off.

The Timer uses a standard 16x2 lcd module for user interface
UI. User can set the time using a 3 button keypad.

After that Timer is started. While count down is in
progress, the time left is displayed on screen.

The program use our LCD driver library more details
of which can be found in Web site.

Use avr-gcc + AVR Studio to compile.

Author: Avinash Gupta
E:Mail: me@avinashgupta.com
Web: www.eXtremeElectronics.co.in

*** THIS PROJECT IS PROVIDED FOR EDUCATION/HOBBY USE ONLY  ***

*** NO PROTION OF THIS WORK CAN BE USED IN COMMERIAL       ***
*** APPLICATION WITHOUT WRITTEN PERMISSION FROM THE AUTHOR ***

EVERYONE IS FREE TO POST/PUBLISH THIS ARTICLE IN
PRINTED OR ELECTRONIC FORM IN FREE/PAID WEBSITES/MAGAZINES/BOOKS
IF PROPER CREDIT TO ORIGINAL AUTHOR IS MENTIONED WITH LINKS TO
ORIGINAL ARTICLE


Copyright (C) 2008-2009 eXtreme Electronics, India.

******************************************************/

#include <avr/io.h>
#include <avr/interrupt.h>

#include "lcd.h"

//Connection of Load
#define LOAD_DDR DDRC
#define LOAD_PORT PORTC
#define LOAD_POS PC0

//Global variable for the clock system
volatile unsigned int   clock_millisecond=0;

volatile char        clock_second=0;
volatile char        clock_minute=0;
volatile char        clock_hour=0;


void Wait(uint8_t n)
{

   uint8_t i,temp;
   temp=n*28;

   for(i=0;i<temp;i++)
      _delay_loop_2(0);
}


void LoadOn()
{
   LOAD_PORT|=(1<<LOAD_POS);
}

void LoadOff()
{
   LOAD_PORT&=(~(1<<LOAD_POS));
}
main()
{

   while(1)
   {
      LOAD_DDR|=(1<<LOAD_POS);

      LoadOff();

      //Enable Pullups on Keypad

      PORTB|=((1<<PB2)|(1<<PB1)|(1<<PB0));

      int8_t hr,min; //Target Time
      hr=min=0;

      //Initialize the LCD Subsystem
      InitLCD(0);
      //Clear the display

      LCDClear();

      //Set up the timer1 as described in the
      //tutorial
      TCCR1B=(1<<WGM12)|(1<<CS11)|(1<<CS10);
      OCR1A=250;

      //Enable the Output Compare A interrupt

      TIMSK|=(1<<OCIE1A);

      //Enable interrupts globally
      sei();

      LCDClear();
      LCDWriteString("    Welcome     ");
      LCDWriteStringXY(0,1,"   Relay Timer  ");

      Wait(4);

      LCDClear();
      LCDWriteString("Set Time - 00:00");
      LCDWriteStringXY(0,1," Start     ^");

      uint8_t selection=1;
      uint8_t old_pinb=PINB;

      while(1)
      {
         while((PINB & 0b00000111) == (old_pinb & 0b00000111));

         //Input received


         if(!(PINB & (1<<PINB2)) && (old_pinb & (1<<PB2)))
         {
            //Selection key Pressed

            selection++;
            if(selection==3)
               selection =0;
         }

         if(!(PINB & (1<<PINB1)) && (old_pinb & (1<<PB1)))
         {
            //Up Key Pressed

            if(selection == 1)
            {

               //Hour is selected so increment it
               hr++;

               if(hr == 100)
                  hr =0;
            }

            if(selection == 2)
            {

               //Min is selected so increment it

               min++;

               if(min == 60)
                  min =0;
            }

            if(selection == 0)
            {
               //Start Selected
               break;
            }


         }

         if(!(PINB & (1<<PINB0)) && (old_pinb & (1<<PB0)))
         {
         //Down Key Pressed

            if(selection == 1)
            {

               //Hour is selected so decrement it
               hr--;

               if(hr == -1)
                  hr =99;
            }

            if(selection == 2)
            {

               //Min is selected so decrement it

               min--;

               if(min == -1)
                  min =59;
            }

            if(selection == 0)
            {
               //Start Selected
               break;
            }

         }


         old_pinb=PINB;


         //Update Display

         LCDClear();
         LCDWriteString("Set Time - 00:00");
         LCDWriteStringXY(0,1," Start    ");

         //Hour
         LCDWriteIntXY(11,0,hr,2);

         //Minute

         LCDWriteIntXY(14,0,min,2);

         if(selection == 0)
            LCDWriteStringXY(0,1,">");

         if(selection == 1)
            LCDWriteStringXY(11,1,"^");

         if(selection == 2)
            LCDWriteStringXY(14,1,"^");

         _delay_loop_2(0);
         _delay_loop_2(0);
         _delay_loop_2(0);
         _delay_loop_2(0);

         _delay_loop_2(0);
         _delay_loop_2(0);
         _delay_loop_2(0);
         _delay_loop_2(0);
      }

      //Start the Load

      LoadOn();

      //Now start the timer
      clock_hour = hr;
      clock_minute = min;
      clock_second =0;

      LCDClear();
      LCDWriteString("  Power Off In ");

      while(1)
      {
         LCDWriteIntXY(4,1,clock_hour,2);
         LCDWriteString(":");
         LCDWriteIntXY(7,1,clock_minute,2);
         LCDWriteString(":");
         LCDWriteIntXY(10,1,clock_second,2);

         if((clock_hour == 0) && (clock_minute == 0) && (clock_second == 0))
         {
            //Time Out

            LoadOff();

            LCDClear();
            LCDWriteString("Load Turned Off");

            while(1)
            {
               LCDWriteStringXY(0,1,"*Press Any Key*");

               Wait(1);

               LCDWriteStringXY(0,1,"                ");

               Wait(1);

               if((~PINB) & 0b00000111)
                  break;

            }

            break;


         }

         _delay_loop_2(0);
         _delay_loop_2(0);
         _delay_loop_2(0);
         _delay_loop_2(0);
      }
   //Continue again

   }


}

//The output compate interrupt handler
//We set up the timer in such a way that
//this ISR is called exactly at 1ms interval
ISR(TIMER1_COMPA_vect)
{
   clock_millisecond++;
   if(clock_millisecond==1000)
   {
      clock_second--;
      clock_millisecond=0;
      if(clock_second==-1)
      {
         clock_minute--;
         clock_second=59;

         if(clock_minute==-1)
         {
            clock_hour--;
            clock_minute=59;
         }
      }
   }
}
Downloads
- Complete Project in a ZIF file
- Compiled HEX file Ready to Burn in ATmega8 IC
My Prototype.
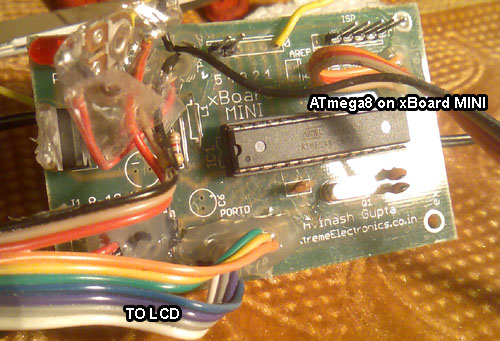
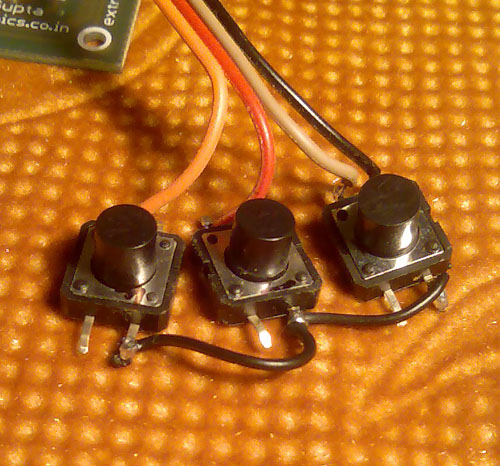
I used the xBoard MINI as a base board for making the timer. The external components attached were the LCD and 3 push buttons.
|
Fig.: AVR Timer Project Prototype. |
Using the Timer
The user interacts with the timer using 3 push buttons and the LCD module. The function of 3 keys are :-
- Select Key – Select Different items like hour,minute and start. It moves the arrow on screen to indicate which option is currently selected.
- Up/Increase Key – Increase the value. For example, select "minute" using "select" key and press this to increase its value.
- Down/Decrease Key – Same as above but it decreases the value.
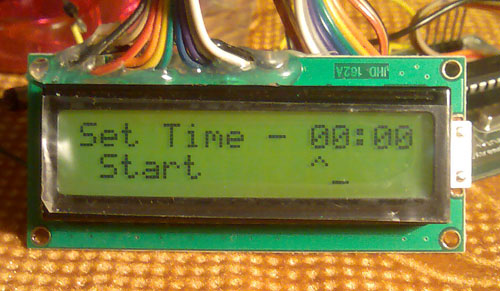
When the timer is powered up the load is in off state. A welcome message is shown. Then you can set the time using the above buttons. After that move to "start" option by using select key. Then press any key to start the timer. Now the screen shows the count down and the load is powered on. When count down reaches 0 the load is turned off. The pictures and videos below illustrate the process.
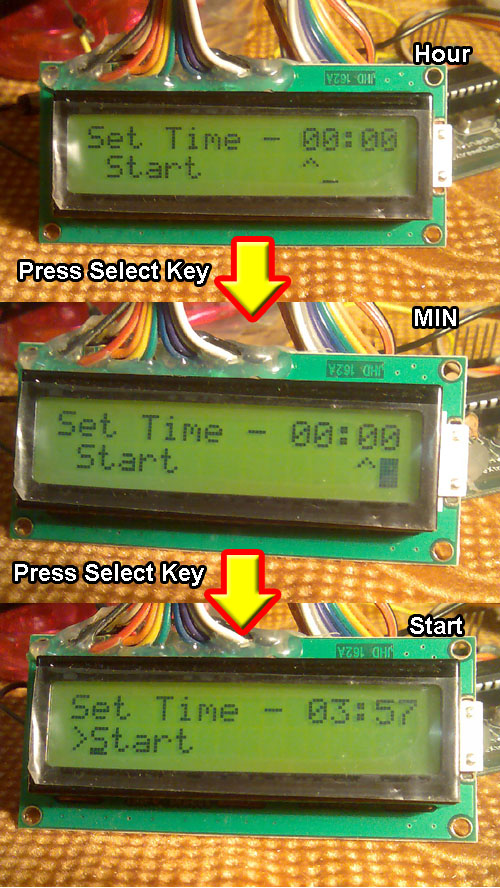 |
Fig.: Use SELECT key to move between options. |
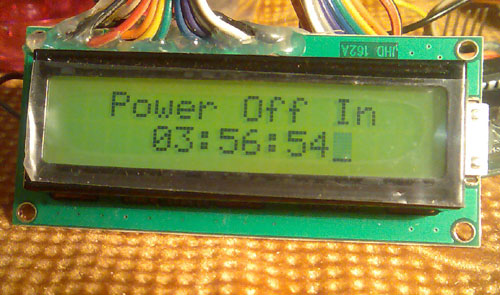 |
Fig.: Count down in progress (HH:MM:SS). |
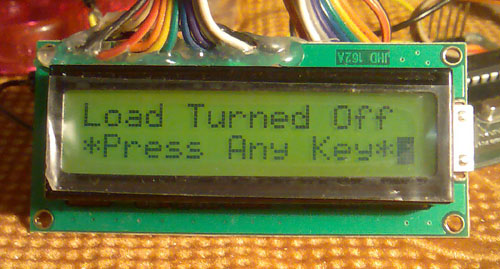 |
Fig.: The Load Turned Off. |
Video
Facing problem with your embedded, electronics or robotics project? We are here to help!
Post a help request.



Hi !
Thanks again for your very great tuto !
Zagg
Hi again!
An idea proposal for your next project/tutorial :
Adding output to ATMega with an 74HC595 :–)
Have a nice day!
Zagg
Mr. Avinash
Thank You again for developing such a nice stuff. I am waiting long for such kind of tutorial, one request-how can I marge real time clock with it.
Regards,
Uttam Dutta
Please describe the fuse….
How can set the fuse bits for the external crystal and for other purpose.
Note:
Fuse Must be set as follows, HIGH FUSE=C9 LOW FUSE=FF (Very Important)
If display is blank please adjust RV1
this is a very nice tutorial and i have liked it.Please am begging you could you send me a pdf of the tutorial.my email is ell86bu@gmail.com
Thanks for your great tuto.
Hello
@kapil:
You can set the fuse bits by this way (with avrdude):
avrdude -c %your programing device% -p m8 -P %programing device emplacment% -U hfuse:w:0xC9:m -U lfuse:w:0xFF:m
Have a nice day !
@ Gandoulf
thanx. But how you decide about the fuse bit and how they are calculated. one more point is that this is for mega8 how fuse bit is set for the mega16/32/8535 or other?
thanks!
@kapil
Man ever herd of a thing called DATASHEET ???????????
Hello!First of all I want to thank you for this tutorial.
Now I have a question: can I use an ATTINY2313 instead Atmega8 to build this timer?
I have to say I’m newbie in microcontrollers and when I try to use attiny, it let me set the clock, but when I start the timer, instead of “:” between hours and minutes and seconds it display all kind of characters changing.
Thank you again.
P.S. Please excuse my english.
Hi,
Nice tuto, could you show me how to setting about clock source for AVR…?
I used extrnal crystal 4MHz with Atmega8535, what are registers to be setting to make avr work in proper clock…?
Cause default setting is CKSEL = 0001 and SUT = 10.
Thank you
Can you please give me some clue for which compiler is the code written for?
Cannot just manage to get it parsed by my CodeVisionAVR 2.04
Thanks in advance!
@Anton
I think you have not read the comments given on the code !!!
Sorry my bad!
As it usually goes: you skip a line == you skip everything…
Pity that those C notations are so different.
Nice tutorial of a nice project, by the way!
Thanks!
Hi,
that’s a nice project ^^
I would need the same but with a second relay, which turns off at last 10 minutes. It’s for turning off the heat-resistors.
Need it for my clothes dryer, but it’s an older one, so I don’t get a new timer for it.
Couldmaybe someone help me out for a chanced code?
Hello avinash,
i have some crazy problem …can you please help me ?
I am using AVR Studio4 as compiler and JTAGICE mkII and ATmega16 controller .
Problem is like when I build my program then building is sucess but it showing following things:
AVR Memory Usage
—————-
Device: atmega16
Program: 17148 bytes (104.7% Full)
(.text + .data + .bootloader)
Data: 151 bytes (14.7% Full)
(.data + .bss + .noinit)
Build succeeded with 5 Warnings…
and I am not able to put it in my controller its tell hex file does not fit in selected device
can you help me ? Is it like I have to change my controller?
Program: 17148 bytes (104.7% Full) is this mean my controller is full
hello Avinash
plz reply I am in problem …with this error
Hi avinash,
what is use of
ISR(TIMER1_COMPA_vect)
why you put this out of main() function ?
hi, i m final yr student of EE. i m making a project by using
atmega853 which is used for the protection of dc motor(12v) with the help of over voltage, undervoltage and over current relay and the value of voltage and current is also being displayed on the lcd . plz can u send me the proper ckt. diagram as well as the programming.
@Sanjeev
🙁
Don’t spoil the name of Indian Students in front of the world. This is no homework site! Why would anyone do the project work for you ??? Its your headache to handle it your self.
Hello Mr. Gupta:
I have recently started learning AVR and C language programming. I found your website through search engine as I was looking for learning material that would get me started at a beginners level. You are doing a excellent job in explaining this rough and tough material in a very simplistic way. I love your approach of being repetitive and understanding of the beginners needs.
I am wondering if you write code for others who wish to compensate you for your time? I have a project that I would like to have coded by someone who has the experience to keep the code tidy. If you are interested in helping me out then please let me know. I would love to call you if you wouldn’t mide sharing your phone number with me.
I hope you keepup the good work.
Best regards.
Felix Khan
Tucson, Az
USA
Hi Avinash
how to set high fuse =c9 low fuse=FF. I am using ponyprog2000 for writing my atmega8 chip.
My timer is taking 16secs to skip 1 sec to turn off the load.
thanks
Murali
@Murali,
See the forum there is a topic on Ponyprog
Hi Avinash,
Thank u for the response. Could not locate the topic ponyprog on the forum, please help.
Thanks
any reason why the variables below are set as char instead of integer int?
volatile char clock_second=0;
volatile char clock_minute=0;
volatile char clock_hour=0;
@Neil
Because we are running on 8bit CPU and it can handle 8bit variable much more efficiently. It we know value that a variable will hold is in range of -127 tp +128 then we use char only. Another typedef for it is int8_t which stands for 8 bit integers.
@avinash
thanks for the clarification. uint8_t can be used too for those global variables? I am trying use part of your codes into my programs, being newbie on AVRs but not on C.
anyway, I found your tutorials so easy to follow . It helps a lot, along with reading the Datasheets.
thanks for this project…..
I remained searching for hardware requirements for a ATMEGA8l for proper operation for the whole last week,
basically i was trying to shift to AVR’s from 89c51’s,
so was trying to find, what are the necessities….
but was unable to find one,,,,
but your project clearly shows , what hardware is necessary,
once again thanks
Bonjour
je vien de réaliser ce montage,j’ai juste un petit problême a la fin du décompte l’affichage reviens a welcome.ont a juste le temps de voir la ligne pour relancer le programme.
cordialement
Paul
Bonjour
Problème résolu par la mise en place de poussoirs liniature a la place de modeles plus gros !
cordialement
hi i am iranian
thanks for it circuit
Dear Sir:
I just build this project, but your C code counts HH:MM, what I have to do to change it to count MM:SS
Thanks
Dear all,
I want to make an event detection timer using 16 MHZ external crytal and atmega32 microcontroller which will be able to calculate the event difference between two port in nano second range. Please help me.
Hi!
I have the same problem like “pepe gonzaes”: i want to use this countdown timer for a UV exposure unit PCB and I need Minute:Seconds.
If you can put a HEX for this it will be great (and appreciated!)
tnx!
Pingback: universal auto matic relay circuit to disconnect charger from supply in ful charging
Dear avinash,
Thank you very much for sharing such working projects!!! i really love your tutorials … always helping me to learn manipulating avrs!! I would like to ask you what the function of the myutils.h file and if the lcd.c and lcd.h files are written by you or are libraries for driving lcd’s?
thank you very much in regards!
This relay timer only could work with 16Mhz External Crystal, cannot lower or higher, or will not exactly match with the clock.
Attention for the fusebit, Can set with AVRIOSP Software.
I suggest you better make it with CMOS IC Such as 74HC595 or 74LS164.
Keep Posting for the next an amazing project…
thank for you aplication
mr i have problem with this project because when i compile this program in code vision evaluation there is error in this part
void Wait(uint8_t n)
{
uint8_t i,temp;
temp=n*28;
for(i=0;i<temp;i++)
_delay_loop_2(0);
}
in this part VOID WAIT ( UINT8_T N )
is declration syntax error
tanks for u kindness
thank for you aplication
mr i have problem with this project because when i compile this program in code vision evaluation there is error in this part
in this part VOID WAIT ( UINT8_T N )
is declration syntax error
tanks for u kindness
@Handrianto,
because you forget to read this instruction
“Use avr-gcc + AVR Studio to compile.”\
Its there in the program itself.
Please I don’t like careless peoples making mistakes and eating my time !
i very apriciate to your project
i will try it for my student
Can you plese publish a clock with a light control to On/Off Porch light at every evening (eg. On at 6.30 pm and Off at 10.30 Pm unattended by settin On off time)
Circuit on the breadboard tested at the moment and with two types of relay 5V, works very well.
Of course, I had to set the fuse as indicated on the site, otherwise it will not work well, he was going too slow.
I think it should also work with a relay 230V, right?
Hello.
plz give pcb layout of this pro
Problem solved Guys !!!
Was able to recover those IC’s by providing an external crystal support .
The Project now works PERFECT !!!
Just as word of precaution
ALWAYS ..flash the AVR first and then set the Fuse to HIGH:C9 and LOW:FF ….Dont do it the other way round .
This was the mistake I did …Now i learnt !!
Thanks for a great project .
Jatin
@Jatin,
You are wrong and confused, you can do it either way. But I don’t have time telling you what wrong you are doing coz it’s just lack of your common sense.
Hey Avinash I have a problem.
I am driving a relay from attiny2313 microcontroller through BC546 transistor. When i connect ac appliance eg a bulb and drive the relay then it becomes on then suddely becomes off.But if no ac load is apllied then relya works fine what could be the problem. Should i saprate the ground of mcu from relay driving transistor ground?
Hi tanks for you
very very good
omid from iran from iran
goodbay engineering
Pingback: IR dálkové ovládání a ?asova? k DSLR Sony | elektro.akceasouteze.cz
Hello, could you help me set a schedule for a timer cascade that controls 15 ports or more? After that triggers the first, the other will then switch on 3 for 3 seconds. Are you doing this?
With atmega?
Have you found solution for Sequential timer ?
If yes, please send me details
Thanking you in advance
sir: i do my final year project ( automatic synchronization)
can you help me?
i need program for frequency comparator , counter ,timer program
in my idea?
first select timer counter
set timer t1,
t2
next timer mode
count port
reg move
port a t1,t2
compare reg timer
if less than port c1 on
if greater than port c2 on
if equal port c3 on
Hello
Can this controller programmed in such way to set the countdown time from a week up to 2 months?
Hi thanks for your projects;
I have a quuestion.
i want to create a timer that set and get number from keypad.
i.e set the hour and minute with numbers on keypad.
please help me!
Hello Avinash,
The Circuit design and your explanations have been very helpful. However, I, myself not being a programmer would require some additional help if its not of too much trouble to you.
I require the system to ask the user for a particular time period for which it will stay on and also a time period for which it will stay off. Having entered the time period the system should enter an infinite loop of operation. It will keep being ON for the SET period and remain OFF for the SET period. the time set should not get wiped off at power down.
I wish to employ this as an airconditioner controller at my place!!
I would be grateful to you if you could help me out!
Hello Avinash,how are you , i am andreas ioannides from cyprus , nice to meet you ,,
i do a project that i find it on the web with dmx and stepper motor ,,
as i see your project is atmel avr gcc ..
i need very much your help .. for my project ,,
can you please find little time to share this project together ,,
please email me
best recards
andreas
Sir how can give me example on eeprom based timer where the interval valve can be store in eeprom.
Hello sir, nice to meet you !!!
is a good project, i’ve tried it and succeeded. only what if the program listing to control with the second, please ……………., thanks a lot
very nice project sir.
but i have a dought, when the supply is stoped to micro controller then what about the timer it will stop .
but i want to stop the timer when supply is stoped and continue after supply is given with the time where it stoped so what i should do..
plz rply me sir..
Hello!
Executed your project on Atmega16.
Used the internal generator on 8 MHz
The select button does not work.
up and down work fine.
Please tell me what could be the problem!
temp=n*28; can you pls clarify this line?