Hello World Project
xBoard MINI v2.1
Easy to Use learning and development tool for Atmel AVR family of MCUs.
Back |
Support |
Store |
Facebook |
The most basic project or your very first project is called a hello world project. In the world of embedded systems, a hello world project is the project which blinks a LED.
The steps we will cover here are:
- Creating a new project with Atmel Studio 6.
- Entering a new program in a new file in the Atmel Studio 6 project.
- Compiling the new project to get the executable HEX file.
- Uploading the HEX file to xBoard MINI using eXtreme Burner - AVR
- Running the LED blink on the xBoard MINI
The user is instructed to go through the following documents thoroughly before performing this experiment.
- What is a Microcontroller?
- Development process.
- Atmel Studio 6
xBoard MINI Basics.
- Know your xBoard MINI !
- Schematic of the board (Circuit Diagrams)
- Programming the board.
Create a new Atmel Studio 6 Project
Create a new Atmel Studio 6 Project with name "LEDBlink".
- Project type should be "GCC C Executable Project"
- Device should be ATmega8
Please refer to the following article for more details.
Define a preprocessor symbol F_CPU=16000000
Please refer to the following article for more details.
Load the "LEDBlink.c" file in editor
Their are more that one source file in a project. But since this is a very basic project we will have only one file in your project that is "LEDBlink.c"
locate the file in solution explorer and double click it to load it into the editor.
For more information refer to following articles.
- Atmel Studio 6 - Main parts of the application.
- Atmel Studio 6 - The solution explorer.
- Atmel Studio 6 - Loading a file in editor.
Copy the program given below
Copy the program given below and paste it into the editor (make sure "LEDBlink.c" file is loaded in editor)
/******************************************************************************

xBoard MINI Sample Programs

Description.
   Blinks a LED on i/o port PORTB bit 1 (PB1)
   LED on time = 100ms
   LED off time = 250ms

   NOTE: A red LED is provided on board which is connected to PB1
         so their is no extra hardware setup required.

COPYRIGHT (C) EXTREME ELECTRONICS INDIA
ALL RIGHTS RESERVED

NO PART OF THIS WORK CAN BE COPIED OR DISTRIBUTED WITHOUT WRITTEN PERMISSION
FROM EXTREME ELECTRONICS.

ALL CODES ARE PROVIDED FOR EDUCATIONAL PURPOSE ONLY

AUTHOR: AVINASH GUPTA
E-MAIL: gmail@avinashgupta.com

*****************************************************************************/

#include <avr/io.h>
#include <util/delay.h>

int main(void)
{
   //Set PB1 as output pin
   DDRB|=(1<<PB1);

    while(1)
    {
      //LED Off
        PORTB|=(1<<PB1);

      //WAIT
      _delay_ms(250);

      //LED On
      PORTB&=~(1<<PB1);

      //WIAT
      _delay_ms(100);
    }
}
Building the project
Please refer to the following article for more details.
Locate the HEX file generated by the building process.
Please refer to the following article for more details.
Burn the HEX file to xBoard MINI
Please refer to the following article for more details.
Running the DEMO
As soon as you will program the xBoard with above generated HEX file. The RED LED on the board will start to blink.
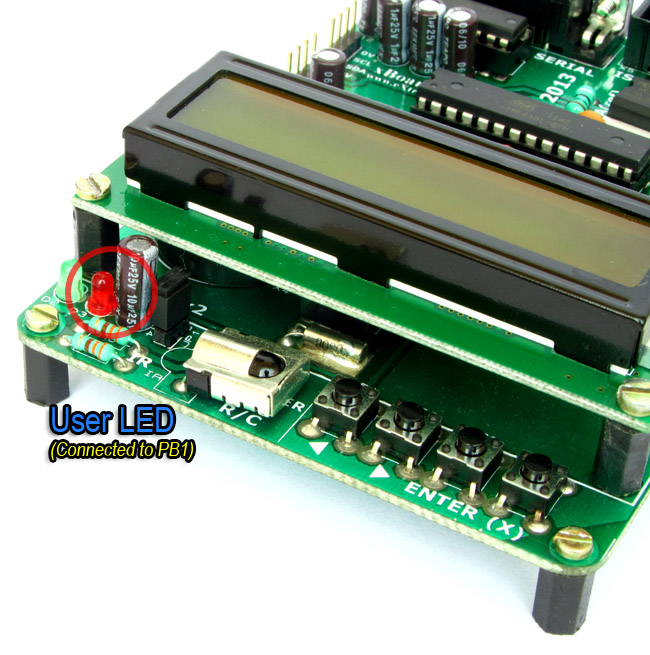 |
Fig. User LED |
Make sure jumper JP2 is closed as shown in the image below. This will connect LED with PB1.
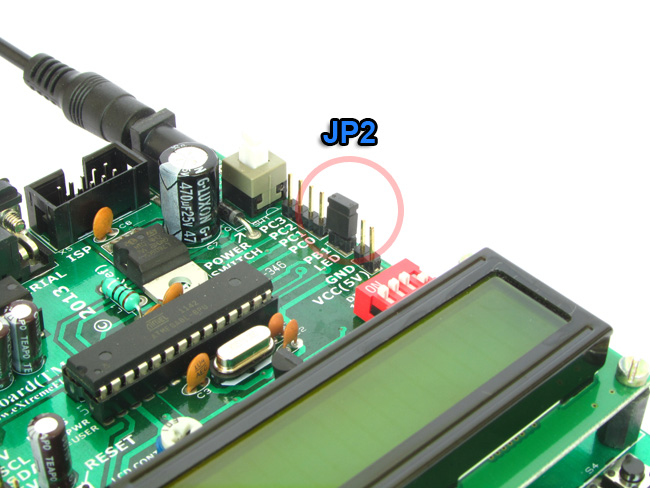 |
JP2 Connects PB1 with USER LED |
Back |
Support |
Store |
Facebook |